- 2024-12-02 Android lspose环境准备
2024-12-02
安装magisk app
https://github.com/topjohnwu/Magisk/
这个app可以显示magisk模块,安装lsPose模块
获取root权限
Rooting any Pixel Phone (Android 12 and 13) (Magisk v25.2))
https://www.youtube.com/watch?v=TJBMmuMp9ZM&t=616s
如果是pixel 4 xl手机, 从这里下载出厂Image, 找到里面的boot.img
https://developers.google.com/android/images?hl=zh-cn#coral
用magisk给boot.img打补丁, 拷回电脑里
adb reboot bootloader 重启到bootloader模式
fastboot flash /magisk_pacthed_xxx.img
fastboot reboot
Zygisk 模块安装
https://github.com/MaterialCleaner/MaterialCleaner/wiki/Zygisk-%E6%A8%A1%E5%9D%97%E5%AE%89%E8%A3%85
下载完zygisk.zip模块之后,从magisk app里加载这个模块
lspose 模块安装
下载完LSPosed-v1.9.2-7024-zygisk-release.zip模块之后,从magisk app里加载这个模块
https://github.com/LSPosed/LSPosed
重启之后再下拉通知里找到lspose, 生成桌面图标
- 2024-09-05 Qq历史版本下载
2024-09-05-qq历史版本下载
Windows Version:
QQ 8.9 版本
http://dldir1.qq.com/qqfile/qq/QQ8.9/20026/QQ8.9.exe
http://dldir1.qq.com/qqfile/qq/QQ8.9/19990/QQ8.9.exe
http://dldir1.qq.com/qqfile/qq/QQ8.9/19983/QQ8.9.exe
QQ 8.8 版本
http://dldir1.qq.com/qqfile/qq/QQ8.8/19876/QQ8.8.exe
QQ 8.7 版本
http://dldir1.qq.com/qqfile/qq/QQ8.7/19113/QQ8.7.exe
http://dldir1.qq.com/qqfile/qq/QQ8.7/19091/QQ8.7.exe
http://dldir1.qq.com/qqfile/qq/QQ8.7/19083/QQ8.7.exe
http://dldir1.qq.com/qqfile/qq/QQ8.7/19071/QQ8.7.exe
QQ 8.6 版本
http://dldir1.qq.com/qqfile/qq/QQ8.6/18804/QQ8.6.exe
http://dldir1.qq.com/qqfile/qq/QQ8.6/18781/QQ8.6.exe
QQ 8.5 版本
http://dldir1.qq.com/qqfile/qq/QQ8.5/18600/QQ8.5.exe
http://dldir1.qq.com/qqfile/qq/QQ8.5/18591/QQ8.5.exe
QQ 8.4 版本
http://dldir1.qq.com/qqfile/qq/QQ8.4/18380/QQ8.4.exe
http://dldir1.qq.com/qqfile/qq/QQ8.4/18376/QQ8.4.exe
http://dldir1.qq.com/qqfile/qq/QQ8.4/18357/QQ8.4.exe
QQ 8.3 版本
http://dldir1.qq.com/qqfile/qq/QQ8.3/18033/QQ8.3.exe
http://dldir1.qq.com/qqfile/qq/QQ8.3/18027/QQ8.3.exe
QQ 8.2 版本
http://dldir1.qq.com/qqfile/qq/QQ8.2/17724/QQ8.2.exe
QQ 8.1 版本
http://dldir1.qq.com/qqfile/qq/QQ8.1/17283/QQ8.1.exe
http://dldir1.qq.com/qqfile/qq/QQ8.1/17216/QQ8.1.exe
http://dldir1.qq.com/qqfile/qq/QQ8.1/17202/QQ8.1.exe
QQ 8.0 版本
http://dldir1.qq.com/qqfile/qq/QQ8.0/16968/QQ8.0.exe
http://dldir1.qq.com/qqfile/qq/QQ8.0/16954/QQ8.0.exe
QQ 7.9 版本
http://dldir1.qq.com/qqfile/qq/QQ7.9/16638/QQ7.9.exe
http://dldir1.qq.com/qqfile/qq/QQ7.9/16621/QQ7.9.exe
http://dldir1.qq.com/qqfile/qq/QQ7.9Light/14308/QQ7.9Light.exe
http://dldir1.qq.com/qqfile/qq/QQ7.9Light/14305/QQ7.9Light.exe
QQ 7.8 版本
http://dldir1.qq.com/qqfile/qq/QQ7.8/16379/QQ7.8.exe
QQ 7.7 版本
http://dldir1.qq.com/qqfile/qq/QQ7.7/16077/QQ7.7.exe
http://dldir1.qq.com/qqfile/qq/QQ7.7Light/14298/QQ7.7Light.exe
QQ 7.6 版本
http://dldir1.qq.com/qqfile/qq/QQ7.6/15742/QQ7.6.exe
QQ 7.5 版本
http://dldir1.qq.com/qqfile/qq/QQ7.5/15445/QQ7.5.exe
http://dldir1.qq.com/qqfile/qq/QQ7.5Light/15463/QQ7.5Light.exe
QQ 7.4 版本
http://dldir1.qq.com/qqfile/qq/QQ7.4/15197/QQ7.4.exe
http://dldir1.qq.com/qqfile/qq/QQ7.4/15193/QQ7.4.exe
http://dldir1.qq.com/qqfile/qq/QQ7.4/15190/QQ7.4.exe
http://dldir1.qq.com/qqfile/qq/QQ7.4/15179/QQ7.4.exe
QQ 7.3 版本
http://dldir1.qq.com/qqfile/qq/QQ7.3/15056/QQ7.3.exe
http://dldir1.qq.com/qqfile/qq/QQ7.3/15047/QQ7.3.exe
http://dldir1.qq.com/qqfile/qq/QQ7.3/15043/QQ7.3.exe
http://dldir1.qq.com/qqfile/qq/QQ7.3/15034/QQ7.3.exe
http://dldir1.qq.com/qqfile/qq/QQ7.3Light/14258/QQ7.3Light.exe
QQ 7.2 版本
http://dldir1.qq.com/qqfile/qq/QQ7.2/14810/QQ7.2.exe
http://dldir1.qq.com/qqfile/qq/QQ7.2/14799/QQ7.2.exe
QQ 7.1 版本
http://dldir1.qq.com/qqfile/qq/QQ7.1/14522/QQ7.1.exe
http://dldir1.qq.com/qqfile/qq/QQ7.1/14509/QQ7.1.exe
QQ 7.0 版本
http://dldir1.qq.com/qqfile/qq/QQ7.0/14275/QQ7.0.exe
QQ 6.9 版本
http://dldir1.qq.com/qqfile/qq/QQ6.9/13786/QQ6.9.exe
QQ 6.8 版本
http://dldir1.qq.com/qqfile/qq/QQ6.8/13624/QQ6.8.exe
http://dldir1.qq.com/qqfile/qq/QQ6.8/13620/QQ6.8.exe
2016年12月21日测试,以下版本(QQ 6.7 及以前各版本)已经不能使用。
QQ 6.7 版本
http://dldir1.qq.com/qqfile/qq/QQ6.7/13451/QQ6.7.exe
http://dldir1.qq.com/qqfile/qq/QQ6.7Light/13466/QQ6.7Light.exe
QQ 6.6 版本
http://dldir1.qq.com/qqfile/qq/QQ6.6/13163/QQ6.6.exe
QQ 6.5 版本
http://dldir1.qq.com/qqfile/qq/QQ6.5/12968/QQ6.5.exe
http://dldir1.qq.com/qqfile/qq/QQ6.5/12956/QQ6.5.exe
http://dldir1.qq.com/qqfile/qq/QQ6.5/12945/QQ6.5.exe
QQ 6.4 版本
http://dldir1.qq.com/qqfile/qq/QQ6.4/12582/QQ6.4.exe
QQ 6.3 版本
http://dldir1.qq.com/qqfile/qq/QQ6.3/12390/QQ6.3.exe
http://dldir1.qq.com/qqfile/qq/QQ6.3/12369/QQ6.3.exe
QQ 6.2 版本
http://dldir1.qq.com/qqfile/qq/QQ6.2/12179/QQ6.2.exe
QQ 6.1 版本
http://dldir1.qq.com/qqfile/qq/QQ6.1/11879/QQ6.1.exe
QQ 6.0 版本
http://dldir1.qq.com/qqfile/qq/QQ6.0/11743/QQ6.0.exe
QQ 5.5 版本
http://dldir1.qq.com/qqfile/qq/QQ5.5/11429/QQ5.5.exe
QQ 5.4 版本
http://dldir1.qq.com/qqfile/qq/QQ5.4/11058/QQ5.4.exe
QQ 5.3 版本
http://dldir1.qq.com/qqfile/qq/QQ5.3/10702/QQ5.3.exe
QQ 5.2 版本
http://dldir1.qq.com/qqfile/qq/QQ5.2/10438/QQ5.2.exe
QQ 5.1 版本
http://dldir1.qq.com/qqfile/qq/QQ5.1/10035/QQ5.1.exe
QQ 5.0 版本
http://dldir1.qq.com/qqfile/qq/QQ5.0/9857/QQ5.0.exe
QQ 2013 版本
http://dldir1.qq.com/qqfile/qq/QQ2013/QQ2013SP6/9294/QQ2013SP6.exe
http://dldir1.qq.com/qqfile/qq/QQ2013/QQ2013SP6/9277/QQ2013SP6.exe
http://dldir1.qq.com/qqfile/qq/QQ2013/QQ2013SP5/9050/QQ2013SP5.exe
http://dldir1.qq.com/qqfile/qq/QQ2013/QQ2013SP4/8796/QQ2013SP4.exe
http://dldir1.qq.com/qqfile/qq/QQ2013/QQ2013SP3/8550/QQ2013SP3.exe
http://dldir1.qq.com/qqfile/qq/QQ2013/QQ2013SP2/8200/QQ2013SP2.exe
http://dldir1.qq.com/qqfile/qq/QQ2013/QQ2013SP2/8183/QQ2013SP2.exe
http://dldir1.qq.com/qqfile/qq/QQ2013/QQ2013SP2/8180/QQ2013SP2.exe
http://dldir1.qq.com/qqfile/qq/QQ2013/QQ2013SP2/8178/QQ2013SP2.exe
http://dldir1.qq.com/qqfile/qq/QQ2013/QQ2013SP1/7979/QQ2013SP1.exe
http://dldir1.qq.com/qqfile/qq/QQ2013/QQ2013SP1/7968/QQ2013SP1.exe
http://dldir1.qq.com/qqfile/qq/QQ2013/QQ2013SP1/7950/QQ2013SP1.exe
http://dldir1.qq.com/qqfile/qq/QQ2013/QQ2013/7681/QQ2013.exe
http://dldir1.qq.com/qqfile/qq/QQ2013/QQ2013/7633/QQ2013.exe
QQ 2012 版本
http://dl_dir.qq.com/qqfile/qd/QQ2012_QQProtect3.0.exe
http://dl_dir.qq.com/qqfile/qq/QQ2012/QQ2012.exe
QQ 2011 版本
http://dl_dir.qq.com/qqfile/qq/QQ2011/QQ2011.exe
http://dl.softmgr.qq.com/original/im/QQ2011_1.71.3019.0.exe
http://dl_dir.qq.com/qqfile/qq/QQ2011/QQ2011Beta4.exe
http://dl_dir.qq.com/qqfile/qq/QQ2011/QQ2011Beta3(QQProtect1.0).exe
http://dl_dir.qq.com/qqfile/qq/QQ2011/QQ2011Beta2.exe
http://dl_dir.qq.com/qqfile/qq/QQ2011/QQ2011Beta1.exe
QQ 2010 版本
http://dl_dir.qq.com/qqfile/qq/QQ2010/QQ2010SP3.1.exe
http://dl_dir.qq.com/qqfile/qq/QQ2010/QQ2010SP3.exe
http://dl_dir.qq.com/qqfile/qq/QQ2010/QQ2010SP2.2.exe
http://dl_dir.qq.com/qqfile/qq/QQ2010/QQ2010SP2.exe
http://dl_dir.qq.com/qqfile/qq/QQ2010/QQ2010SP1.exe
QQ 2009 版本
http://dl_dir.qq.com/qqfile/qq/QQ2009/QQ2009SP6.exe
http://dl_dir.qq.com/qqfile/qq/QQ2009/QQ2009SP5.exe
http://dl_dir.qq.com/qqfile/qq/QQ2009/QQ2009SP4.exe
http://dl_dir.qq.com/qqfile/qq/QQ2009/QQ2009SP3.exe
http://dl_dir.qq.com/qqfile/qq/QQ2009/QQ2009SP2.exe
http://dl_dir.qq.com/qqfile/qq/QQ2009/QQ2009SP1.exe
http://dl_dir.qq.com/qqfile/qq/QQ2009/QQ2009_chs.exe
QQ 2008 版本
http://dl_dir.qq.com/qqfile/qq/QQ2008stablehij/QQ2008IIBeta1.exe
http://dl_dir.qq.com/qqfile/qq/QQ2008stablehij/QQ2008KB3.exe
http://dl_dir.qq.com/qqfile/qq/QQ2008stablehij/QQ2008.exe
http://dl_dir.qq.com/qqfile/qq/QQ2008beta2ghi/QQ2008Beta2.exe
http://dl_dir.qq.com/qqfile/qq/QQ2008beta1efg/QQ2008Beta1_Blessing.exe
http://dl_dir.qq.com/qqfile/qq/QQ2008beta1efg/QQ2008Beta1.exe
http://dl_dir.qq.com/qqfile/qq/QQ2008Spring/QQ2008Spring.exe
QQ 2007 版本
http://dl_dir.qq.com/qqfile/qq/2007iistable/QQ2007II.exe
http://dl_dir.qq.com/qqfile/qq/2007iibeta2/QQ2007II_Beta2SP1.exe
http://dl_dir.qq.com/qqfile/qq/2007iibeta2/QQ2007II_Beta2.exe
http://dl_dir.qq.com/qqfile/qq/2007standard/qq2007ii_beta1.exe
http://dl_dir.qq.com/qqfile/qq/2007standard/qq2007kb.exe
http://dl_dir.qq.com/qqfile/qq/2007standard/qq2007.exe
http://221.236.11.53/qqfile/qq/2007beta4jul/qq2007beta4kb1.exe
http://dl_dir.qq.com/qqfile/tm/tm2007beta1.exe
QQ 2006 版本
http://dldir1.qq.com/qqfile/qq2006standard.exe
http://http://dl_dir.qq.com/qqfile/qq2006formal.exe
http://dl_dir.qq.com/qqfile/qq2006beta3.exe
http://dl_dir.qq.com/qqfile/qq2006Beta2SP1.exe
http://dl_dir.qq.com/qqfile/qq2006Beta2.exe
QQ 2005 版本
http://dl_dir.qq.com/qqfile/qq2005sp1.exe
http://dl_dir.qq.com/qqfile/qq2005_beta3.exe
QQ 2004 版本
http://dl_dir.qq.com/qqfile/qq2004sp1.exe
http://dl_dir.qq.com/qqfile/qq2004ii.exe
QQ 2003 版本
http://qqdl.tencent.com/qq2003iiibuild0117.exe
http://qqdl.tencent.com/tm10build0116.exe
http://qqdl.tencent.com/qq2003iiibuild0115.exe
http://qqdl.tencent.com/tm10preview3.exe
http://qqdl.tencent.com/qq2003iiibeta3.exe
http://qqdl.tencent.com/qq2003iiibeta2.exe
QQ2002 1230Beta3(2003.03.06)
QQ2002 0630(2002.07.01)
QQ2002 0510(2002.05.09)
QQ2002 0305b(2002.04.03)
QQ2001 1220(2001.12.24)
QQ2001 1125
Oicq2000 正式版
Oicq2000 a (2000.10)
Oicq Beta3
Oicq Beta2
Oicq Beta1(1999.02)
参考:
http://im.qq.com/qq/affiche/20070111.shtml
http://im.qq.com/qq/affiche/soft.shtml
- 2024-07-20 Docker使用
2024-07-20-docker使用
How to keep Docker container running after starting services?
https://stackoverflow.com/questions/25775266/how-to-keep-docker-container-running-after-starting-services
ENTRYPOINT [“tail”, “-f”, “/dev/null”]
CMD[“sleep”, “1d”]
CMD[“sleep”, “infinity”]
you can run plain cat without any arguments as mentioned by bro @Sa’ad to simply keep the container working [actually doing nothing but waiting for user input] (Jenkins’ Docker plugin does the same thing)
This is not really how you should design your Docker containers.
When designing a Docker container, you’re supposed to build it such that there is only one process running (i.e. you should have one container for Nginx, and one for supervisord or the app it’s running); additionally, that process should run in the foreground.
The container will “exit” when the process itself exits (in your case, that process is your bash script).
However, if you really need (or want) to run multiple service in your Docker container, consider starting from “Docker Base Image”, which uses runit as a pseudo-init process (runit will stay online while Nginx and Supervisor run), which will stay in the foreground while your other processes do their thing.
They have substantial docs, so you should be able to achieve what you’re trying to do reasonably easily.
win10 WSL 安装 ubuntu
win10 端口转发
netsh interface portproxy add v4tov4 listenaddress=0.0.0.0 listenport=2222 connectaddress=172.19.74.239 connectport=2222
Dockerfile例子
FROM ubuntu:latest
RUN apt-get update && apt-get install -y \
unzip \
cmake \
make \
build-essential \
zlib1g-dev \
openssl \
libssl-dev \
docker build .
给image id 修改名字
docker tag xxx ubuntu_env
- 2024-07-08 Go_build_shared_library
2024-07-08-go_build_shared_library.md
go build –buildmode=c-shared -o libhello.so hello.go
- 2024-04-26 Windows hook和inject dll研究
- 2020-11-02 虚拟机保护Visual Machine Protect
MIPS64 Architecture
#
The MIPS64 architecture has been used in a variety of applications including game consoles, office automation and set-top boxes. It continues to be popular today in networking and telecommunications infrastructure applications, and is at the heart of next-generation servers, advanced driver assistance systems (ADAS) and autonomous driving SoCs. As design complexity and software footprints continue to increase, the 64-bit MIPS architecture will be used in an even broader set of connected consumer devices, SOHO networking products, and emerging intelligent applications.
The MIPS64® architecture provides a solid high-performance foundation for future MIPS processor-based development by incorporating powerful features, standardizing privileged mode instructions, supporting past ISAs, and providing a seamless upgrade path from the MIPS32 architecture.
The MIPS32 and MIPS64 architectures incorporate important functionality including SIMD (Single Instruction Multiple Data) and virtualization. These technologies, in conjunction with technologies such as multi-threading (MT), DSP extensions and EVA (Enhanced Virtual Addressing), enrich the architecture for use with modern software workloads which require larger memory sizes, increased computational horsepower and secure execution environments.
The MIPS64 architecture is based on a fixed-length, regularly encoded instruction set, and it uses a load/store data model. It is streamlined to support optimized execution of high-level languages. Arithmetic and logic operations use a three-operand format, allowing compilers to optimize complex expressions formulation. Availability of 32 general-purpose registers enables compilers to further optimize code generation by keeping frequently accessed data in registers.
By providing backward compatibility, standardizing privileged mode, and memory management and providing the information through the configuration registers, the MIPS64 architecture enables real-time operating systems and application code to be implemented once and reused with future members of both the MIPS32 and the MIPS64 processor families.
High-Perfomance Caches
Flexibility of high-performance caches and memory management schemes are strengths of the MIPS architecture. The MIPS64 architecture extends these advantages with well-defined cache control options. The size of the instruction and data caches can range from 256 bytes to 4 MB. The data cache can employ either a write-back or write-through policy. A no-cache option can also be specified. The memory management mechanism can employ either a TLB or a Block Address Translation (BAT) policy. With a TLB, the MIPS64 architecture meets the memory management requirements of Linux, Android™, Windows® CE and other historically popular operating systems.
The addition of data streaming and predicated operations supports the increasing computation needs of the embedded market. Conditional data move and data prefetch instructions are standardized, allowing for improved system-level data throughput in communication and multimedia applications.
Fixed-Point DSP-Type Instructions
Fixed-point DSP-type instructions further enhance multimedia processing. These instructions that include Multiply (MUL), Multiply and Add (MADD), Multiply and Subtract (MSUB), and “count leading 0s/1s,” previously available only on some 64-bit MIPS processors, provide greater performance in processing data streams such as audio, video, and multimedia without adding additional DSP hardware to the system.
Powerful 64-bit Floating-Point Registers
Powerful 64-bit floating-point registers and execution units speed the tasks of processing some DSP algorithms and calculating graphics operations in real-time. Paired-single instructions pack two 32-bit floating-point operands into a single 64-bit register, allowing Single Instruction Multiple Data operations (SIMD). This provides twice as fast execution compared to traditional 32-bit floating-point units. Floating point operations can optionally be emulated in software.
Addressing Modes
The MIPS64 architecture features both 32-bit and 64-bit addressing modes, while working with 64-bit data. This allows reaping the benefits of 64-bit data without the extra memory needed for 64-bit addressing. In order to allow easy migration from the 32-bit family, the architecture features a 32-bit compatibility mode, in which all registers and addresses are 32-bit wide and all instructions present in the MIPS32 architecture are executed.
Documentation
MIPS64 Architecture for Programmers: Release 6
Introduction to the MIPS64 Architecture v6.01 (874.83 KB)
The MIPS64 Instruction Set v6.06 (2.7 MB)
The microMIPS64 Instruction Set v6.05 (2.3 MB)
The MIPS64 and microMIPS64 Privileged Resource Architecture v6.03 (3.3 MB)
MIPS64 Architecture for Programmers: Releases 1-5
Introduction to the MIPS64 Architecture v5.04 (1.27 MB)
Introduction to the microMIPS64 Architecture v5.03 (1020.18 KB)
The MIPS64 Instruction Set v5.04 (4.64 MB)
The microMIPS64 Instruction Set v5.04 (5.59 MB)
The MIPS64 and microMIPS64 Privileged Resource Architecture v5.04 (2.58 MB)
MIPS Instruction Formats
-
All MIPS instructions are encoded in binary.
-
All MIPS instructions are 32 bits long.
- (Note: some assembly langs do not have uniform length for all instructions)
-
There are three instruction categories: R-format (most common), I-format, and J-format.
-
All instructions have:
-
- op (or opcode): operation code (specifies the operation) (first 6 bits)
Name Format Layout Example 6 bits 5 bits 5 bits 5 bits 5 bits 6 bits op rs rt rd shamt funct addR0 2310 32add $1, $2, $3 adduR0 2310 33addu $1, $2, $3 subR0 2310 34sub $1, $2, $3 subuR0 2310 35subu $1, $2, $3 andR0 2310 36and $1, $2, $3 orR0 2310 37or $1, $2, $3 norR0 2310 39nor $1, $2, $3 sltR0 2310 42slt $1, $2, $3 sltuR0 2310 43sltu $1, $2, $3 sllR0 02110 0sll $1, $2, 10 srlR0 02110 2srl $1, $2, 10 jrR0 31000 8jr $31
NOTE: op is 0, so funct disambiguates
-
Example
-
add $s0, $s1, $s2 (registers 16, 17, 18)
op rs rt rd shamt funct 0 17 18 16 0 32 000000 10001 10010 10000 00000 100000
NOTE: Order of components in machine code is different from assembly code. Assembly code order is similar to C, destination first. Machine code has destination last.
| C: |
a = b + c |
| assembly code: |
add $s0, $s1, $s2 # add rd, rs, rt |
| machine code: |
000000 10001 10010 10000 0000 100000 (op rs rt rd shamt funct) |
Name Format Layout Example 6 bits 5 bits 5 bits 5 bits 5 bits 6 bits op rs rt immediate beqI4 1225 (offset) beq $1, $2, 100 bneI5 1225 (offset) bne $1, $2, 100 addiI8 21100 addi $1, $2, 100 addiuI9 21100 addiu $1, $2, 100 andiI12 21100 andi $1, $2, 100 oriI13 21100 ori $1, $2, 100 sltiI10 21100 slti $1, $2, 100 sltiuI11 21100 sltiu $1, $2, 100 luiI15 01100 lui $1, 100 lwI35 21100 (offset) lw $1, 100($2) swI43 21100 (offset) sw $1, 100($2)
-
Example
-
lw $t0, 32($s3) (registers 8 and 19)
op rs rt immediate 35 19 8 32 100011 10011 01000 0000000000100000
-
Example: beq
-
-
The offset stored in a beq (or bne) instruction is the number of instructions from the PC (the instruction after the beq instruction) to the label (ENDIF in this example). Or, in terms of addresses, it is the difference between the address associated with the label and the PC, divided by four.
-
offset = (addrFromLabelTable - PC) / 4
-
In the example above, if the beq instruction is at address 1004, and thus the PC is 1008, and if ENDIF is at address 1028, then the value stored in the machine instruction would be
-
offset = (1028 - 1008) / 4 = 5
op rs rt immediate 4 8 0 5 000100 01000 00000 0000000000000101
- Have an address (part of one, actually) in the instruction.
Name Format Layout Example 6 bits 5 bits 5 bits 5 bits 5 bits 6 bits op address jJ2 2500j 10000 jalJ3 2500jal 10000
op address 2 257 000010 00000000000000000100000001
Previous Slide
Next Slide
Alyce Brady, Kalamazoo College
MIPS Instruction Reference
https://github.com/adeys/litemips
arm64 noop
1f 20 03 d5 1f 20 03 d5 1f 20 03 d5 1f 20 03 d5
http://www.cs.iit.edu/~virgil/cs470/
https://github.com/RomanCastellarin/MIPS-VM
https://github.com/Gz3zFork/simple-virtual-machine
Tutorial for Building and Reverse Engineering Simple Virtual Machine Protection
1. Introduction
The virtual machine protection refers to the kind of software protection technology by which the original executable and readable code are translated into a string of pseudo-code byte stream, and a virtual machine is embedded into the program to interpret and execute that pseudo-code byte stream. The difference between virtual machine protection technology and the other virtual machine technology, such as Java Virtual Machine, is that virtual machine protection technology is designed for software protection and uses a custom instruction set.
虚拟机保护是一种软件保护技术,通过该技术,原始的可执行文件和可读代码被转换为一串伪代码字节流,并将虚拟机嵌入到程序中以解释并执行该伪代码字节。 流。 虚拟机保护技术与其他虚拟机技术(例如Java虚拟机)之间的区别在于,虚拟机保护技术是为软件保护而设计的,并使用自定义指令集。
There are some famous commercial virtual machine protection products, such as VMProtect, Themida, etc., but all of them are too complex to analyze. To illustrate the software protection technology, we turn to build a simple virtual machine project. Although this project is far from the commercial products, it is enough for building a CrackMe.
有一些著名的商业虚拟机保护产品,例如VMProtect,Themida等,但是它们都太复杂而无法分析。 为了说明软件保护技术,我们转向构建一个简单的虚拟机项目。 尽管该项目与商业产品相距甚远,但足以构建CrackMe。
By the way, GitHub is a fantastic site, and we have found a perfect source code written by NWMonster. The rest of this paper is organized as follows: the CrackMe built by NWMonster’s source code is reverse engineered in section 2, and source code is introduced in section 3, and we summarize this paper in section 4.
顺便说一下,GitHub是一个很棒的站点,我们找到了由NWMonster编写的完美源代码。 本文的其余部分安排如下:由NWMonster的源代码构建的CrackMe在第2部分中进行了逆向工程,在第3部分中介绍了源代码,在第4部分中对本文进行了总结。
2. Reverse Analysis
Before we reverse engineer this CrackMe, there are something that we need to understand. The flowchart of a simple virtual machine protection is shown in the following figure:
#
Before we reverse engineer this CrackMe, there are something that we need to understand. The flowchart of a simple virtual machine protection is shown in the following figure:

In this figure, VM_code represents the pseudo-code byte stream, and VM_register simulates the general registers of CPU. In the one run of VM_loop, the virtual machine will run the specific VM_handler according to the VM_code read in Loop head. To reverse engineer a simple virtual machine protection, we need to figure out the meaning of every VM_handler, and thus grasp the main idea of the origin program, which is protected by the virtual machine.
Pay attention that this flowchart does NOT apply to commercial virtual machine protection products because this flowchart is too simple.
From now on, let’s begin our reverse engineering. Usually, OllyDbg (OD) is used to trace out the VM_loop, but this time we use IDA because the graphic view of IDA is much clearer. To make it easy for our discussion, we rebuild the source code to run in x86 Windows environment with debug version. All the materials will be uploaded to GitHub for the readers who need them.
After putting this CrackMe into IDA, it is easy to find out the 207 bytes VM_code in the CrackMe:

In addition, VM_code in the above figure is assigned to [eax + 20h]:

From those instructions, we can assume that EAX points to VM_register structure and EAX+20h points to IP register, like this:
Structure VM_register{
+0x00 ??
+0x04 ??
+0x08 ??
+0x0C ??
+0x10 ??
+0x14 ??
+0x18 ??
+0x1C ??
+0x20 IP register
}
The VM_loop can be found just after VM_register initialization:
By counting the squares in the figure, it seems that there are totally 23 VM_handlers in this virtual machine. Now, we need to analyze those VM_handlers in the order of VM_code sequence. The first byte of VM_code is 0xDE, which corresponds to VM_handler_defaultcase:

The detail of VM_handler_defaultcase is:

Notice that VM_register is the first element of VM class, so the another 0x4 offset is added to the origin 0x20 offset, which means *(this + 0x24) point to IP register in the VM_register:
Now, we can see that VM_handler_defaultcase does nothing but increase the IP register. The second, third and fourth byte of VM_code also corresponds to VM_handler_defaultcase. To make it more comprehensive, we can rewrite VM_code as:
From this figure, we can understand that VM_handler_22 XORs the following 0xF bytes VM_code with 0x66:
Currently, we cannot tell why those bytes are XORed with 0x66. The 21st VM_code is 0x70, which makes the virtual machine run to VM_handler_10, and the detail of VM_handler_10 is:

This is a typical PUSH stack operations, which pushes the next 4 bytes VM_code into VM_stack. It is equals to:
Besides, *(this + 0x20) seems to point to the SP register, thus, we can find another element in VM_register structure:
Until now, we have figured out the 25 bytes of VM_code, three handlers of VM_handler and part of VM_register. The whole analysis is too long to post here so that we leave the rest work for the readers to analyze by themselves. Anyone who is interested can check yourself by reading the source and the whole algorithm, which is protected by that simple virtual machine, is translated into CPP-file in the corresponding GitHub.
3. Build a simple virtual machine
#
With that source code in hand, it is rather easy to build a simple virtual machine. Let us first into that source code. The VM_register is defined as:

Where ‘cf’ is condition flag, and ‘*db’ points to user-input data. The VM_loop is achieved by a while-switch structure:

Where ‘r.ip’ points to the VM_code. Moreover, VM_code is defined as an array of unsigned char:

The VM_handler is defined in the VM class:

As we can see, the first element of VM class is a REG structure, which is what we called VM_register structure; all the 23 VM_handlers can be found in the VM class. In the one run of VM_loop, the VM_code is read, and one of those VM_handlers is chosen to be executed.
Based on those source codes, we can easily build a simple virtual machine for ourselves. To make it easy, we use the existing VM_handler and VM_register. One can define more and obscure VM_handlers to make the virtual machine more difficult to analyze.
基于这些源代码,我们可以轻松地为自己构建一个简单的虚拟机。 为简单起见,我们使用现有的VM_handler和VM_register。 可以定义更多且晦涩的VM_handlers,以使虚拟机更加难以分析。
All we need to do is to design the sequence of VM_code to accomplish our purpose. For example, if we want to check out whether the 0x27 bytes user-input is a hexadecimal number or not, we can use the follow VM_code listed below:
我们要做的就是设计VM_code的序列以实现我们的目的。 例如,如果要检查用户输入的0x27字节是否为十六进制数,可以使用下面列出的VM_code:
The above code is taken modified from the origin source code. In the above list, each byte of 0x27 bytes user-input is compared with char ‘F’, ‘0’, ‘9’, ‘A’ to determine whether it is a hexadecimal number. If all the user-input are hexadecimal numbers, this virtual machine will leave with R0=1; otherwise, R0=0.
上面的代码是从原始源代码中修改而来的。 在上面的列表中,将用户输入的每个0x27字节字节与char“ F”,“ 0”,“ 9”,“ A”进行比较,以确定它是否为十六进制数。 如果所有用户输入均为十六进制数,则该虚拟机将以R0 = 1离开; 否则,R0 = 0。
As soon as we finish writing VM_code, we need to replace the origin code with this VM_code, put them into practice and make sure that there is no bug.
一旦完成编写VM_code,我们需要用此VM_code替换原始代码,将它们投入实践并确保没有错误。
4. Summary
In this paper, we reverse engineer a simple open source virtual machine protected CrackMe and build a simple virtual machine protection for ourselves. To reverse engineer a simple virtual machine protection, the key step is to find out all VM_handlers and understand the meaning of each VM_handler. When building a simple virtual machine protection, we need to design the sequence of VM_code to accomplish our purpose.
Besides, we have found some other virtual machine protected CrackMe from bbs.pediy.com, and we leave them for readers who are interested in reverse engineering them. All the materials mentioned above are uploaded to GitHub:
- 2020-05-08 svc
Kernel Syscalls
入口函数
MachOView 找到 init func, Section64(_DATA,__mod_init_func)
如何找到[class load]?
inline a big function in llvm pass
always inline pass
编译obfuscator with llvm12 https://holycall.tistory.com/364
PLCT实验室维护的ollvm分支
https://www.jianshu.com/p/e0637f3169a3
sudo make install-xcode-toolchain
控制流扁平化
-mllvm -fla:激活控制流扁平化
-mllvm -split:激活基本块分割。在一起使用时改善展平。
-mllvm -split_num=3:如果激活了传递,则在每个基本块上应用3次。默认值:1
指令替换
-mllvm -sub:激活指令替换
-mllvm -sub_loop=3:如果激活了传递,则在函数上应用3次。默认值:1
虚假控制流程
这个模式主要嵌套几层判断逻辑,一个简单的运算都会在外面包几层if-else,所以这个模式加上编译速度会慢很多因为要做几层假的逻辑包裹真正有用的代码。
另外说一下这个模式编译的时候要浪费相当长时间包哪几层不是闹得!
-mllvm -bcf:激活虚假控制流程
-mllvm -bcf_loop=3:如果激活了传递,则在函数上应用3次。默认值:1
-mllvm -bcf_prob=40:如果激活了传递,基本块将以40%的概率进行模糊处理。默认值:30
-mllvm -sobf:编译时候添加选项开启字符串加密
-mllvm -seed=0xdeadbeaf:指定随机数生成器种子
#cross compile for iOS on macOS
https://clang.llvm.org/docs/
–host,–target,–build
configure.ios
#!/bin/sh -x -e

case "$ARCH" in
    armv6-apple-darwin10|armv7-apple-darwin10|armv7s-apple-darwin10|arm64-apple-darwin10|i386-apple-darwin11)
        ;;
    *)
        cat <<EOF
Must set ARCH environment variable to
armv6-apple-darwin10 = All iOS devices
armv7-apple-darwin10 = All except iPhone 1st, iPhone 3G, iPod Touch 1st, iPod Touch 2nd
armv7s-apple-darwin10 = iPhone 5, iPhone 5c, iPhone 5S, iPad 4th, iPad Air, iPad Mini 2nd
arm64-apple-darwin10 = iPhone 5s, iPad Air, iPad Mini 2nd
i386-apple-darwin11 = iPhone Simulator
See <http://en.wikipedia.org/wiki/List_of_iOS_devices#Features> and search for the architecture name for a comprehensive list.
EOF
        exit 2
        ;;
esac

clang="/Applications/Xcode.app/Contents/Developer/Toolchains/XcodeDefault.xctoolchain/usr/bin/clang"
clangxx="${clang}++"
optflags=${OPTFLAGS:--Os}

case $ARCH in
    i386-apple-darwin11)
        sdk="/Applications/Xcode.app/Contents/Developer/Platforms/iPhoneSimulator.platform/Developer/SDKs/iPhoneSimulator7.0.sdk"
        ;;
    *)
        sdk="/Applications/Xcode.app/Contents/Developer/Platforms/iPhoneOS.platform/Developer/SDKs/iPhoneOS14.4.sdk"
        ;;
esac

IPHONEOS_DEPLOYMENT_TARGET=${IPHONEOS_DEPLOYMENT_TARGET:-7.0}
export IPHONEOS_DEPLOYMENT_TARGET

CC="$clang"
CPP="$clang -E"
export CC CPP

CXX="$clangxx"
CXXCPP="$clangxx -E"
export CXX CXXCPP

CFLAGS="-target $ARCH --sysroot=$sdk $optflags -mios-version-min=$IPHONEOS_DEPLOYMENT_TARGET"
CPPFLAGS="$CFLAGS"
CXXFLAGS="$CFLAGS -stdlib=libc++"
LDFLAGS="$CFLAGS -dead_strip"
export CFLAGS CPPFLAGS CXXFLAGS LDFLAGS

case $ARCH in
    arm64-apple-darwin10)
        host=aarch64-apple-darwin10
        ;;
    *)
        host=$ARCH
        ;;
esac

${CONFIGURE:-./configure} --host="$host" --disable-shared --disable-dependency-tracking "$@"
#剔除符号
strip
#Mac系统下lipo, ar, nm等工具的使用简介
- 2020-04-11 花指令Junk Code
void noop1()
{
      int a = 3, b = 3, c;

    __asm__(
            "BR X11"
            );


      printf("%d", c);

}
http://malwarejake.blogspot.com/2015/12/junk-code-makes-reversing-pain.html
https://github.com/ThaisenPM/AutoJunk
https://www.praetorian.com/blog/extending-llvm-for-code-obfuscation-part-1
https://github.com/chenkaie/junkcode
svc nop
BSD System Calls Manual
https://developer.apple.com/library/archive/documentation/System/Conceptual/ManPages_iPhoneOS/man2/syscall.2.html
https://stackoverflow.com/questions/56985859/ios-arm64-syscalls
- 2020-01-14 Angr学习
- 2019-12-12 using HexRaysDeob
支配树图解 http://pages.cs.wisc.edu/~fischer/cs701.f08/lectures/Lecture19.4up.pdf
Hex-Rays Microcode API vs. Obfuscating Compiler
Rolf Rolles博客 https://www.msreverseengineering.com/
项目地址: https://github.com/RolfRolles/HexRaysDeob
- Pattern-based obfuscation
- Opaque predicates
- Alloca-related stack manipulation
- Control flow flattening
implemented via pattern substitutions
https://github.com/REhints/HexRaysCodeXplorer
IDA PLUG-IN WRITINGINC/C++
$ export PATH=~/idasdk/bin:$PATH
export __MAC__=1
export MACSDK=/Applications/Xcode.app/Contents/Developer/Platforms/MacOSX.platform/Developer/SDKs/MacOSX10.15.sdk
export __X64__=1
make __EA64__=1
cmake 制作插件的例子 https://github.com/google/idaidle
https://www.secshi.com/18281.html
microcode数据结构
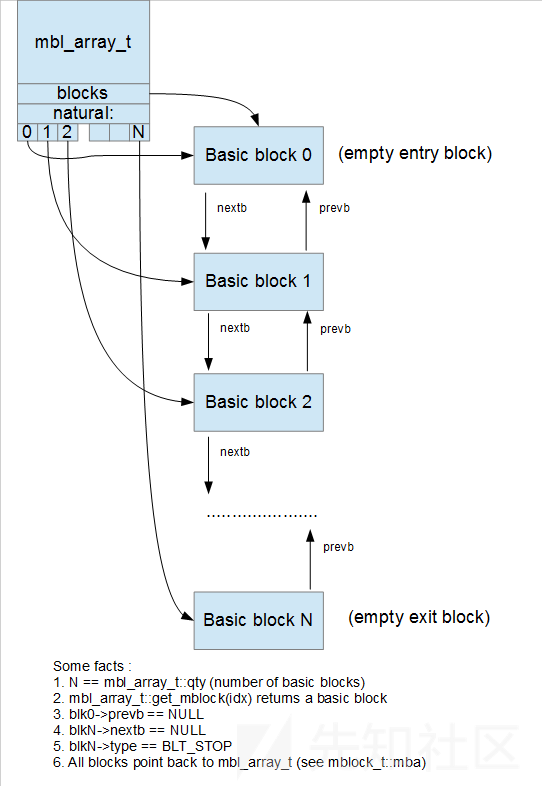
microcode中四个比较重要的数据结构如下。
mbl_array_t
保存关于反编译代码和基本块数组的信息,比较重要的成员和函数如下。
int qty;
// 基本块数组的数量
const mblock_t *get_mblock(int n) const { return natural[n]; }
// 根据序号返回数组中对应的基本块
mblock_t *hexapi insert_block(int bblk);
// 插入一个基本块
bool hexapi remove_block(mblock_t *blk);
// 删除一个基本块
bool hexapi remove_empty_blocks(void);
// 删除所有空的基本块
bool hexapi combine_blocks(void);
// 合并线性的基本块
int hexapi for_all_ops(mop_visitor_t &mv);
// 遍历所有操作数(包括子指令的)
int hexapi for_all_insns(minsn_visitor_t &mv);
// 遍历所有指令(包括子指令)
int hexapi for_all_topinsns(minsn_visitor_t &mv);
// 遍历所有指令(不包括子指令)
mblock_t
一个包含指令列表的基本块,比较重要的成员和函数如下。
mblock_t *nextb;
// 双向链表中的下一个基本块
mblock_t *prevb;
// 双向链表中的上一个基本块
minsn_t *head;
// 指向基本块中的第一条指令
minsn_t *tail;
// 指向基本块中的最后一条指令
mbl_array_t *mba;
// 所属的mbl_array_t
int npred(void) const { return predset.size(); }
// 该块的前驱者数目
int nsucc(void) const { return succset.size(); }
// 该块的后继者数目
int pred(int n) const { return predset[n]; }
// 该块的第n个前驱者
int succ(int n) const { return succset[n]; }
// 该块的第n个后继者
minsn_t *hexapi insert_into_block(minsn_t *nm, minsn_t *om);
// 向双向链表中插入指令
minsn_t *hexapi remove_from_block(minsn_t *m);
// 删除双向链表中的指令
int hexapi for_all_ops(mop_visitor_t &mv);
// 遍历所有操作数(包括子指令的)
int hexapi for_all_insns(minsn_visitor_t &mv);
// 遍历所有指令(包括子指令)
minsn_t
表示一条指令,比较重要的成员和函数如下。指令可以嵌套,也就是说mop_t也可能会包含一个minsn_t。
mcode_t opcode;
// 操作码
int iprops;
// 一些表示指令性质的位的组合
minsn_t *next;
// 双向链表中的下一条指令
minsn_t *prev;
// 双向链表中的上一条指令
ea_t ea;
// 指令地址
mop_t l;
// 左操作数
mop_t r;
// 右操作数
mop_t d;
// 目标操作数
int hexapi for_all_ops(mop_visitor_t &mv);
// 遍历所有操作数(包括子指令的)
int hexapi for_all_insns(minsn_visitor_t &mv);
// 遍历所有指令(包括子指令)
mop_t
表示一个操作数,根据它的类型可以表示不同的信息(数字,寄存器,堆栈变量等等),比较重要的成员和函数如下。
mopt_t t;
// 操作数类型
uint8 oprops;
// 操作数属性
uint16 valnum;
// 操作数的值,0表示未知,操作数的值相同操作数也相同
int size;
// 操作数大小
//下面的联合体中包含有关操作数的其它信息,根据操作数类型,存储不同类型的信息
  union
  {
    mreg_t r;
    // mop_r   寄存器数值
    mnumber_t *nnn;
    // mop_n   立即数的值
    minsn_t *d;
    // mop_d   另一条指令
    stkvar_ref_t *s;
    // mop_S   堆栈变量
    ea_t g;
    // mop_v   全局变量
    int b;
    // mop_b   块编号(在jmp\call指令中使用)
    mcallinfo_t *f;
    // mop_f   函数调用信息
    lvar_ref_t *l;
    // mop_l   本地变量
    mop_addr_t *a;
    // mop_a   操作数地址(mop_l\mop_v\mop_S\mop_r)
    char *helper;
    // mop_h   辅助函数名
    char *cstr;
    // mop_str 字符串常量
    mcases_t *c;
    // mop_c   switch的case和target
    fnumber_t *fpc;
    // mop_fn  浮点数常量
    mop_pair_t *pair;
    // mop_p   操作数对
    scif_t *scif;
    // mop_sc  分散的操作数信息
  };
使用IDA microcode去除ollvm混淆
前言
本文原文来自Hex-Rays Microcode API vs. Obfuscating Compiler。在IDA 7.1中IDA发布了反编译中使用的中间语言microcode,IDA 7.2和7.3中又新增了相关的C++和python API,这篇文章就是关于Rolf Rolles如何使用这一新功能来处理ollvm混淆的,代码地址:HexRaysDeob。我翻译过程中为了方便理解加入了一些数据结构说明和相关代码对照,并不与原文完全相同。文章较长,分为上下两个部分。
microcode和ctree
IDA反编译器中二进制代码有两种表示方式:
microcode:处理器指令被翻译成microcode,反编译器对其进行优化和转换。
使用HexRaysDeob插件除了处理ollvm混淆也可以查看microcode。
 ctree:由优化的microcode构建而成,用C语句和表达式表示像AST一样的树。
使用HexRaysCodeXplorer插件或者IDApython中的示例vds5.py可以查看ctree。
ctree:由优化的microcode构建而成,用C语句和表达式表示像AST一样的树。
使用HexRaysCodeXplorer插件或者IDApython中的示例vds5.py可以查看ctree。
 IDA反编译的整体流程如下所示。
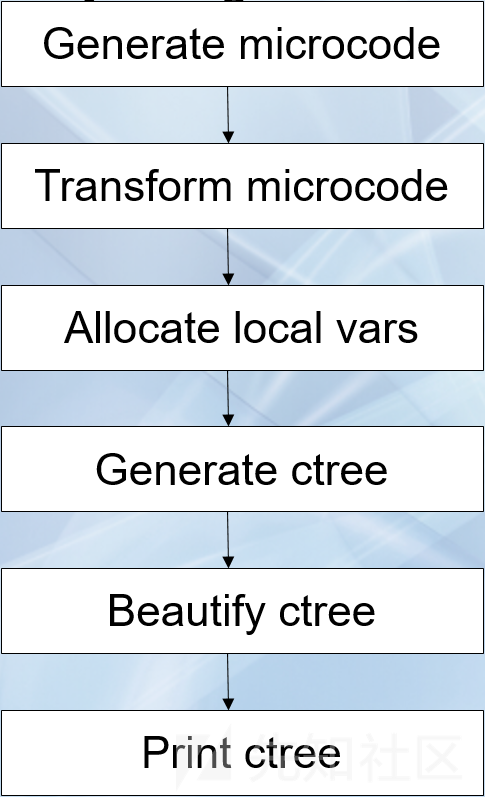 这篇文章重点说microcode。
microcode数据结构
microcode中四个比较重要的数据结构如下。
mbl_array_t
保存关于反编译代码和基本块数组的信息,比较重要的成员和函数如下。
int qty;
// 基本块数组的数量
const mblock_t *get_mblock(int n) const { return natural[n]; }
// 根据序号返回数组中对应的基本块
mblock_t *hexapi insert_block(int bblk);
// 插入一个基本块
bool hexapi remove_block(mblock_t *blk);
// 删除一个基本块
bool hexapi remove_empty_blocks(void);
// 删除所有空的基本块
bool hexapi combine_blocks(void);
// 合并线性的基本块
int hexapi for_all_ops(mop_visitor_t &mv);
// 遍历所有操作数(包括子指令的)
int hexapi for_all_insns(minsn_visitor_t &mv);
// 遍历所有指令(包括子指令)
int hexapi for_all_topinsns(minsn_visitor_t &mv);
// 遍历所有指令(不包括子指令)
mblock_t
一个包含指令列表的基本块,比较重要的成员和函数如下。
mblock_t *nextb;
// 双向链表中的下一个基本块
mblock_t *prevb;
// 双向链表中的上一个基本块
minsn_t *head;
// 指向基本块中的第一条指令
minsn_t *tail;
// 指向基本块中的最后一条指令
mbl_array_t *mba;
// 所属的mbl_array_t
int npred(void) const { return predset.size(); }
// 该块的前驱者数目
int nsucc(void) const { return succset.size(); }
// 该块的后继者数目
int pred(int n) const { return predset[n]; }
// 该块的第n个前驱者
int succ(int n) const { return succset[n]; }
// 该块的第n个后继者
minsn_t *hexapi insert_into_block(minsn_t *nm, minsn_t *om);
// 向双向链表中插入指令
minsn_t *hexapi remove_from_block(minsn_t *m);
// 删除双向链表中的指令
int hexapi for_all_ops(mop_visitor_t &mv);
// 遍历所有操作数(包括子指令的)
int hexapi for_all_insns(minsn_visitor_t &mv);
// 遍历所有指令(包括子指令)
minsn_t
表示一条指令,比较重要的成员和函数如下。指令可以嵌套,也就是说mop_t也可能会包含一个minsn_t。
mcode_t opcode;
// 操作码
int iprops;
// 一些表示指令性质的位的组合
minsn_t *next;
// 双向链表中的下一条指令
minsn_t *prev;
// 双向链表中的上一条指令
ea_t ea;
// 指令地址
mop_t l;
// 左操作数
mop_t r;
// 右操作数
mop_t d;
// 目标操作数
int hexapi for_all_ops(mop_visitor_t &mv);
// 遍历所有操作数(包括子指令的)
int hexapi for_all_insns(minsn_visitor_t &mv);
// 遍历所有指令(包括子指令)
mop_t
表示一个操作数,根据它的类型可以表示不同的信息(数字,寄存器,堆栈变量等等),比较重要的成员和函数如下。
mopt_t t;
// 操作数类型
uint8 oprops;
// 操作数属性
uint16 valnum;
// 操作数的值,0表示未知,操作数的值相同操作数也相同
int size;
// 操作数大小
//下面的联合体中包含有关操作数的其它信息,根据操作数类型,存储不同类型的信息
union
{
mreg_t r;
// mop_r 寄存器数值
mnumber_t *nnn;
// mop_n 立即数的值
minsn_t *d;
// mop_d 另一条指令
stkvar_ref_t *s;
// mop_S 堆栈变量
ea_t g;
// mop_v 全局变量
int b;
// mop_b 块编号(在jmp\call指令中使用)
mcallinfo_t *f;
// mop_f 函数调用信息
lvar_ref_t *l;
// mop_l 本地变量
mop_addr_t *a;
// mop_a 操作数地址(mop_l\mop_v\mop_S\mop_r)
char *helper;
// mop_h 辅助函数名
char *cstr;
// mop_str 字符串常量
mcases_t *c;
// mop_c switch的case和target
fnumber_t *fpc;
// mop_fn 浮点数常量
mop_pair_t *pair;
// mop_p 操作数对
scif_t *scif;
// mop_sc 分散的操作数信息
};
它们之间的关系由下图所示。简单来说就是操作数(mop_t)组成指令(minsn_t),指令(minsn_t)组成基本块(mblock_t),基本块(mblock_t)组成mbl_array_t。

 当HexRays在内部优化和转换microcode时,它将经历不同的成熟阶段(maturity phases),该阶段由类型为mba_maturity_t的枚举元素表示。例如,刚刚生成的microcode成熟度为MMAT_GENERATED,经过了局部优化之后的microcode成熟度为MMAT_LOCOPT,经过了函数调用的分析之后microcode成熟度为MMAT_CALLS。通过gen_microcode() API生成microcode时,用户可以指定需要优化microcode的成熟度级别。
使用IDA microcode去除ollvm混淆
样本中采用的混淆手段
样本来源:https://www.virustotal.com/gui/file/0ac399bc541be9ecc4d294fa3545bbf7fac4b0a2d72bce20648abc7754b3df24/detection
基于模式的混淆
在该样本反编译的结果中可以看到相同的模式。
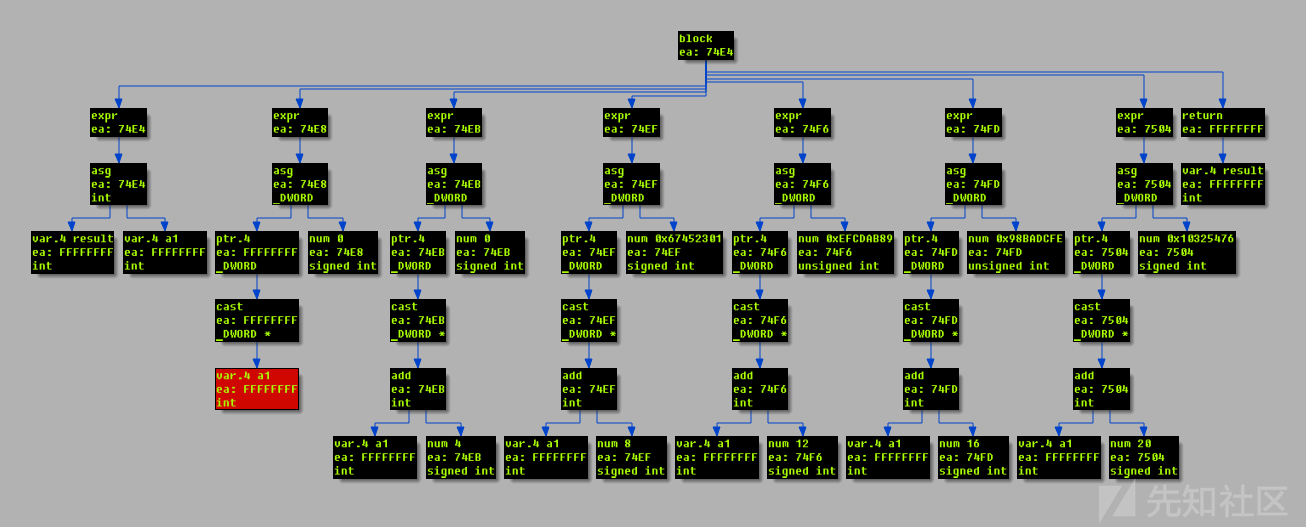
 带下划线的部分在运行时始终为0,因为x是偶数或者奇数,并且x-1和x的奇偶性相反,偶数乘以奇数总是偶数,偶数的最低位为0,因此&1结果为0。这种模式还出现在带有AND复合条件的if语句中,AND复合条件结果总是为0,因此if语句永远不会执行。这是一种称为不透明谓词的混淆方式:条件分支运行时永远只会执行其中一条路径。
控制流平坦化
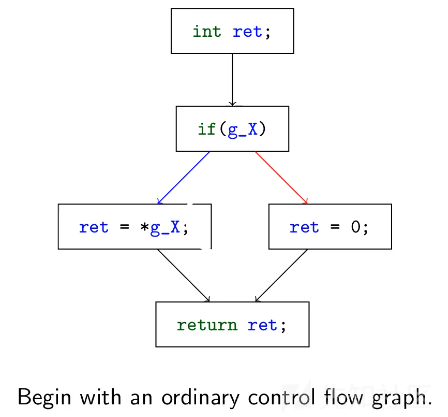
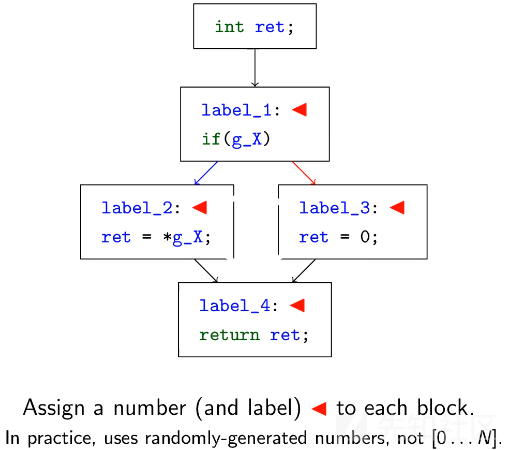
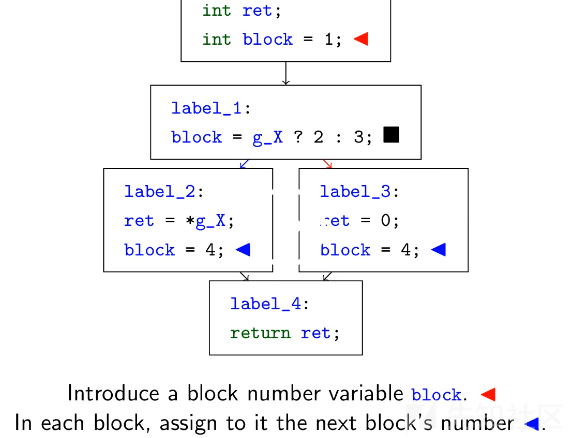
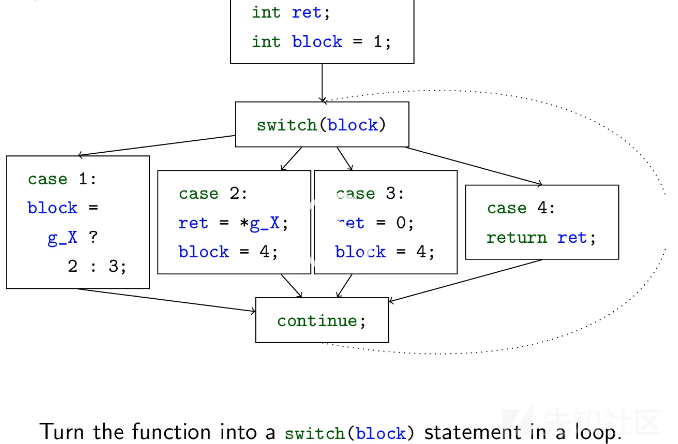
被混淆的函数具有异常的控制流。每个被混淆的函数都包含一个循环中的switch语句,这是一种被称为控制流平坦化(control flow flattening)的混淆方式。简而言之,它的原理如下。
1.为每个基本块分配一个数字。
2.混淆器引入了块号变量,指示应执行哪个块。
3.每个块都不会像往常那样通过分支指令将控制权转移给后继者,而是将块号变量更新为其所选的后继者。
4.普通的控制流被循环内的根据块号变量执行的switch语句代替。
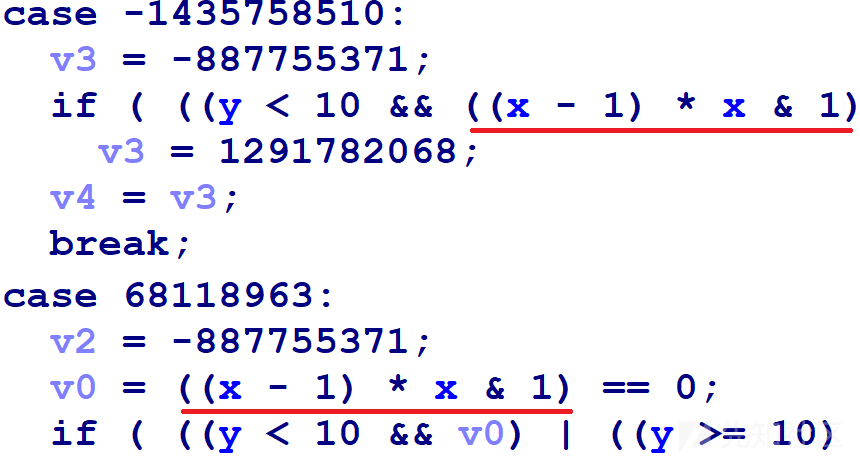
 该样本一个被控制流平坦化的函数的switch(block)部分的汇编代码如下所示。
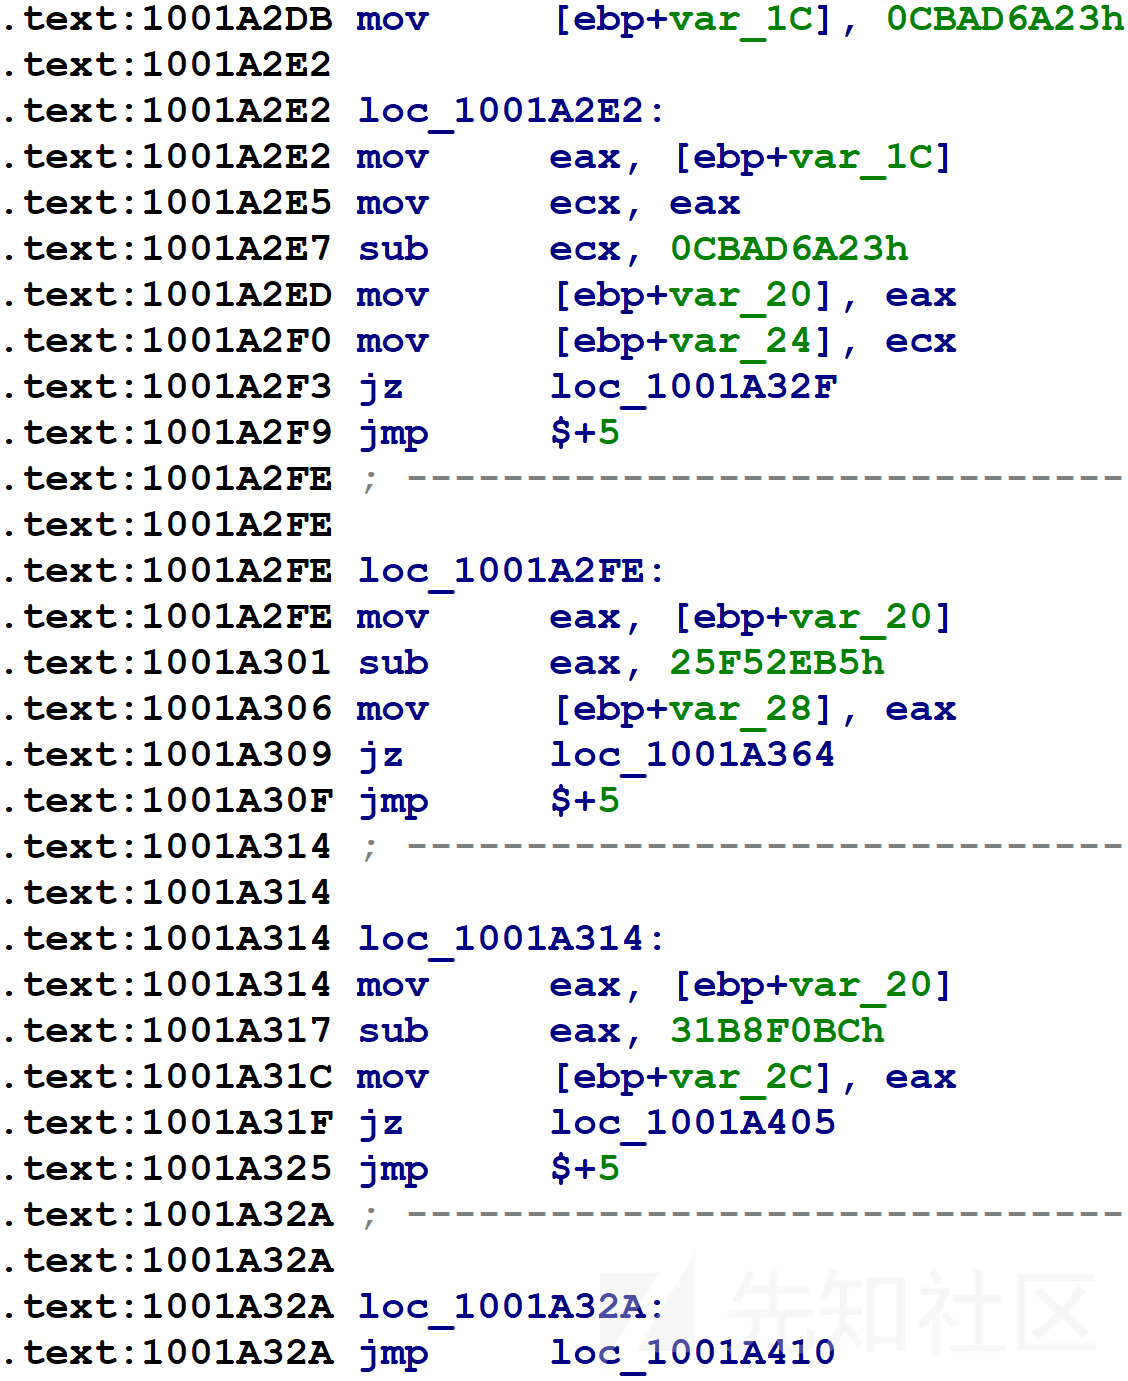 在第一行,var_1C即上面提到的块号变量被初始化为某个看起来很随机的数字。紧随其后的是一系列var_1C与其它随机数字的比较(var_1C复制到var_20中,var_20用于之后的比较)。这些比较的目标是原始函数的基本块。基本块在回到刚才显示的代码之前会更新var_1C指示下一步应执行哪个基本块,然后代码将执行比较并选择要执行的相应块。对于只有一个后继者的块,混淆器给var_1C分配一个常量,如下图所示。
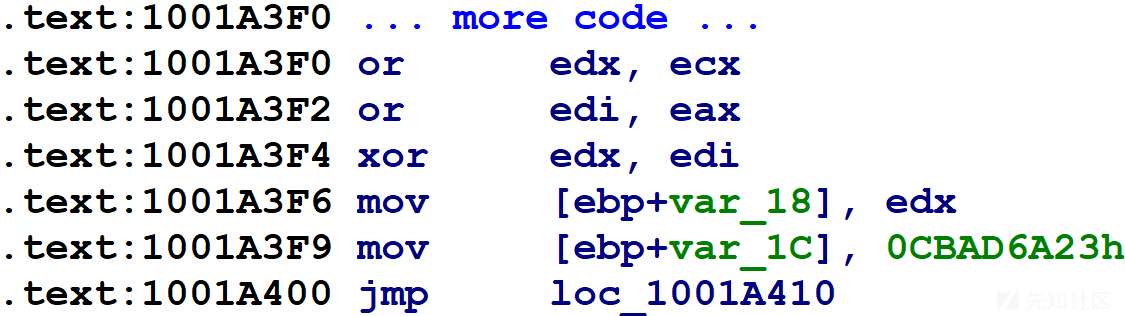 对于具有两个可能的后继者(例如if语句)的块,混淆器引入x86 CMOV指令以将var_1C设置为两个可能的值之一,如下图所示。
 整个函数看起来如下所示。
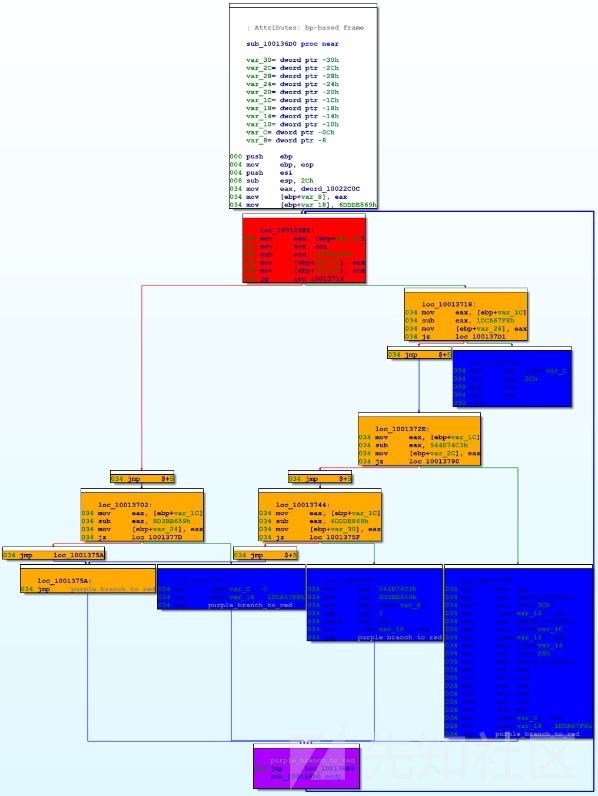 在上图中,红色和橙色节点是switch(block)部分的实现。蓝色节点是该函数的原始基本块(可能会进一步混淆)。底部的紫色节点返回到开头的switch(block)部分。
奇怪的栈操作
最后,我们还可以看到混淆器以不同寻常的方式操纵栈指针。它用__alloca_probe为函数参数和局部变量保留栈空间,而普通的编译器会在函数开头用push指令为所有局部变量保留栈空间。
 IDA具有内置的启发式方法,可以确定__alloca_probe调用的参数并跟踪这些调用对栈指针的影响。但是混淆器使得IDA无法确定参数,因此IDA无法正确跟踪栈指针。
反混淆器代码结构
HexRaysDeob反混淆器的代码结构如下所示。
AllocaFixer:处理__alloca_probe
CFFlattenInfo:处理控制流平坦化之前的准备工作
main:插件入口
MicrocodeExplorer:显示microcode
PatternDeobfuscate/PatternDeobfuscateUtil:处理基于模式的混淆
Unflattener:处理控制流平坦化
DefUtil/HexRaysUtil/TargetUtil:其它功能
IDA的插件入口一般会有的三个函数是init,term和run,作用分别是初始化,清理和调用插件。init函数中调用了install_optinsn_handler函数和install_optblock_handler函数进行指令级别的优化(PatternDeobfuscate)和块级别的优化(Unflattener),HexRays会自动调用注册的回调对象。
 PatternDeobfuscate和AllocaFixer的代码相对比较好理解,接下来会重点讲解关于处理控制流平坦化的代码。
前面说了IDA反编译器中二进制代码有microcode和ctree两种表示方式,那么使用microcode相关API而不是ctree相关API有什么好处呢?从前面的介绍中我们可以了解到ctree是由microcode产生的,microcode比ctree更“底层”。如果在microcode级别操作可以利用HexRays已有的恢复控制流的算法,另外一些模式在microcode级别能更好被匹配。
PatternDeobfuscate和AllocaFixer的代码相对比较好理解,接下来会重点讲解关于处理控制流平坦化的代码。
前面说了IDA反编译器中二进制代码有microcode和ctree两种表示方式,那么使用microcode相关API而不是ctree相关API有什么好处呢?从前面的介绍中我们可以了解到ctree是由microcode产生的,microcode比ctree更“底层”。如果在microcode级别操作可以利用HexRays已有的恢复控制流的算法,另外一些模式在microcode级别能更好被匹配。
对抗控制流平坦化
简单来说,控制流平坦化消除了块到块直接的控制流传输。平坦化过程引入了一个块号变量,在函数执行的每一步它决定应该执行的块。函数的控制流结构被转换为块号变量上的一个switch,它最终引导执行到正确的块。每个块必须更新块号变量,以指示在当前块号之后应该执行的块。
对抗控制流平坦化的过程在概念上很简单。简单地说,我们的任务是重建块到块直接的控制流传输,在此过程中消除switch(block)机制。在下面的小节中,我们将以图片的方式展示该过程。只需要三个步骤就可以消除控制流平坦化。一旦重新构建了原始的控制流传输,HexRays现有的控制流重组机制将完成剩下的工作。
确定平坦块编号到mblock_t的映射
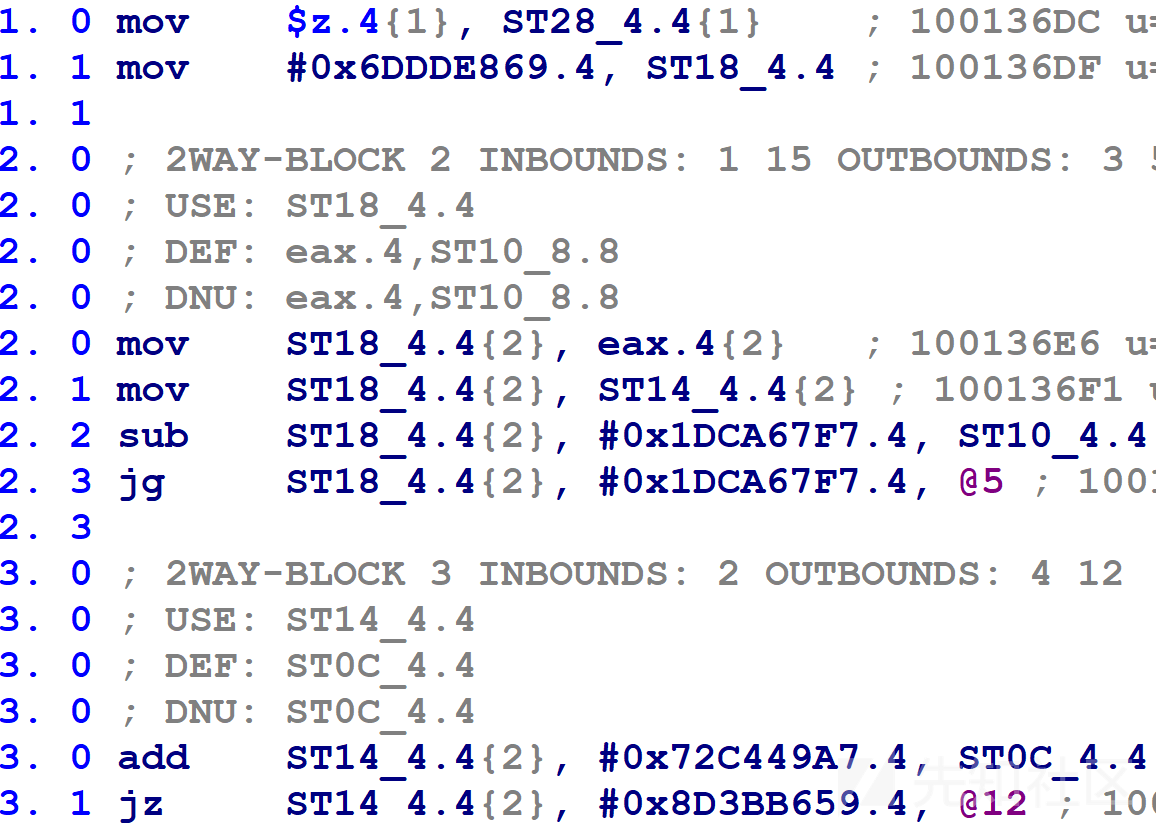
我们的首要任务是确定哪个平坦块编号对应于哪个mblock_t。下图所示是一个被控制流平坦化的函数的switch(block)部分的microcode表示。
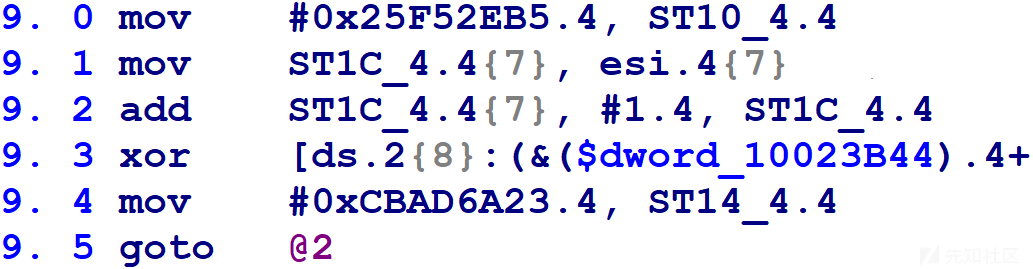
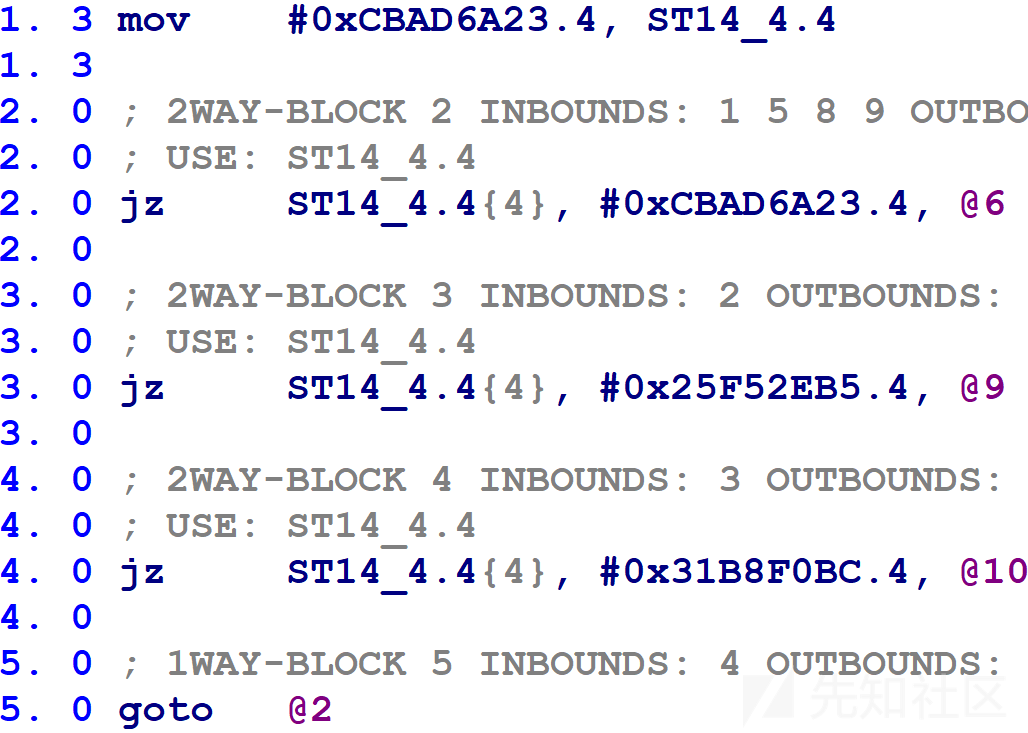 HexRays当前正在使用块号变量ST14_4.4。如果等于0xCBAD6A23,则jz指令将控制流转移到@6块。类似的,0x25F52EB5对应于@9块,0x31B8F0BC对应于@10块。
确定每个平坦块的后继者
接下来对于每个平坦块,我们需要确定控制流可能转移到的平坦块编号。如果原始控制流是无条件的,则它们可能具有一个后继者;如果其原始控制流是有条件的,则可能具有两个后继者。
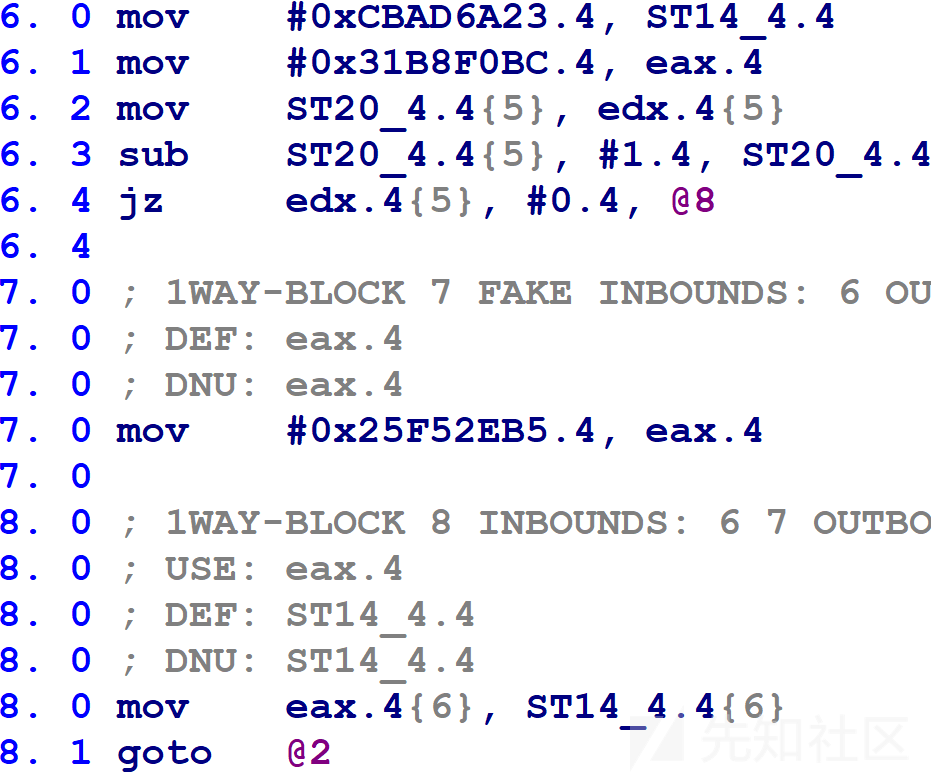
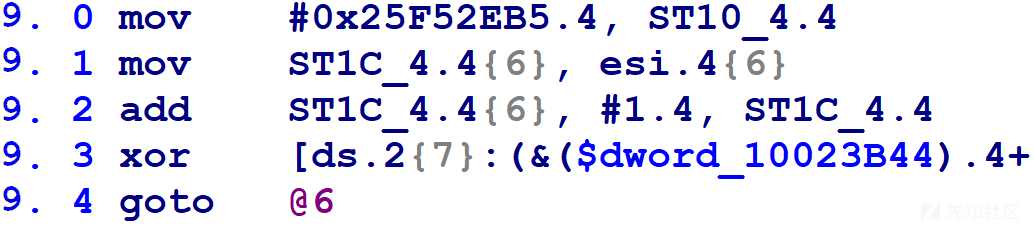
@9块中的microcode有一个后继者(第9.3行已被截断,因为它很长并且其细节不重要)。我们可以在9.4行上看到,该块在执行goto返回到switch(block)之前将块号变量更新为0xCBAD6A23,switch(block)会将控制流转移到@6块。
 @6块中的microcode有两个后继者。在第8.1行执行goto返回到switch(block)之前,第8.0行用eax的值更新块号变量。如果第6.4行的jz为true,eax值为0x31B8F0BC;如果第6.4行的jz为false,eax值为0x25F52EB5。switch(block)会将控制流转移到@10块或@9块。
直接将控制流从源块转移到目标块
最后我们可以修改microcode中的控制流指令以直接指向其后继,而不是通过switch(block)。如果对所有平坦化的块执行此操作,则switch(block)将不再可用,我们可以将其删除,仅保留函数原始的未平坦化的控制流。
前面我们确定@9块最终将控制流转移到@6块。@9块结尾用goto声明返回到位于@2块的switch(block)。我们只需将现有goto语句的目标修改为指向@6块而不是@2块,如下图所示(同时也删除了对块号变量的分配,因为不再需要)。
 有两个后继者的块的情况稍微复杂一些,但是基本思想是相同的:将现有的控制流直接指向目标块而不是switch(block)。
为了解决这个问题,我们将:
1.将@8块的指令复制到@7块的末尾。
2.更改@7块(刚从@8块复制过来)的goto指令,使其指向@9块。
3.更改@8块的goto指令,使其指向@10块。
我们还可以清除8.0行对块号变量的更新以及6.1行和7.0行中对eax的赋值。
有两个后继者的块的情况稍微复杂一些,但是基本思想是相同的:将现有的控制流直接指向目标块而不是switch(block)。
为了解决这个问题,我们将:
1.将@8块的指令复制到@7块的末尾。
2.更改@7块(刚从@8块复制过来)的goto指令,使其指向@9块。
3.更改@8块的goto指令,使其指向@10块。
我们还可以清除8.0行对块号变量的更新以及6.1行和7.0行中对eax的赋值。
工程实现
启发式识别被展平的函数
事实证明,二进制文件中的一些非库函数未被展平。我设计了一种启发式方法来确定给定函数是否被展平。被展平的函数将块号变量与jz和jg指令中的数字常量进行比较,这些数字常量似乎是伪随机生成的。有了这种特征就可以编写用于启发式确定某个函数是否被展平的算法。
1.遍历函数中的所有microcode。
 2.对于每一个将变量和常数比较的jz/jg指令,记录相应的信息(变量,变量和常量比较的次数,对应的所有常量)。
 3.选择被比较次数最多的变量对应的所有常量。
 4.计算常量中为1的位数然后除以总位数,因为这些常量应该是伪随机生成的,所以这个值应该接近0.5。如果这个值在0.4和0.6之间则可以确定该函数已被展平。

简化图结构
被展平的函数有时具有直接导致其它跳转的跳转,或者有时microcode翻译器插入以其它goto指令为目标的goto指令。例如在下图中,块4包含goto到块8的指令,而块8又包含goto到块15的指令。
 如果@X块以goto @N指令结尾,并且@N块为一条goto @M指令,则将goto @N更新为goto @M。对于任意数量的goto以递归的方式应用此过程。
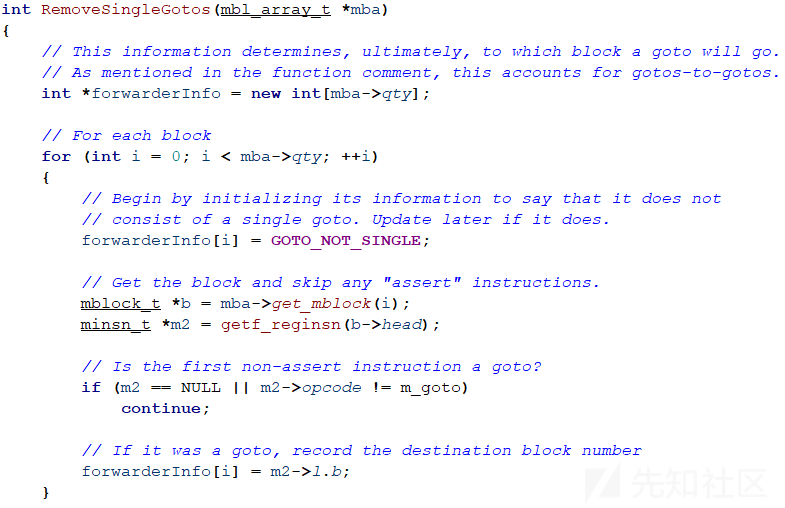
在RemoveSingleGotos函数中第一次遍历所有的块,如果该块的第一条指令是goto指令则记录下目的地址到forwarderInfo中,否则forwarderInfo为-1。
如果@X块以goto @N指令结尾,并且@N块为一条goto @M指令,则将goto @N更新为goto @M。对于任意数量的goto以递归的方式应用此过程。
在RemoveSingleGotos函数中第一次遍历所有的块,如果该块的第一条指令是goto指令则记录下目的地址到forwarderInfo中,否则forwarderInfo为-1。
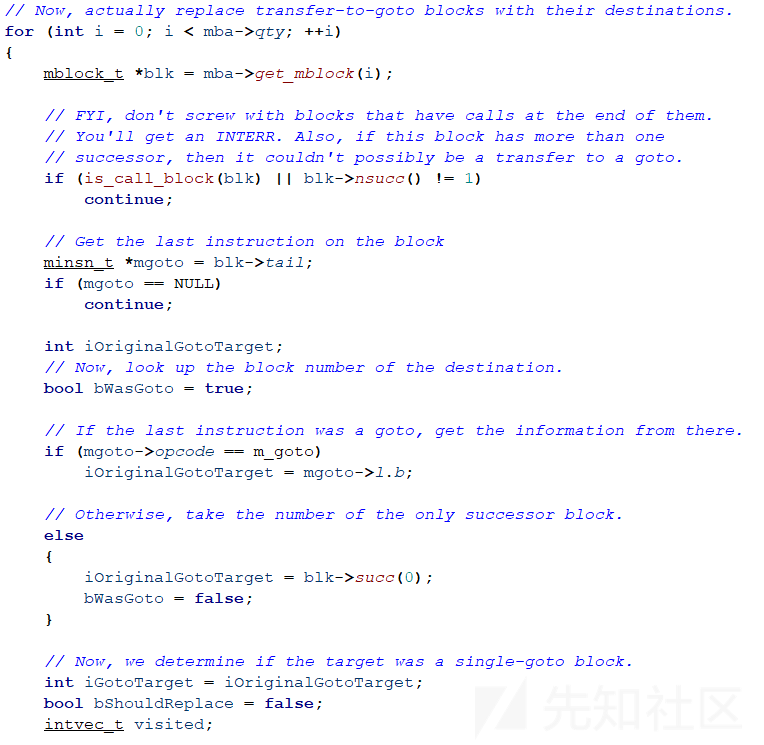
 第二次遍历所有的块,如果该块的最后一条指令是call或者该块有不止一个后继者则跳过,考虑两种情况:最后一条指令是goto和最后一条指令不是goto。如果最后一条指令是goto指令,将iGotoTarget设置为goto的目标;如果最后一条指令不是goto指令,将iGotoTarget设置为其唯一后继者。
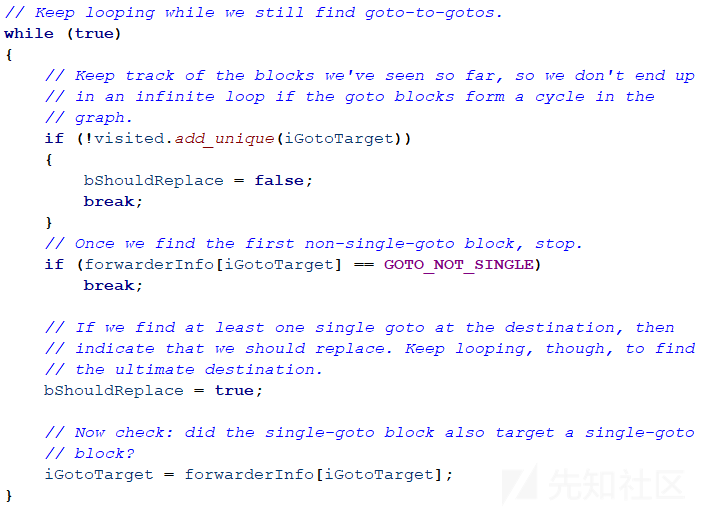
 在while循环中将下一个块设置为forwarderInfo[iGotoTarget],如果该块已经在while循环中遇到过说明这是一个死循环,将bShouldReplace设置为false并退出。如果forwarderInfo为-1说明遇到了一个第一条指令不是goto指令的块,也退出。只要遇到了一个第一条指令是goto指令的块就将bShouldReplace设置为true。
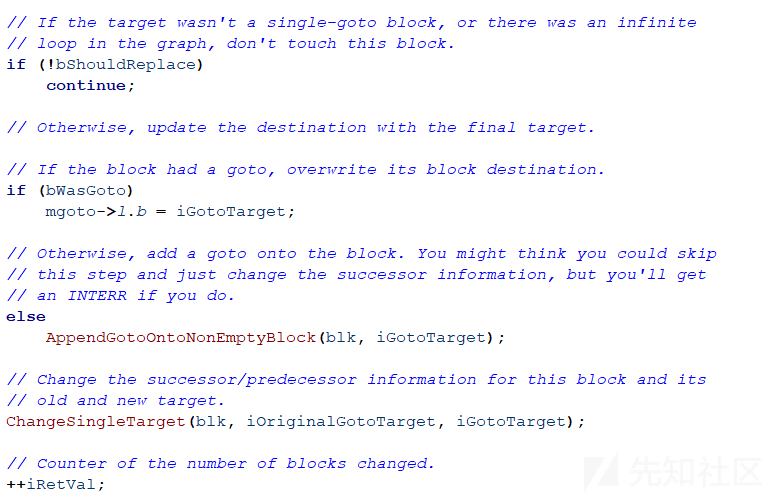
 如果最后一条指令是goto指令,将目的地址更改为while循环中的最后一个块;如果最后一条指令不是goto指令,增加一个目的地址为while循环中的最后一个块的goto指令。修改相应的前驱者和后继者信息。
提取块号信息
许多平坦化函数使用两个变量来实现与块号相关的功能。对于使用两个变量的情况,该函数的基本块更新的变量与switch(block)所比较的变量不同。这里将这两个变量分别称为块更新变量和块比较变量。在switch(block)开始时,将块更新变量的值复制到块比较变量中,此后所有后续比较均参考块比较变量。下图中switch(block)从@2块开始,@1块为ST18_4.4变量分配了一个数值。switch(block)中第一个比较在第2.3行,跟此变量相关。第2.1行将该变量复制到另一个名为ST14_4.4的变量中,然后将其用于后续比较(如第3.1行以及此后的所有switch(block)比较)。
 然后,函数的平坦块更新变量ST18_4.4。
 (令人困惑的是,函数的平坦块更新了两个变量,但是仅使用了对块更新变量ST18_4.4的赋值。块比较变量ST14_4.4在使用其值之前,在第2.1行中被重新定义了)。
因此,我们实际上有三个任务:
1.确定哪个变量是块比较变量(我们已经通过熵检查得知)。
2.确定是否存在块更新变量,如果存在,则确定它是哪个变量。
3.从jz针对块比较变量/块更新变量的比较中提取数字常数,以确定平坦块编号到mblock_t的映射。
首先,我们获取switch(block)之前的第一个块。从函数的开头开始一直向后移动,直到下一个块有多个前驱者。此时这个块就是switch(block)之前的第一个块(例如上面例子中的@1块),下一个块就是switch(block)(例如上面例子中的@2块)。
(令人困惑的是,函数的平坦块更新了两个变量,但是仅使用了对块更新变量ST18_4.4的赋值。块比较变量ST14_4.4在使用其值之前,在第2.1行中被重新定义了)。
因此,我们实际上有三个任务:
1.确定哪个变量是块比较变量(我们已经通过熵检查得知)。
2.确定是否存在块更新变量,如果存在,则确定它是哪个变量。
3.从jz针对块比较变量/块更新变量的比较中提取数字常数,以确定平坦块编号到mblock_t的映射。
首先,我们获取switch(block)之前的第一个块。从函数的开头开始一直向后移动,直到下一个块有多个前驱者。此时这个块就是switch(block)之前的第一个块(例如上面例子中的@1块),下一个块就是switch(block)(例如上面例子中的@2块)。
 找到switch(block)之前的第一个块中所有对变量赋常量值的指令,如果找到了块比较变量说明此时不存在块更新变量。
 否则说明此时存在块更新变量,如果switch(block)之前的第一个块中对某变量赋常量值并且在switch(block)中将该变量拷贝给块比较变量,那么这个变量就是块更新变量。

 从jz针对块比较变量(位于switch(block)的块更新变量)的比较中提取数字常数,以确定平坦块编号到mblock_t的映射。

取消控制流平坦化
我们现在知道哪个变量是块更新变量/块比较变量。我们还知道哪个平坦块编号对应于哪个mblock_t。对于每个被展平的块,我们需要确定块更新变量的值。
如前所述,平坦块有两种情况:
平坦块始终将块更新变量设置为单个值(对应于无条件分支)。
平坦块使用x86 CMOV指令将块更新变量设置为两个可能值之一(对应于条件分支)。
对于如下所示的第一种情况找到一个数字就可以了。下图中块更新变量为ST14_4.4,我们的任务是在第9.4行找到数字分配。现在可以将最后一行的goto更改为对应的mblock_t。

 对于如下所示的第二种情况需要确定ST14_4.4可能被更新为0xCBAD6A23(6.0)或0x25F52EB5(7.0)。
 更新jz为true执行的块的goto指令(上面的例子中,将@8块的goto指令更新为goto @6)。
 将jz为true执行的块拷贝到jz为false执行的块(上面的例子中,将@8块拷贝到@7块)。
 更新jz为false执行的块的goto指令(上面的例子中,将@7块的goto指令更新为goto @9)。

其它问题
平坦块可能包含许多mblock_t
One complication is that a flattened block may be implemented by more than one Hex-Rays mblock_t as in the first case above, or more than three Hex-Rays mblock_t objects in the second case above. In particular, Hex-Rays splits basic blocks on function call boundaries — so there may be any number of Hex-Rays mblock_t objects for a single flattened block. Since we need to work backwards from the end of a flattened region, how do we know where the end of the region is? I solved this problem by computing the function’s dominator tree and finding the block dominated by the flattened block header that branches back to the control flow switch.
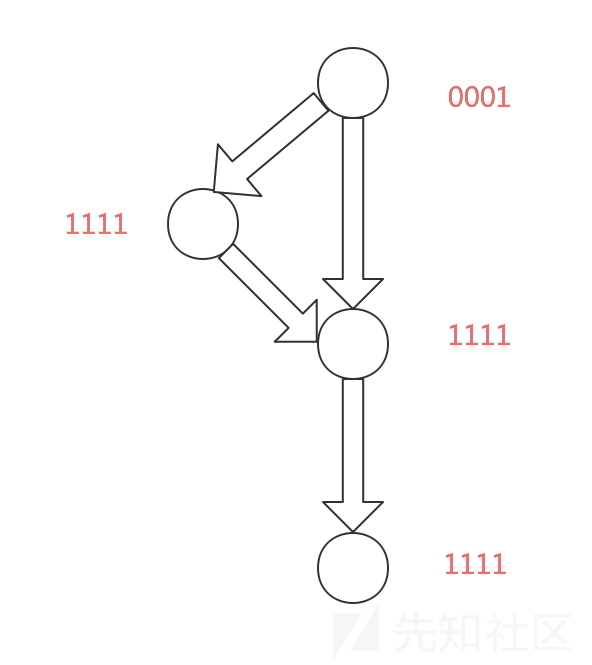
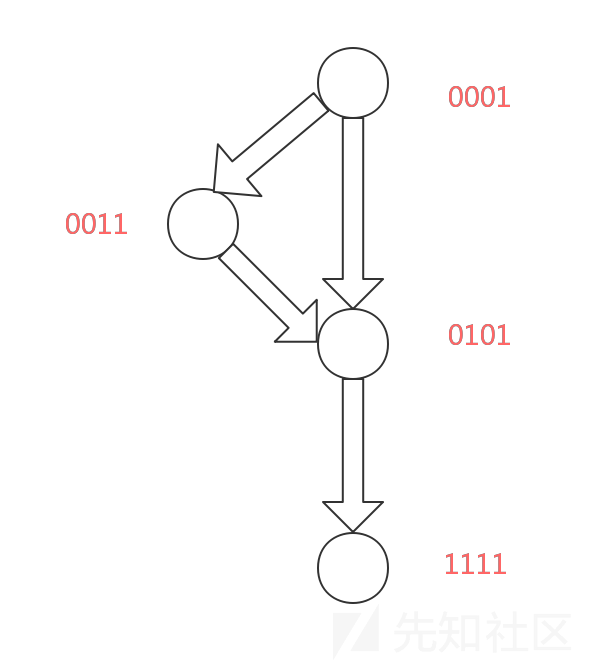
如上述第一种情况,mblock_t可以通过一个以上的mblock_t来实现平坦块;或者如上述第二种情况,mblock_t可以通过三个以上的mblock_t来实现平坦块。HexRays在函数调用边界上分割基本块,因此单个平坦块可以有任意数量的mblock_t。由于查找分配给块更新变量的数值需要从平坦区域的末端开始工作,所以需要知道该区域的末端在哪里。这里通过计算函数的支配树(dominator tree)并找到将回到switch(block)并且由平坦块块头支配的块解决了这个问题。计算支配树的算法如下所示。如果一个函数含有X个基本块则每个基本块用X位的bitset来表示支配关系,第Y位为1表示基本块Y支配基本块X。初始化时每个基本块都支配每个基本块,即每个基本块的bitset每一位都为1,然后将第一个基本块的bitset设置为只有第一位为1,即对于第一个基本块只有它自己支配自己。然后遍历基本块,更新该基本块的bitset为它的bitset和它的前驱的bitset的与,然后设置该基本块自己支配自己。一直重复这样循环,直到bitset不再发生改变。


查找分配给块更新变量的数值
查找分配给块更新变量的数值有些情况下很简单,有些情况下很困难。有时HexRays的常量传播算法会创建将常量直接移动到块更新变量中的microcode或者通过几个寄存器或栈变量对块更新变量赋值。FindNumericDefBackwards函数从一个块的底部开始搜索对块更新变量的赋值。如果块更新变量是由另一个变量赋值的,它将执行递归搜索。一旦最终找到数字常量赋值则返回true。如果找到了支配该块的mbClusterHead块仍然没有找到则返回false。然而当平坦块通过指针写入内存时上述算法将不起作用。如下所示,在平坦块的开头常量被写入寄存器,然后被保存到栈变量中。
 稍后用指针写入内存。
 最后从栈变量中读取。
 这给我们带来的问题是HexRays需要证明中间的内存写入不会覆盖已保存的数据。通常,指针混叠是一个无法确定的问题,这意味着不可能编写算法来解决它的每个实例。当FindNumericDefBackwards函数返回false并且最后是从栈变量中读取时调用FindForwardStackVarDef函数转到平坦块的开头查找。以上面的情况为例,跳到第一个代码片段并且找到分配给var_B4和var_BC的常量。这样做不安全,但是恰好适用于此样本中的每个函数,并且很可能适用于该混淆编译器编译的每个样本。

总结
控制流平坦化这一混淆技术早已经在代码保护工具和恶意代码样本中屡见不鲜,Rolf Rolles的方法为解决这一问题提供了新的思路。目前idapython已经提供了Rolf Rolles所开源代码的python版本pyhexraysdeob。国外有研究人员基于Rolf Rolles的成果对APT10样本中类似的混淆进行了处理,也取得了比较好的效果:Defeating APT10 Compiler-level Obfuscations。
- 2019-12-12 mac逆向相关
使用lldb调试代替cycript
cd 到程序所在目录
直接运行程序:
./WeChat -NSDocumentRevisionsDebugMode YES
新建一个终端:
开启lldb,attach 到微信进程
- 2019-12-06 android逆向入门
进入bootloader模式
Root成功之后安装Frida Server到设备上
从Frida官网下载安装包 frida-server-xxx-android-arm64.xz放到设备相应目录
adb push frida-xxx.xz /data/local/tmp/
执行这个文件
adb shell
su
cd /data/local/tmp
chmod +x frida-xxx.xz
./frida-server-xxx
dump.py
#!/usr/bin/env python
# encoding: utf-8

import frida
import sys


def on_message(message, data):
    if message['type'] == 'send':
        pass
    else:
        print(message)


jscode = """

function Bytes2HexString(arrBytes) {
    var str = "";
    for (var i = 0; i < arrBytes.length; i++) {
      var tmp;
      var num=arrBytes[i];
      if (num < 0) {
      //此处填坑,当byte因为符合位导致数值为负时候,需要对数据进行处理
        tmp =(255+num+1).toString(16);
      } else {
        tmp = num.toString(16);
      }
      if (tmp.length == 1) {
        tmp = "0" + tmp;
      }
      str += tmp;
    }
    return str;
  }


function print(bytes){
   var s = "";
   var i = 0;
   for(var i=0;i < bytes.length; i+=1)
       s += String.fromCharCode(bytes[i]);
   return s;
}


function hexdumpp(tag, buf, buf_len) {
  var buf = Memory.readByteArray(buf, buf_len);

  //var str = Bytes2HexString(buf);
  //console.log(str);

  //print(buf);

  /*console.log(hexdump(buf, {
    offset: 0,
    length: buf_len,
    header: false,
    ansi: false
  }));
  */

}


   var base = Module.findBaseAddress('libwechatnormsg.so');
// // 703 ??var compressFunc = Module.findExportByName("libz.so" , "compress");
// // 704 0xE00F0
// // 705 0xE00F0
// // 706 0xE2DD0
// // 708 0x38367C
// var compressFunc = base.add(0x38367C+1)
// Interceptor.attach(compressFunc, {
//     onEnter: function(args) {
//         hexdumpp("compress", args[2], args[3].toInt32());
//     },
//     onLeave: function(retval) {}
// });


   var sub_347008 = base.add(0x347008)
   Interceptor.attach(sub_347008, {
     onEnter: function(args) {
    console.log('>>> onEnter MD5Final this: ' + args[0]+',args1:'+args[1]+',args2:'+args[2]);
    console.log("Call Stack:"+Thread.backtrace(this.context,Backtracer.ACCURATE).map(DebugSymbol.fromAddress).join(" "));
    this.MyRet1 = args[1];
     },
     onLeave: function(retval) {
       console.log("MD5:"+hexdump(this.MyRet1, {
        offset: 0,
        length: 16,
        header: true,
        ansi: false
      }));
     }
   });


"""


# var sub_37b2a4 = base.add(0x37b2a4+1);
#    console.log("sub_37b2a4:" + sub_37b2a4);

#    Interceptor.attach(sub_37b2a4, {
#      onEnter: function(args) {
#     //console.log('>>> onEnter Md5Update this: ' + args[0]+',args1:'+args[1]+',args2:'+args[2]);
#     //console.log(Thread.backtrace(this.context,Backtracer.ACCURATE).map(DebugSymbol.fromAddress).join(" "));
#     var file = Memory.readCString(args[1]);
#     if(args[2].toInt32()<0x1000){
#       if(file.startsWith("/system")){
#         console.log(file);
#       }else{
#         console.log(hexdump(args[1], {
#           offset: 0,
#           length: args[2].toInt32(),
#           header: true,
#           ansi: false
#         }));
#       }
#     }
#       this.MyRet = args[0];
#      },
#      onLeave: function(retval) {

#      }
#    });


#    var sub_37b350 = base.add(0x37b350+1);

#    Interceptor.attach(sub_37b350, {
#      onEnter: function(args) {
#     console.log('>>> onEnter MD5Final this: ' + args[0]+',args1:'+args[1]+',args2:'+args[2]);
#       this.MyRet1 = args[1];
#      },
#      onLeave: function(retval) {
#        console.log("MD5:"+hexdump(this.MyRet1, {
#         offset: 0,
#         length: 16,
#         header: true,
#         ansi: false
#       }));
#      }
#    });


#    const libcso = "libc.so";
#    var dlopen = Module.findExportByName(libcso, 'lstat');
#    console.log("lstat:" + dlopen);
#    Interceptor.attach(ptr(dlopen), {
#      onEnter: function(args) {
#     //console.log("Enter dlopen call:args[0]:"+args[0]+",args1:"+args[1]);
#        console.log(Memory.readCString(args[0]));

#      },
#      onLeave: function(retval) {
#      }

#    });


process = frida.get_usb_device().attach('com.tencent.mm')
script = process.create_script(jscode)
script.on('message', on_message)
print('[*] Dump Data')
script.load()
sys.stdin.read()
- 2019-11-04 密码学基础
CRC从原理到实现
摘要:CRC(Cyclic Redundancy Check)被广泛用于数据通信过程中的差错检测,具有很强的
检错能力。本文详细介绍了CRC的基本原理,并且按照解释通行的查表算法的由来的思路介绍
了各种具体的实现方法。
1.差错检测
-———
数据通信中,接收端需要检测在传输过程中是否发生差错,常用的技术有奇偶校验(Parity
Check),校验和(Checksum)和CRC(Cyclic Redundancy Check)。它们都是发送端对消息按照
某种算法计算出校验码,然后将校验码和消息一起发送到接收端。接收端对接收到的消息按
照相同算法得出校验码,再与接收到的校验码比较,以判断接收到消息是否正确。
奇偶校验只需要1位校验码,其计算方法也很简单。以奇检验为例,发送端只需要对所有消息
位进行异或运算,得出的值如果是0,则校验码为1,否则为0。接收端可以对消息进行相同计
算,然后比较校验码。也可以对消息连同校验码一起计算,若值是0则有差错,否则校验通过。
通常说奇偶校验可以检测出1位差错,实际上它可以检测出任何奇数位差错。
校验和的思想也很简单,将传输的消息当成8位(或16/32位)整数的序列,将这些整数加起来
而得出校验码,该校验码也叫校验和。校验和被用在IP协议中,按照16位整数运算,而且其
MSB(Most Significant Bit)的进位被加到结果中。
显然,奇偶校验和校验和都有明显的不足。奇偶校验不能检测出偶数位差错。对于校验和,
如果整数序列中有两个整数出错,一个增加了一定的值,另一个减小了相同的值,这种差错
就检测不出来。
2.CRC算法的基本原理
-——————
CRC算法的是以GF(2)(2元素伽罗瓦域)多项式算术为数学基础的,听起来很恐怖,但实际上它
的主要特点和运算规则是很好理解的。
GF(2)多项式中只有一个变量x,其系数也只有0和1,如:
1*x^7 + 0*x^6 + 1*x^5 + 0*x^4 + 0*x^3 + 1*x^2 +1*x^1 + 1*x^0
即:
x^7 + x^5 + x^2 + x + 1 //(x^n表示x的n次幂)
GF(2)多项式中的加减用模2算术执行对应项上系数的加减,模2就是加减时不考虑进位和借位,
即:
0 + 0 = 0    0 - 0 = 0
    0 + 1 = 1    0 - 1 = 1
    1 + 0 = 1    1 - 0 = 1
    1 + 1 = 0    1 - 1 = 0
显然,加和减是一样的效果(故在GF(2)多项式中一般不出现”-“号),都等同于异或运算。例 如P1 = x^3 + x^2 + 1,P2 = x^3 + x^1 + 1,P1 + P2为:
x^3  + x^2     + 1
  + x^3        + x + 1
    ------------------
           x^2 + x
GF(2)多项式乘法和一般多项式乘法基本一样,只是在各项相加的时候按模2算术进行,例如
P1 * P2为:
(x^3 + x^2 + 1)(x^3 + x^1 + 1)
   = (x^6 + x^4 + x^3
     + x^5 + x^3 + x^2
     + x^3 + x + 1)
   = x^6 + x^5 + x^4 + x^3 + x^2 + x + 1
GF(2)多项式除法也和一般多项式除法基本一样,只是在各项相减的时候按模2算术进行,例
如P3 = x^7 + x^6 + x^5 + x^2 + x,P3 / P2为:
x^4 + x^3           + 1
                    ------------------------------------------
        x^3 + x + 1 )x^7 + x^6 + x^5 +             x^2 + x
                     x^7       + x^5 + x^4
                     ---------------------
                           x^6       + x^4
                           x^6       + x^4 + x^3
                           ---------------------
                                             x^3 + x^2 + x
                                             x^3       + x + 1
                                             -----------------
                                                   x^2     + 1
CRC算法将长度为m位的消息对应一个GF(2)多项式M,比如对于8位消息11100110,如果先传输 MSB,则它对应的多项式为x^7 + x^6 + x^5 + x^2 + x。发送端和接收端约定一个次数为r的 GF(2)多项式G,称为生成多项式,比如x^3 + x + 1,r = 3。在消息后面加上r个0对应的多 项式为M’,显然有M’ = Mx^r。用M’除以G将得到一个次数等于或小于r - 1的余数多项式R, 其对应的r位数值则为校验码。如下所示:
11001100
         -------------
    1011 )11100110000
          1011.......
          ----.......
           1010......
           1011......
           ----......
              1110...
              1011...
              ----...
               1010..
               1011..
               ----
                  100  <---校验码
发送端将m位消息连同r位校验码(也就是M’ + R)一起发送出去,接收端按同样的方法算出收
到的m位消息的校验码,再与收到的校验码比较。接收端也可以用收到的全部m + r位除以生
成多项式,再判断余数是否为0。这是因为,M’ + R = (QG + R) + R = QG,这里Q是商。显
然,它也可以像发送端一样,在全部m + r后再增加r个0,再除以生成多项式,如果没有差错
发生,余数仍然为0。
3.生成多项式的选择
-—————–
很明显,不同的生成多项式,其检错能力是不同的。如何选择一个好的生成多项式需要一定
的数学理论,这里只从一些侧面作些分析。显然,要使用r位校验码,生成多项式的次数应为
r。生成多项式应该包含项”1”,否则校验码的LSB(Least Significant Bit)将始终为0。如果
消息(包括校验码)T在传输过程中产生了差错,则接收端收到的消息可以表示为T + E。若E不
能被生成多项式G除尽,则该差错可以被检测出。考虑以下几种情况:
1)1位差错,即E = x^n = 100…00,n >= 0。只要G至少有2位1,E就不能被G除尽。这
是因为Gx^k相当于将G左移k位,对任意多项式Q,QG相当于将多个不同的G的左移相加。
如果G至少有两位1,它的多个不同的左移相加结果至少有两位1。
2)奇数位差错,只要G含有因子F = x + 1,E就不能被G除尽。这是因为QG = Q’F,由1)
的分析,F的多个不同的左移相加结果1的位数必然是偶数。
3)爆炸性差错,即E = (x^n + … + 1)x^m = 1…100…00,n >= 1,m >= 0,显然只
要G包含项”1”,且次数大于n,就不能除尽E。
4)2位差错,即E = (x^n + 1)x^m = 100…00100…00,n >= 0。设x^n + 1 = QG + R,
则E = QGx^m + Rx^m,由3)可知E能被G除尽当且仅当R为0。因此只需分析x^n + 1,根
据[3],对于次数r,总存在一个生成多项式G,使得n最小为2^r - 1时,才能除尽x^n
+ 1。称该生成多项式是原始的(primitive),它提供了在该次数上检测2位差错的最高
能力,因为当n = 2^r - 1时,x^n + 1能被任何r次多项式除尽。[3]同时指出,原始
生成多项式是不可约分的,但不可约分的的多项式并不一定是原始的,因此对于某些
奇数位差错,原始生成多项式是检测不出来的。
以下是一些标准的CRC算法的生成多项式:
标准          多项式                                        16进制表示
----------------------------------------------------------------------
CRC12        x^12 + x^11 + x^3 + x^2 + x + 1                80F
CRC16        x^16 + x^15 + x^2 + 1                          8005
CRC16-CCITT  x^16 + x^12 + x^5 + 1                          1021
CRC32        x^32 + x^26 + x^23 + x^22 + x^16 + x^12 + x^11
             + x^10 + x^8 + x^7 + x^5 + x^4 + x^2 + x + 1   04C11DB7
16进制表示去掉了最高次项,CCITT在1993年改名为ITU-T。CRC12用于6位字节,其它用于8位 字节。CRC16在IBM的BISYNCH通信标准。CRC16-CCITT被广泛用于XMODEM, X.25和SDLC等通信 协议。而以太网和FDDI则使用CRC32,它也被用在ZIP,RAR等文件压缩中。在这些生成多项式 中,CRC32是原始的,而其它3个都含有因子x + 1。
4.CRC算法的实现
-————–
要用程序实现CRC算法,考虑对第2节的长除法做一下变换,依然是M = 11100110,G = 1011,
其系数r为3。
11001100                      11100110000
         -------------                     1011
    1011 )11100110000                      -----------
          1011.......                       1010110000
          ----.......                      1010110000
           1010......                      1011
           1011......        ===>          -----------
           ----......                       001110000
              1110...                      1110000
              1011...                      1011
              ----...                      -----------
               1010..                       101000
               1011..                      101000
               ----                        1011
                  100  <---校验码          -----------
                                            00100
                                            100           <---校验码
用CRC16-CCITT的生成多项式0x1021,其C代码(本文所有代码假定系统为32位,且都在VC6上
编译通过)如下:
unsigned short do_crc(unsigned char *message, unsigned int len)
{
    int i, j;
    unsigned short crc_reg;

    crc_reg = (message[0] << 8) + message[1];
    for (i = 0; i < len; i++)
    {
        if (i < len - 2)
            for (j = 0; j <= 7; j++)
            {
                if ((short)crc_reg < 0)
                    crc_reg = ((crc_reg << 1) + (message[i + 2] >> (7 - i))) ^ 0x1021;
                else
                    crc_reg = (crc_reg << 1) + (message[i + 2] >> (7 - i));
            }
         else
            for (j = 0; j <= 7; j++)
            {
                if ((short)crc_reg < 0)
                    crc_reg = (crc_reg << 1) ^ 0x1021;
                else
                    crc_reg <<= 1;
            }
    }
    return crc_reg;
}
显然,每次内循环的行为取决于寄存器首位。由于异或运算满足交换率和结合律,以及与0异
或无影响,消息可以不移入寄存器,而在每次内循环的时候,寄存器首位再与对应的消息位
异或。改进的代码如下:
unsigned short do_crc(unsigned char *message, unsigned int len)
{
    int i, j;
    unsigned short crc_reg = 0;
    unsigned short current;

    for (i = 0; i < len; i++)
    {
        current = message[i] << 8;
        for (j = 0; j < 8; j++)
        {
            if ((short)(crc_reg ^ current) < 0)
                crc_reg = (crc_reg << 1) ^ 0x1021;
            else
                crc_reg <<= 1;
            current <<= 1;
        }
    }
    return crc_reg;
}
以上的讨论中,消息的每个字节都是先传输MSB,CRC16-CCITT标准却是按照先传输LSB,消息
右移进寄存器来计算的。只需将代码改成判断寄存器的LSB,将0x1021按位颠倒后(0x8408)与
寄存器异或即可,如下所示:
unsigned short do_crc(unsigned char *message, unsigned int len)
{
    int i, j;
    unsigned short crc_reg = 0;
    unsigned short current;

    for (i = 0; i < len; i++)
    {
        current = message[i];
        for (j = 0; j < 8; j++)
        {
            if ((crc_reg ^ current) & 0x0001)
                crc_reg = (crc_reg >> 1) ^ 0x8408;
            else
                crc_reg >>= 1;
            current >>= 1;
        }
    }
    return crc_reg;
}
该算法使用了两层循环,对消息逐位进行处理,这样效率是很低的。为了提高时间效率,通
常的思想是以空间换时间。考虑到内循环只与当前的消息字节和crc_reg的低字节有关,对该
算法做以下等效转换:
unsigned short do_crc(unsigned char *message, unsigned int len)
{
    int i, j;
    unsigned short crc_reg = 0;
    unsigned char  index;
    unsigned short to_xor;

    for (i = 0; i < len; i++)
    {
        index = (crc_reg ^ message[i]) & 0xff;
        to_xor = index;
        for (j = 0; j < 8; j++)
        {
            if (to_xor & 0x0001)
                to_xor = (to_xor >> 1) ^ 0x8408;
            else
                to_xor >>= 1;
        }
        crc_reg = (crc_reg >> 8) ^ to_xor;
    }
    return crc_reg;
}
现在内循环只与index相关了,可以事先以数组形式生成一个表crc16_ccitt_table,使得
to_xor = crc16_ccitt_table[index],于是可以简化为:
unsigned short do_crc(unsigned char *message, unsigned int len)
{
    unsigned short crc_reg = 0;

    while (len--)
        crc_reg = (crc_reg >> 8) ^ crc16_ccitt_table[(crc_reg ^ *message++) & 0xff];

    return crc_reg;
}

crc16_ccitt_table通过以下代码生成:

int main()
{
    unsigned char index = 0;
    unsigned short to_xor;
    int i;

    printf("unsigned short crc16_ccitt_table[256] =/n{");
    while (1)
    {
        if (!(index % 8))
            printf("/n");

        to_xor = index;
        for (i = 0; i < 8; i++)
        {
            if (to_xor & 0x0001)
                to_xor = (to_xor >> 1) ^ 0x8408;
            else
                to_xor >>= 1;
        }
        printf("0x%04x", to_xor);

        if (index == 255)
        {
            printf("/n");
            break;
        }
        else
        {
            printf(", ");
            index++;
        }
    }
    printf("};");
    return 0;
}
生成的表如下:
unsigned short crc16_ccitt_table[256] =
{
0x0000, 0x1189, 0x2312, 0x329b, 0x4624, 0x57ad, 0x6536, 0x74bf,
0x8c48, 0x9dc1, 0xaf5a, 0xbed3, 0xca6c, 0xdbe5, 0xe97e, 0xf8f7,
0x1081, 0x0108, 0x3393, 0x221a, 0x56a5, 0x472c, 0x75b7, 0x643e,
0x9cc9, 0x8d40, 0xbfdb, 0xae52, 0xdaed, 0xcb64, 0xf9ff, 0xe876,
0x2102, 0x308b, 0x0210, 0x1399, 0x6726, 0x76af, 0x4434, 0x55bd,
0xad4a, 0xbcc3, 0x8e58, 0x9fd1, 0xeb6e, 0xfae7, 0xc87c, 0xd9f5,
0x3183, 0x200a, 0x1291, 0x0318, 0x77a7, 0x662e, 0x54b5, 0x453c,
0xbdcb, 0xac42, 0x9ed9, 0x8f50, 0xfbef, 0xea66, 0xd8fd, 0xc974,
0x4204, 0x538d, 0x6116, 0x709f, 0x0420, 0x15a9, 0x2732, 0x36bb,
0xce4c, 0xdfc5, 0xed5e, 0xfcd7, 0x8868, 0x99e1, 0xab7a, 0xbaf3,
0x5285, 0x430c, 0x7197, 0x601e, 0x14a1, 0x0528, 0x37b3, 0x263a,
0xdecd, 0xcf44, 0xfddf, 0xec56, 0x98e9, 0x8960, 0xbbfb, 0xaa72,
0x6306, 0x728f, 0x4014, 0x519d, 0x2522, 0x34ab, 0x0630, 0x17b9,
0xef4e, 0xfec7, 0xcc5c, 0xddd5, 0xa96a, 0xb8e3, 0x8a78, 0x9bf1,
0x7387, 0x620e, 0x5095, 0x411c, 0x35a3, 0x242a, 0x16b1, 0x0738,
0xffcf, 0xee46, 0xdcdd, 0xcd54, 0xb9eb, 0xa862, 0x9af9, 0x8b70,
0x8408, 0x9581, 0xa71a, 0xb693, 0xc22c, 0xd3a5, 0xe13e, 0xf0b7,
0x0840, 0x19c9, 0x2b52, 0x3adb, 0x4e64, 0x5fed, 0x6d76, 0x7cff,
0x9489, 0x8500, 0xb79b, 0xa612, 0xd2ad, 0xc324, 0xf1bf, 0xe036,
0x18c1, 0x0948, 0x3bd3, 0x2a5a, 0x5ee5, 0x4f6c, 0x7df7, 0x6c7e,
0xa50a, 0xb483, 0x8618, 0x9791, 0xe32e, 0xf2a7, 0xc03c, 0xd1b5,
0x2942, 0x38cb, 0x0a50, 0x1bd9, 0x6f66, 0x7eef, 0x4c74, 0x5dfd,
0xb58b, 0xa402, 0x9699, 0x8710, 0xf3af, 0xe226, 0xd0bd, 0xc134,
0x39c3, 0x284a, 0x1ad1, 0x0b58, 0x7fe7, 0x6e6e, 0x5cf5, 0x4d7c,
0xc60c, 0xd785, 0xe51e, 0xf497, 0x8028, 0x91a1, 0xa33a, 0xb2b3,
0x4a44, 0x5bcd, 0x6956, 0x78df, 0x0c60, 0x1de9, 0x2f72, 0x3efb,
0xd68d, 0xc704, 0xf59f, 0xe416, 0x90a9, 0x8120, 0xb3bb, 0xa232,
0x5ac5, 0x4b4c, 0x79d7, 0x685e, 0x1ce1, 0x0d68, 0x3ff3, 0x2e7a,
0xe70e, 0xf687, 0xc41c, 0xd595, 0xa12a, 0xb0a3, 0x8238, 0x93b1,
0x6b46, 0x7acf, 0x4854, 0x59dd, 0x2d62, 0x3ceb, 0x0e70, 0x1ff9,
0xf78f, 0xe606, 0xd49d, 0xc514, 0xb1ab, 0xa022, 0x92b9, 0x8330,
0x7bc7, 0x6a4e, 0x58d5, 0x495c, 0x3de3, 0x2c6a, 0x1ef1, 0x0f78
};
这样对于消息unsigned char message[len],校验码为:
unsigned short code = do_crc(message, len);
并且按以下方式发送出去:
message[len] = code & 0x00ff;
message[len + 1] = (code » 8) & 0x00ff;
接收端对收到的len + 2字节执行do_crc,如果没有差错发生则结果应为0。
在一些传输协议中,发送端并不指出消息长度,而是采用结束标志,考虑以下几种差错:
1)在消息之前,增加1个或多个0字节;
2)消息以1个或多个连续的0字节开始,丢掉1个或多个0;
3)在消息(包括校验码)之后,增加1个或多个0字节;
4)消息(包括校验码)以1个或多个连续的0字节结尾,丢掉1个或多个0;
显然,这几种差错都检测不出来,其原因就是如果寄存器值为0,处理0消息字节(或位),寄
存器值不变。为了解决前2个问题,只需寄存器的初值非0即可,对do_crc作以下改进:
unsigned short do_crc(unsigned short reg_init, unsigned char *message, unsigned int len)
{
    unsigned short crc_reg = reg_init;

    while (len--)
        crc_reg = (crc_reg >> 8) ^ crc16_ccitt_table[(crc_reg ^ *message++) & 0xff];

    return crc_reg;
}
在CRC16-CCITT标准中reg_init = 0xffff,为了解决后2个问题,在CRC16-CCITT标准中将计
算出的校验码与0xffff进行异或,即:
unsigned short code = do_crc(0xffff, message, len);
code ^= 0xffff;
message[len] = code & 0x00ff;
message[len + 1] = (code » 8) & 0x00ff;
显然,现在接收端对收到的所有字节执行do_crc,如果没有差错发生则结果应为某一常值
GOOD_CRC。其满足以下关系:
unsigned char p[]= {0xff, 0xff};
GOOD_CRC = do_crc(0, p, 2);
其结果为GOOD_CRC = 0xf0b8。
参考文献
-——-
[1] Ross N. Williams,”A PAINLESS GUIDE TO CRC ERROR DETECTION ALGORITHMS”,Version 3,
http://www.ross.net/crc/crcpaper.html,August 1993
[2] Simpson, W., Editor, “PPP in HDLC Framing”,RFC 1549, December 1993
[3] P. E. Boudreau,W. C. Bergman and D. R. lrvin,”Performance of a cyclic redundancy
check and its interaction with a data scrambler”,IBM J. RES. DEVELOP.,VOL.38
NO.6,November 1994
- 2019-11-03 Deobfuscation recovering an OLLVM-protected program
https://webcache.googleusercontent.com/search?q=cache:hJb_kcMp1wsJ:https://blog.quarkslab.com/deobfuscation-recovering-an-ollvm-protected-program.html+&cd=1&hl=en&ct=clnk&gl=us
We recently looked at the Obfuscator-LLVM project in order to test its different protections. Here are our results, and explanations on how we deal with obfuscation.
Introduction
As we sometimes have to deal with heavily obfuscated code, we wanted to have a look at the Obfuscator-LLVM project to check the strengths and weaknesses of the generated obfuscated code. We looked at the latest version available (based on LLVM 3.5). We will show how it is possible to break all the protections using the Miasm reverse engineering framework.
Warning: this article only shows a method among others to break the OLLVM obfuscation passes. Although it contains many code samples, it is not a Miasm tutorial and there is no all-in-one Python script to download at the end. Of course, we could make a huge article, where we would analyze a complex program obfuscated by OLLVM, on an unsupported Miasm architecture… but no. We keep things simple and show how we manage to cleanup the code.
First, we present all the tools we used and then, how it is possible on a simple example application we made, to break all OLLVM layers one by one (then all together).
Disclaimer: Quarkslab also works on obfuscation using LLVM. We work on that topic on both part, attacking obfuscation or designing some. These results are not yet public, and not ready to be made public. So, we looked at OLLVM because we know the challenges faced here. OLLVM is a useful project in the obfuscation world where everything is about (misplaced) secrets.
Quickly: What is obfuscation?
Code obfuscation means code protection. A piece of code which is obfuscated is modified in order to be harder to understand. As example, it is often used in DRM (Digital Rights Management) software to protect multimedia content by hiding secrets informations like algorithms and encryption keys.
When you need obfuscation, it means everybody can access your code or binary program but you don’t want some to understand how it works. It is security through obscurity and a matter of time before someone can break it. So the security of an obfuscation tool depends on the time an attacker must spend in order to break it.
Used Tools
Test Case
Our target is a single function which does some computations on the input value. There are 4 conditions which also depend on the input parameter. The application is compiled for x86 32-bit architecture:
unsigned int target_function(unsigned int n)
{
  unsigned int mod = n % 4;

  unsigned int result = 0;

  if (mod == 0) result = (n | 0xBAAAD0BF) * (2 ^ n);

  else if (mod == 1) result = (n & 0xBAAAD0BF) * (3 + n);

  else if (mod == 2) result = (n ^ 0xBAAAD0BF) * (4 | n);

  else result = (n + 0xBAAAD0BF) * (5 & n);

  return result;
}
Here is the IDA Pro Control Flow Graph representation:

We can see there are 3 conditions and 4 paths which make a specific computation using boolean and arithmetic instructions. We made it this way so that all OLLVM passes can obfuscate something in the test program.
This function is very simple because it is the best way to learn. Our goal is not to obtain a 100% generic deobfuscation tool but to study OLLVM behaviour.
Miasm Framework
Miasm is a Python open source reverse engineering framework. The latest version is available here: https://github.com/cea-sec/miasm. As we said earlier, this article is not a Miasm tutorial although we’ll show some pieces of code. Other tools can be used to do what we did, but this article is a good opportunity to show that this framework is evolving day by day and can be used to make powerful deobfuscation tools.
Warning! As the Miasm API can change in future commits, it is important to note the examples we give here are valid with the latest Miasm version available at the release date of this article (commit a5397cee9bacc81224f786f9a62adf3de5c99c87).
Graph Representation
Before we can start to analyze the obfuscated code, it is important to decide the deobfuscated output representation we want. It is not an easy problem because deobfuscation work can take some time and we want to have an understandable output.
We could translate basic blocks content into LLVM Intermediate Representation in order to recompile them, and apply optimisation passes to clean the useless parts of code and obtain a new binary, but it is time consuming and it could be done as a future improvement. Instead, we choose to build our deobfuscated output in an IDAPython graph, using GraphViewer class. This way we can build nodes and edges easily and fill the basic blocks with the Miasm intermediate representation.
As an example, here is the graph our script produces on our un-obfuscated test case we presented earlier:
Click to enlarge
Sure, there are still some efforts to make for the output to be more understandable, but that’s enough for this article. On the above screenshot, we can see the 3 conditions and the 4 paths with their respective computation. The graph could not be valid in terms of execution but it leaves enough information for the analyst to understand the function properly. And that’s all deobfuscation is about.
Our script used to produce the graph is ugly, there is no colors/cosmetics in the basic blocks. Also this is not 100% Miasm IR code because it is not easy to read. We choose to convert the IR to some (near Python) pseudo-code instead.
So, when we do some deobfuscation work and want to display the result, we can generate the output using this representation and compare it to the above screenshot, as it is the original one.
Breaking OLLVM
Quick Presentation
We will not explain in details how OLLVM works because it is already very well explained from the project website (http://o-llvm.org). But quickly, we can say it is composed of 3 distinct protections: Control Flow Flattening, Bogus Control Flow and Instructions Substitution, which can be cumulated in order to make the code very complicated to statically understand. In this part, we show how we managed to remove each protection, one by one and then all together.
Control Flow Flattening
This pass is explained here: https://github.com/obfuscator-llvm/obfuscator/wiki/Control-Flow-Flattening
We applied this pass using the following command line on our test case application:
../build/bin/clang -m32 target.c -o target_flat -mllvm -fla -mllvm -perFLA=100
This command enables the Control Flow Flattening protection on all the functions of our binary so that we are sure our test function is targeted.
Protected Function
By looking at the control flow graph of our target function in IDA, one can see:
Click to enlarge
The behaviour of the obfuscated code is quite simple. On the prologue, a state variable is affected with a numeric constant which indicates to the main dispatcher (and to sub-dispatchers) the path to take to reach the target relevant basic block. The relevant blocks are the ones of the original un-obfuscated function. At the end of each relevant basic block, the state variable is affected with another numeric constant to indicate the next relevant block, and so on.
The original conditions are transformed to CMOV conditional instructions, and according to the result of the comparison they will set the next relevant block in the state variable.
This pass doesn’t add any protection at the instruction level, so the code still remains readable. Only the control flow graph is destroyed. Our goal here is to recover the original CFG of the function. We need to recover all possible paths, meaning we need to know all the links (parent -> child) between relevants basic blocks in order to rebuild the flow.
Here we require a symbolic execution tool which will browse the code and try to compute each basic block destination. If a condition occurs, it will give us the test and the possible destinations list. The Miasm framework has a symbolic execution engine (for x86 32-bit architecture and some others) based on its own IR and a disassembler to convert binary code to it.
Below is documented Miasm Python code which enables us to do symbolic execution on a basic block in order to compute its destination address:
# Imports from Miasm framework
from miasm2.core.bin_stream                 import bin_stream_str
from miasm2.arch.x86.disasm                 import dis_x86_32
from miasm2.arch.x86.ira                    import ir_a_x86_32
from miasm2.arch.x86.regs                   import all_regs_ids, all_regs_ids_init
from miasm2.ir.symbexec                     import symbexec
from miasm2.expression.simplifications      import expr_simp

# Binary path and offset of the target function
offset = 0x3e0
fname = "../src/target"

# Get Miasm's binary stream
bin_file = open(fname).read()
bin_stream = bin_stream_str(bin_file)

# Disassemble blocks of the function at 'offset'
mdis = dis_x86_32(bin_stream)
disasm = mdis.dis_multibloc(offset)

# Create target IR object and add all basic blocks to it
ir = ir_a_x86_32(mdis.symbol_pool)
for bbl in disasm: ir.add_bloc(bbl)

# Init our symbols with all architecture known registers
symbols_init =  {}
for i, r in enumerate(all_regs_ids):
    symbols_init[r] = all_regs_ids_init[i]

# Create symbolic execution engine
symb = symbexec(ir, symbols_init)

# Get the block we want and emulate it
# We obtain the address of the next block to execute
block = ir.get_bloc(offset)
nxt_addr = symb.emulbloc(block)

# Run the Miasm's simplification engine on the next
# address to be sure to have the simplest expression
simp_addr = expr_simp(nxt_addr)

# The simp_addr variable is an integer expression (next basic block offset)
if isinstance(simp_addr, ExprInt):
  print("Jump on next basic block: %s" % simp_addr)

# The simp_addr variable is a condition expression
elif isinstance(simp_addr, ExprCond):
  branch1 = simp_addr.src1
  branch2 = simp_addr.src2
  print("Condition: %s or %s" % (branch1,branch2))
The code above is an example of just one basic block symbolic execution. In order to cover all the function’s basic blocks, we can use it by starting at the prologue of the target function and follow the execution flow. If we encounter a condition we must explore all branches, one by one, until we cover the function entirely.
So we must have a branches stack to process the next available one when we reach the return of the function. For each branch we have to save the state in order to restore all the symbolic execution context (the registers for instance) when we want to process it.
Intermediate Function
By applying the previously explained method, we are able to rebuild an intermediate CFG. Let’s display it with our graph representation script:
Click to enlarge
In this intermediate function, all the useful basic blocks and the conditions are now visible. Although the main dispatcher and its sub-dispatchers are useful for the execution of the code, they are useless for us because we just want to recover the original CFG. So we need to remove them, which is equivalent to keep only relevants blocks.
In order to do that, we can use the constant “shape” of OLLVM control flow flattening. Indeed, most of the relevants blocks (excepted the prologue and return basic block), are located at a very precise place we can detect. We have to start from the original protected function and make some coding to build a generic algorithm which will find the relevants blocks:
Start from the function prologue (which is relevant)
We are on the main dispatcher. Get its parent (different of prologue): it is the pre-dispatcher
Mark as relevant all pre-dispatcher parents
Mark as relevant the only block which has no child(ren): the return block
This algorithm can easily be realized statically, by using the Miasm disassembler which gives us, as we seen earlier, the list of all disassembled basic blocks of the target function. Once we get the relevant blocks list, we are able to rebuild the original control flow by following the rules of this algorithm during the symbolic execution:
Define a variable which contains parent block (prologue at start) (only relevant blocks can be affected to this variable)
On each new block we encounter, if it is in relevant list we can do the link between it and the parent block. Set this new block as parent.
On each condition, each path will have its own relevant parent block variable
And so on.
In order to illustrate this algorithm, below is a documented example:
Here we disassemble target function and collect relevants blocks
Collapsed for clarity but nothing complicated here, and the algorithm is given above
relevants = get_relevants_blocks()
Control flow dictionnary {parent: set(childs)}
flow = {}
Init flow dictionnary with empty sets of childs
for r in relevants: flow[r] = set()
Start loop of symbolic execution
while True:
block_state = # Get next block state to emulate

# Get current branch parameters
# "parent_addr" is the parent block variable se seen earlier
# "symb" is the context (symbols) of the current branch
parent_addr, block_addr, symb = block_state

# If it is a relevant block
if block_addr in flow:

    # We avoid the prologue's parent, as it doesn't exist
    if parent_addr != ExprInt32(prologue_parent):

        # Do the link between the block and its relevant parent
        flow[parent_addr].add(block_addr)

    # Then we set the block as the new relevant parent
    parent_addr = block_addr

# Finally, we can emulate the next block and so on.
Recovered Function
By using the algorithm above, we are able to obtain this CFG:
Click to enlarge
The original code is completely recovered. We can see the 3 conditions and the 4 equations that are used to compute the output value.
Bogus Control Flow
This pass is explained here: https://github.com/obfuscator-llvm/obfuscator/wiki/Bogus-Control-Flow
We applied this pass using the following command line, on our test case application:
../build/bin/clang -m32 target.c -o target_flat -mllvm -bcf -mllvm -boguscf-prob=100 -mllvm -boguscf-loop=1
This command enables the Bogus Control Flow protection on all the functions of our test binary. We set only one pass on the “-boguscf-loop” parameter because it does not change the problem, the generation and the recovery are just much slower, and more RAM is needed when the pass is applied.
Protected Function
Here is the control flow graph IDA Pro gives us when we load our target binary:
Click to enlarge
The poor resolution is not important here as this picture is enough to see the function is complex to understand. This pass, for each basic block to obfuscate, creates a new one containing an opaque predicate which makes a conditional jump: it can lead to the real basic block or another one containing junk code.
We could use the symbolic execution method we seen in the previous part. By applying this method we’ll find all useful basic block and rebuild the flow. But there is a problem: the opaque predicate. The basic block containing junk code returns to it’s parent, so if we follow this path during symbolic execution, we’ll get stuck in an infinite loop. So, we need to solve the opaque predicate in order to directly find the right path and avoid the useless block.
Here is a graphical explanation of the problem, which is available in the source code of OLLVM:
// Before :
//                       entry
//                         |
//                   ______v______
//                  |   Original  |
//                  |_____________|
//                         |
//                         v
//                       return
//
// After :
//                       entry
//                         |
//                     ____v_____
//                    |condition*| (false)
//                    |__________|----+
//                   (true)|          |
//                         |          |
//                   ______v______    |
//              +-->|   Original* |   |
//              |   |_____________| (true)
//              |   (false)|    !-----------> return
//              |    ______v______    |
//              |   |   Altered   |<--!
//              |   |_____________|
//              |__________|
//
//  * The results of these terminator's branch's conditions are always true, but these predicates are
//    opacificated. For this, we declare two global values: x and y, and replace the FCMP_TRUE
//    predicate with (y < 10 || x * (x + 1) % 2 == 0) (this could be improved, as the global
//    values give a hint on where are the opaque predicates)
During our symbolic execution, we need to simplify the following opaque predicate: (y < 10 || x * (x + 1) % 2 == 0). Miasm can still help us to do that because it contains an expression simplification engine which operates on its own IR. We have to add the knowledge of the opaque predicate. As we have an “or” (||) between two equations and as the result has to be True it is enough to only simplify one.
The goal here is to do pattern matching using Miasm and replace the expression: x * (x + 1) % 2 by zero. So, the right term of the opaque predicate is True and we solve it easily.
It seems the ollvm developers made a little mistake in the code comments above: the announced opaque predicate is not valid. At first, we didn’t managed to match it using the Miasm simplification engine. By looking at the equations given by Miasm we saw that the opaque predicate equation was: (x * (x - 1) % 2 == 0) (minus one instead of plus one).
This problem can be verified by looking at the OLLVM source code:
BogusControlFlow.cpp:620
//if y < 10 || x*(x+1) % 2 == 0
opX = new LoadInst ((Value *)x, "", (*i));
opY = new LoadInst ((Value *)y, "", (*i));

op = BinaryOperator::Create(Instruction::Sub, (Value *)opX,
    ConstantInt::get(Type::getInt32Ty(M.getContext()), 1,
      false), "", (*i));
This piece of code shows the problem. The comment indicates (x+1) but the code is using Instruction::Sub directive which means: (x-1). As we work modulo 2, it is not a real problem because the result of the equation is the same, but working with pattern matching make this information important.
Since we know precisely what we have to match, here is a code example to do it using Miasm:
Imports from Miasm framework
from miasm2.expression.expression import *
from miasm2.expression.simplifications import expr_simp
We define our jokers to match expressions
jok1 = ExprId(“jok1”)
jok2 = ExprId(“jok2”)
Our custom expression simplification callback
We are searching: (x * (x - 1) % 2)
def simp_opaque_bcf(e_s, e):
# Trying to match (a * b) % 2
to_match = ((jok1 * jok2)[0:32] & ExprInt32(1))
result = MatchExpr(e,to_match,[jok1,jok2,jok3])
if (result is False) or (result == {}):
    return e # Doesn't match. Return unmodified expression

# Interesting candidate, try to be more precise
# Verifies that b == (a - 1)
mult_term1 = expr_simp(result[jok1][0:32])
mult_term2 = expr_simp(result[jok2][0:32])
if mult_term2 != (mult_term1 + ExprInt(uint32(-1))):
    return e # Doesn't match. Return unmodified expression

# Matched the opaque predicate, return 0
return ExprInt32(0)
We add our custom callback to Miasm default simplification engine
The expr_simp object is an instance of ExpressionSimplifier class
simplifications = {ExprOp : [simp_opaque_bcf]}
expr_simp.enable_passes(simplifications)
Then, every time we call: expr_simp(e) (with “e” a lambda Miasm IR expression), if the opaque predicate is contained in it, it will be simplified. Since Miasm IR classes sometimes call expr_simp() method, it is possible that the callback is executed during IR manupulations.
Intermediate Function
Now, we have to apply the same symbolic execution algorithm than before, without dealing with relevants blocks. Indeed, useless blocks will automatically be removed since they are not executed. We obtain the follow CFG:
Click to enlarge
To get this graph, we just added the opaque predicate knowledge to our algorithm, and Miasm simplified it. The symbolic execution finds all possible paths and ignore impossible ones. We can see the “shape” of the function is correct but the result is kind of ugly because of the remaining instructions added by OLLVM and some empty basic blocks.
Recovered Function
We can now apply the same heuristics than before (Control Flow Flattening) in order to clean the remains. Ok, it is an ugly method but we have to find something which works since we cannot use compiler simplification passes. We obtain the following CFG, which is pretty much the same as the original one:
Click to enlarge
Original code is recovered. We can see the 3 conditions and the 4 equations that are used to compute the output value.
Instructions Substitution
This pass is explained here: https://github.com/obfuscator-llvm/obfuscator/wiki/Instructions-Substitution
We applied this pass using the following command line, on our test case application:
../build/bin/clang -m32 target.c -o target_flat -mllvm -sub
This command enables the Instructions Substitution protection on all the functions of our test binary.
Protected Function
Since this protection doesn’t modify the original CFG, it is interesting to display it directly in our graph representation, using Miasm IR:
Click to enlarge
As expected, the function “shape” hasn’t changed, we can still see conditions but the relevants blocks, which are supposed to do computations on input value seems bigger and more complex. Of course, in this example they are not very impressive since it is a simple one but it can be very ugly on a longer original code.
OLLVM pass replaced arithmetic and boolean operations by more complex ones. But since it is nothing more than a list of equivalent expressions, we can still attack them by using Miasm pattern matching technique.
| As we can see on the OLLVM website, there are several possible substitutions depending on the operator: + , - , ^ , |
, & |
Here is the code that enables us to simplify the OLLVM XOR substitution:
Imports from Miasm framework
from miasm2.expression.expression import *
from miasm2.expression.simplifications import expr_simp
We define our jokers to match expressions
jok1 = ExprId(“jok1”)
jok2 = ExprId(“jok2”)
jok3 = ExprId(“jok3”)
jok4 = ExprId(“jok4”)
Our custom expression simplification callback
We are searching: (~a & b) | (a & ~b)
def simp_ollvm_XOR(e_s, e):
# First we try to match (a & b) | (c & d)
to_match = (jok1 & jok2) | (jok3 & jok4)
result = MatchExpr(e,to_match,[jok1,jok2,jok3,jok4])
if (result is False) or (result == {}):
    return e # Doesn't match. Return unmodified expression

# Check that ~a == c
if expr_simp(~result[jok1]) != result[jok3]:
    return e # Doesn't match. Return unmodified expression

# Check that b == ~d
if result[jok2] != expr_simp(~result[jok4]):
    return e # Doesn't match. Return unmodified expression

# Expression matched. Return a ^ d
return expr_simp(result[jok1]^result[jok4])
We add our custom callback to Miasm default simplification engine
The expr_simp object is an instance of ExpressionSimplifier
simplifications = {ExprOp : [simp_ollvm_XOR]}
expr_simp.enable_passes(simplifications)
The method is exactly the same for all substitutions. We just have to check if Miasm is matching it correctly. It could be a little tricky or time consuming because Miasm may suffer of some matching problems sometimes and we have to match specifically some equations. But when it’s done… it’s done.
Also, it is important to say we have an advantage here because the obfuscator we are analyzing is open-source and we just have to look at the source in order to know precisely the substitutions. In a close source obfuscator, we have to find them manually and it can be very time consuming.
Recovered Function
Once the knowledge of all OLLVM substitutions is added to the Miasm simplification engine, we can regenerate the CFG:
Click to enlarge
We can see on the screenshot above the relevants basic blocks are smaller and cleaned from ugly equations. Instead, we have the original equations back, and it is understandable for an analyst.
Full Protection
It is a good point to break all protections one by one but often, the power of an obfuscator is to be able to cumulate passes, which makes the code very hard to understand without manipulation. Also, in real life, people may want to enable the maximum protection level in order to obfuscate their software. So, it is important to be able to handle all the protections at the same time.
We enabled the maximum OLLVM protection level on our test case function using this command:
../build/bin/clang -m32 target.c -o target_flat -mllvm -bcf -mllvm -boguscf-prob=100 -mllvm -boguscf-loop=1 -mllvm -sub -mllvm -fla -mllvm -perFLA=100
Protected Function
By looking at the protected function in IDA, one can see the following control flow graph:
Click to enlarge
It is important to say that passes cumulation seems to significantly improve the protection level of the code because opaque predicates can be transformed by instructions substitution and the control flow flattening is applied on a bogus control flow protected code. On the screenshot above, we can see more and longer relevant blocks.
Recovered Function
But we just run our script containing all methods described in this article, without any modification. The function is completely recovered and although the protected function above seems very impressive, we can say here the cumulation of all the passes doesn’t make any difference, at the protection level.
Click to enlarge
We can see some useless lines our heuristic cleanup script didn’t remove but it is negligeable as we recovered the original “shape”, conditions and equations of the original function.
Bonus
As we have seen, it is possible to attack directly the control flow graph in order to rebuild it and fill it with understandable pseudo code. On our test case we can understand the code differently, using only Miasm symbolic execution engine.
We know that our function take one input parameter and produce an output value, which depends on the input. What we can do is, during symbolic execution, each time we reach the bottom (return) of a branch, to display EAX equation (which is the return value register for x86 32-bit architecture). For this example, we activated the full OLLVM protections options as we’ve seen in the previous part of this article.
.. Here we have to do basic blocks symbolic execution, as we seen earlier ..
# Jump to next basic block
if isinstance(simp_addr, ExprInt):
  # Useless code removed here...

# Condition
elif isinstance(simp_addr, ExprCond):
  # Useless code removed here...

# Next basic block address is in memory
# Ugly way: Our function only do that on return, by reading return value on the stack
elif isinstance(simp_addr, ExprMem):
    print("-"*30)
    print("Reached return ! Result equation is:")

    # Get the equation of EAX in symbols
    # "my_sanitize" is our function used to display Miasm IR "properly"
    eq = str(my_sanitize(symb.symbols[ExprId("EAX",32)]))

    # Replace input argument memory deref by "x" to be more understandable
    eq = eq.replace("@32[(ESP_init+0x4)]","x")
    print("Equation = %s" % eq)
By using the code above and running the symbolic execution, we get the following output:
starting symbolic execution...
------------------------------
Reached return ! Result equation is:
Equation = ((x^0x2) * (x|0xBAAAD0BF) & 0xffffffff)
------------------------------
Reached return ! Result equation is:
Equation = ((x&0xBAAAD0BF) * (x+0x3) & 0xffffffff)
------------------------------
Reached return ! Result equation is:
Equation = ((x^0xBAAAD0BF) * (x|0x4) & 0xffffffff)
------------------------------
Reached return ! Result equation is:
Equation = ((x&0x5) * (x+0xBAAAD0BF) & 0xffffffff)
------------------------------
symbolic execution is done.
Great, the result is exactly what we can find in the source code of our test case application!
Conclusion
Although our script is a good start, it doesn’t and will never break all functions protected by OLLVM, because on one hand there are always particular cases depending on the target binary and the scripts have to be patched/hacked/improved accordingly. Also it relies on Miasm which can have some unsupported features we have to implement or report.
We tested this script on more complex functions, with loops for instance and it is working pretty well. But it does not handle particular cases, for example when a loop stop condition depends on an input parameter. It is difficult to handle because we have to deal with already encountered branches and quickly enter an infinite symbolic execution loop. In order to detect them, we have to do branches states differences to deduce the stop condition and continue symbolic execution normally.
The OLLVM project is really interesting and useful because it shows by the example how to manipulate LLVM in order to build your own obfuscator, which can support several CPU architectures. Compared to commercial closed-source protections, we have seen having access to the source code helps to break protections. But it also shows how strongly obfuscation relies on secrets: how the transformations are applied, on what rely transformations, how they are combined and so on. So, really, congrats to OLLVM team for exposing that.
Conversely to what many people believe, code obfuscation is REALLY difficult. It is not about forbidding access to the code and data, it is about buying time and thinking ahead of how one will break your layers of protection.
Thanks
OLLVM authors for their useful project
Fabrice Desclaux for the awesome Miasm framework
Camille Mougey for his contribution and help on Miasm
Ninon Eyrolles for her help and corrections
- 2019-10-16 Ios常用
layout: post
title: IPad微信协议
date: 2019-10-16
categories: tech
cydia 插件
add admin 可以降级app到任意版本,只要苹果的服务器上有
./debugserver -x auto *:10010 /var/mobile/Containers/Bundle/Application/EB02DC6D-EBE5-4BE8-92CE-B9ABE75B3C3E/WeChat.app/WeChat
微信就会被启动,通过下面lldb命令,程序停止在_dyld_start 处。_dyld_start是汇编函数,iOS逆向学习~UIKit框架的Mach-O文件查找 有提到dyld的事情,可以去lyld工程搜到_dyld_start函数
- 2019-08-21 Ipad微信协议
layout: post
title: IPad微信协议
date: 2019-08-21
categories: tech
环境及工具
XCode
Theos github上有
MonkeyDev github上有
代码签名 ldid 可以从brew安装
手机越狱 http://canijailbreak.com
usb端口映射 tcpreplay.py usbmux ipproxy
usbmuxd虽然目前最新的版本是1.1.0,但是1.1.0版本和1.0.9版本仅支持Linux系统,也就是说我们的Mac还是得下载v1.0.8的版本,下载地址(usbmuxd-v1.0.8)。下载完后,将下载的文件进行解压,内容如下所示:
dumpdecrypted 脱壳 http://liaogang.github.io/tech/2018/03/12/APP%E8%84%B1%E5%A3%B3.html
ipa安装 可以从pp助手上下载到脱壳的ipa ipainstaller console. github上用 , 还可以用monkey dev和app模板
cycript 注入app动态执行oc代码,打印数据 http://www.cycript.org 在cydia里安装,如果cydia的版本用不了。试下重签名,如果还是用不了,
IDA7.0 破解版
LLDB DebugServer 动态调试,lldb macOS自带。 debugserver手机里有. http://liaogang.github.io/tech/2018/02/03/iOS%E9%87%8C%E7%94%A8LLDB%E8%B0%83%E8%AF%95%E7%AC%AC%E4%B8%89%E6%96%B9App.html
class-dump 用于从二进制中导出头文件
runtime headers 查看各种版本的iOS系统头文件
logos语法
fishhook github上有
去掉安装app时的签名校验 https://github.com/angelXwind/AppSync
Reveal 破解版 https://www.waitsun.com/reveal-4-0.html
rvictl macOS 自带,远程虚拟接口工具, 把mac连接的手机映射成一个虚拟网卡用于抓包
应用程序包路径
沙盒路径: /var/mobile/Containers/Data/Application/8CF3DA4E-BF8E-4509-93D7-D131E12F7176
bundle路径: /var/containers/Bundle/Application/5044D35F-ECB1-4E00-872C-7805F8C14AD8/Aweme.app/Aweme
符号化Tweak里的bug http://liaogang.github.io/tech/2018/02/03/%E5%A6%82%E4%BD%95%E8%BF%BD%E6%9F%A5Tweak%E9%87%8C%E7%9A%84bug.html
如何添加新接口
CGI接口参数
1. 可以先开启xlogger查看mar 库的输出日志
 	2. 可以查看wechatNote的cgi.mm和cmdidlist.mm
ProtoBuf Request 及 Response 参数
- 导出Protobuf结构,在strings window中搜索关系字 GetQRCodeRequest(以
我的二维码接口为例.) 把整个ClassData拷过来。 一般类的成员变量顺序和protobuf的filed number是对应的。 可以通过charles来确认。
如果实在无法确认field number ,可以把数据从charles里导出来,拷到手机里去。 进入cycript动态反序列化。
data = [NSData dataWithConstentOfFile: @”/var/mobile/GetQRCodeRequest”]
r = [GetQRCodeRequest parseFromData: data]
再打印出相应字段 [r userName]
[r opCode]与charles的值作对比
-
在iPad中安装wechatSender HOOK,先在MyMsg中设置好代理端口,让请求经过charles
-
开启charles
-
开启后台web服务。可以用python -m SimpleHTTPServer 8880 或开启工程DynamicServer
LLDB调试
- 安装debugserver
-
在LLDB中插入python脚本sbr.py方便打印插入断点
-
- GDB to LLDB command map
资源
##bbs.iosre.com
##pewpewthespells.com
##NSBlog
Reverse Engineering Mac OS X
- 2019-07-12 密码学基础术语
DH 的变种——基于“椭圆曲线”的 ECDH
DH 算法有一个变种,称之为 ECDH(全称是“Elliptic Curve Diffie-Hellman”)。维基条目在“” 它与 DH 类似,差别在于: DH 依赖的是——求解“离散对数问题”的困难。 ECDH 依赖的是——求解“椭圆曲线离散对数问题”的困难。
RSADSAECDSA
◇概述
PSK 是洋文“Pre-Shared Key”的缩写。顾名思义,就是【预先】让通讯双方共享一些密钥(通常是【对称加密】的密钥)。所谓的【预先】,就是说,这些密钥在 TLS 连接尚未建立之前,就已经部署在通讯双方的系统内了。 这种算法用的不多,它的好处是: 1. 不需要依赖公钥体系,不需要部属 CA 证书。 2. 不需要涉及非对称加密,TLS 协议握手(初始化)时的性能好于前述的 RSA 和 DH。 更多介绍可以参见维基百科,链接在“”。
◇密钥协商的步骤
(由于 PSK 用的不多,下面只简单介绍一下步骤,让大伙儿明白其原理)
◇如何防范偷窥(嗅探)
使用这种算法,在协商密钥的过程中交换的是密钥的标识(ID)而【不是】密钥本身。 就算攻击者监视了全过程,也无法知晓密钥啥。
◇如何防范篡改(假冒身份)
PSK 可以单独使用,也可以搭配签名算法一起使用。 对于单独使用 如果攻击者篡改了协商过程中传送的密钥 ID,要么服务端发现 ID 无效(协商失败),要么服务端得到的 ID 与客户端不一致,在后续的通讯步骤中也会发现,并导致通讯终止。 (下一篇讲具体协议的时候会提到:协议初始化/握手阶段的末尾,双方都会向对方发送一段“验证性的密文”,这段密文用各自的会话密钥进行【对称】加密,如果双方的会话密钥不一致,这一步就会失败,进而导致握手失败,连接终止)
◇补充说明
PSK 与 RSA 具有某种相似性——既可以用来搞“密钥协商”,也可以用来搞“身份认证”。 所以,PSK 可以跟 DH(及其变种)进行组合。例如:DHE-PSK、ECDHE-PSK 关于 PSK 的更多细节,可以参见
- 2019-02-28 编写lldb python脚本来跟踪所有指令并记录寄存器的变动
layout: post
title: 编写LLDB Python脚本来跟踪所有指令并记录寄存器的变动
date: 2019-02-28
categories: tech
—
编写LLDB Python脚本来跟踪所有指令并记录寄存器的变动
动机: 反混淆一段OLLVM加密过的程序功能
https://github.com/zeroepoch/ibatlvl/blob/master/lldb-trace.py
https://opensource.apple.com/source/lldb/lldb-159/www/python-reference.html
https://lldb.llvm.org/python_reference/index.html
比如当前程序停止在这个地址:
(lldb) n
Process 4717 stopped
* thread #1, queue = 'com.apple.main-thread', stop reason = instruction step over
    frame #0: 0x0000000183468e54 libsystem_kernel.dylib`mach_msg + 72
libsystem_kernel.dylib`mach_msg:
->  0x183468e54 <+72>: cbz    w0, 0x183468ed8           ; <+204>
    0x183468e58 <+76>: tbnz   w24, #0x6, 0x183468e90    ; <+132>
    0x183468e5c <+80>: mov    w27, #0x10000000
    0x183468e60 <+84>: movk   w27, #0x7
Target 0: (Aweme) stopped.

--------------------------------------------------------
# disasm next instruction
lldb.frame = lldb.thread.GetSelectedFrame()
insn = lldb.target.ReadInstructions(lldb.frame.addr, 1)[0]
#指令的助记符
>>> insn.mnemonic
'cbz'
#指令的操作数
>>> insn.operands
'w0, 0x183468ed8'
我们把python做成一个命令asdf
    lldb.debugger.HandleCommand('command script add -f ls.ls ls')
        lldb.debugger.HandleCommand('br ')
- 2019-02-28 抖音参数加签算法
layout: post
title: 抖音参数加签算法
date: 2019-02-28
categories: tech
—
IOS debugserver with IDA
http://wiki.hawkguide.com/wiki/IOS_debugserver_with_IDA
Setup Scripts To Auto do ASLR
#!/usr/bin/python
#coding:utf-8

import lldb
import commands
import optparse
import shlex
import re


# 获取ASLR偏移地址
def get_ASLR():
    # 获取'image list -o'命令的返回结果
    interpreter = lldb.debugger.GetCommandInterpreter()
    returnObject = lldb.SBCommandReturnObject()
    interpreter.HandleCommand('image list -o', returnObject)
    output = returnObject.GetOutput();
    # 正则匹配出第一个0x开头的16进制地址
    match = re.match(r'.+(0x[0-9a-fA-F]+)', output)
    if match:
        return match.group(1)
    else:
        return None

# Super breakpoint
def sbr(debugger, command, result, internal_dict):

    #用户是否输入了地址参数
    if not command:
        print >>result, 'Please input the address!'
        return

    ASLR = get_ASLR()
    if ASLR:
        #如果找到了ASLR偏移,就设置断点
        debugger.HandleCommand('br set -a "%s+%s"' % (ASLR, command))
    else:
        print >>result, 'ASLR not found!'

def readReg(debugger, register, result, internal_dict):
    interpreter = lldb.debugger.GetCommandInterpreter()
    returnObject = lldb.SBCommandReturnObject()
    debugger.HandleCommand('register read ' + register, returnObject)
    output = returnObject.GetOutput()
    match = re.match(' = 0x(.*)', output)
    if match:
        print match.group(1)
    else:
        print "error: " + output

def readMem(debugger, address, result, internal_dict):
    debugger.HandleCommand('memory read --size 4 --format x --count 32 ' + address)

def connLocal(debugger, address, result, internal_dict):
    debugger.HandleCommand('platform select remote-ios')
    debugger.HandleCommand('process connect connect://localhost:2008')

# And the initialization code to add your commands
def __lldb_init_module(debugger, internal_dict):
    # 'command script add sbr' : 给lldb增加一个'sbr'命令
    # '-f sbr.sbr' : 该命令调用了sbr文件的sbr函数
    debugger.HandleCommand('command script add sbr -f sbr.sbr')
    debugger.HandleCommand('command script add readReg -f sbr.readReg')
    debugger.HandleCommand('command script add connLocal -f sbr.connLocal')
    debugger.HandleCommand('command script add readMem -f sbr.readMem')
    print 'The "sbr" python command has been installed and is ready for use.'
Objective-C Fast Enumeration 的实现原理
http://blog.leichunfeng.com/blog/2016/06/20/objective-c-fast-enumeration-implementation-principle/
IDA调试技巧
https://www.jianshu.com/p/c0afd9186610
Find_equal 出从何处
https://opensource.apple.com/source/libcpp/libcpp-19/include/__tree.auto.html
 {
        unsigned long sub_func = (_dyld_get_image_vmaddr_slide(0) + 0x101DA0CB4) ;
         NSLog(@"hook sub: founded: %p",sub_func);
         MSHookFunction((void)sub_func , (void)&sub_101DA0CB4_1,(void**)&sub_101DA0CB4_0);
  }
ARM Neon 指令 解释
https://zhuanlan.zhihu.com/p/27334213
http://shell-storm.org/armv8-a/ISA_v84A_A64_xml_00bet7/xhtml/ushll_advsimd.html
Deobfuscation: recovering an OLLVM-protected program
Sign extension and Zero extension in vmivl
https://en.wikipedia.org/wiki/Sign_extension
https://blog.csdn.net/lohiaufung/article/details/49205981
大端字节序:高位字节在前,低位字节在后,这是人类读写数值的方法
而一般ARM CPU也是Little-Endian
##
网络传输一般采用大端序,也被称之为
网络字节序
,或
网络序
。
IP
协议中定义大端序为网络字节序。
vmovl_high_s16
参数的意思为 high 将目标分为两半,只取目标为高位部分
S16 s: 符号扩展sign extension 16: 16bit to 32 bit
U8 u: zero extension , 8 :一个元素的位数. ,这里意思是把8位扩展到16位
IDA小技巧
左边窗口开一个IDA View 右边开一个Pseudocode点右键同步。
鼠标在伪代码里点到哪一行,左边就可以同步跳到哪一行了.
as 参数的逆向已经完成,接下来as生成mas的函数
抖音在mas函数使用了ollvm的Control Flow Flattening控制流平展模式和Bogus Control Flow控制流伪造模式进行混淆。
Obfuscator-LLVM在iOS中的实践
Deobfuscation: recovering an OLLVM-protected program
MIASM工程
Reverse engineering framework in Python
RE Tools
LLDB 调试,怎么在触发条件断点后添加事件并自动继续运行程序
比如断点触发后,需要打印x0的值
breakpoint modify –condition The breakpoint stops only if this condition expression evaluates to true.
breakpoint modify –auto-continue 1 设置自动继续
https://stackoverflow.com/questions/16345261/how-do-you-add-breakpoint-actions-via-the-lldb-command-line
(lldb) br com add 1
Enter your debugger command(s).  Type 'DONE' to end.
> p i
> bt
> DONE
Lldb 在aslr下断点保存到文件,怎样重新加载
使用sbr.py的sbr命令在lldb下断点, 0000000101F1A620为文件地址,就是从ida或hopper直接看到的地址, 把0000000101F1A620记为fAdr_a
(lldb) sbr 0000000101F1A620
Breakpoint 2: where = Aweme`std::__1::shared_ptr<Assimp::FBX::PropertyTable const> std::__1::shared_ptr<Assimp::FBX::PropertyTable const>::make_shared<Assimp::FBX::Element const&, std::__1::shared_ptr<Assimp::FBX::PropertyTable const>&>(Assimp::FBX::Element const&&&, std::__1::shared_ptr<Assimp::FBX::PropertyTable const>&&&) + 6405816, address = 0x0000000101fb2620
breakpoint write -f br.json
把断点保存到文件中.
[{"Breakpoint" : {"BKPTOptions" : {"AutoContinue" : false,"ConditionText" : "","EnabledState" : true,"IgnoreCount" : 0,"OneShotState" : false},"BKPTResolver" : {"Options" : {"AddressOffset" : 32581600,"ModuleName" : "","Offset" : 0},"Type" : "Address"},"Hardware" : false,"SearchFilter" : {"Options" : {},"Type" : "Unconstrained"}}}]
值32581600记为brJson_a
要自动加载只需要改动br.json 文件中的二个地方
- AddressOffset 一项 把原值加上常数C, C与ASLR无关, C只与文件相关,同一个程序的C值相同
C = fAdr_a - brJson_a
这个C值就是section offset
- ModuleName一项改为”Aweme”
lldb read breakpoint 的bug ,如果breakpoint下面没有”ConditionText” : ““会报错。需要手动加上.
- 2019-02-28 ida恢复堆栈平衡
IDA的反编译F5有时会报错 positive sp value has been found
原因是检测到sp被打乱了.
在菜单 Option->通用->选中 显示 stack pointer
__text:0000000102742C0C 060                 ADD             SP, SP, #0x743
__text:0000000102742C10 -6E3                MOV             W8, #0x25F7
__text:0000000102742C14 -6E3                MOVK            W8, #0x8CA2,LSL#16
__text:0000000102742C18 -6E3                STUR            W8, [X29,#var_20]
__text:0000000102742C1C -6E3                B               loc_102742CAC
选中ADD SP, SP这行,右键菜单change stack pointer之后
把值改成
改成0即,按确定,ida刷新之后可以看到sp值变成一样的了.
也就是说__text:0000000102742C0C 060 ADD SP, SP, #0x743这行代码破坏了平衡
The graph is too big (more than 1000 nodes) to be displayed on the screen.
Switching to text mode.
(you can change this limit in the graph options dialog)
- 2018-09-26 清除iOS app的系统隐私记录
How to reset iOS App’s System Privacy
环境
iOS9.2
动机
怀疑抖音对小号的机器审核算法里有包含这个权限的探针。需要重置抖音app的权限,相册,相机,microphone, wifi , celluar等
临床表现
未安装过抖音的第一次找开app时,iOS会出现一个弹框向用户提示是否受权, 而已安装过抖音的,则会提示用户此权限已完毕,需要用户手动去Preferences里去打开开关。
分析步骤
开始分析界面, 在Reveal里打开Preferences抖音的权限设置页面,里看到PSAppListController里有一个属性,相册的一项对应为PSSystemPolicyForApp。 再看它的一个属性\t_properties (NSMutableDictionary*): <__NSDictionaryM: 0x14f489800> 打印这个字典,显示为
@{"iconImage":#"<UIImage: 0x14f0c4b30>, {29, 29}","enabled":true,"value":true,"service":"kTCCServicePhotos"}
kTCCServicePhotos这个应该是关键,用ldid看Prefercences的授权字段,发现二个有点关系的字段
	<key>com.apple.private.tcc.allow</key>
	<array>
		<string>kTCCServiceAddressBook</string>
		<string>kTCCServicePhotos</string>
		<string>kTCCServiceCalendar</string>
		<string>kTCCServiceReminders</string>
		<string>kTCCServiceCamera</string>
		<string>kTCCServiceWillow</string>
		<string>kTCCServiceMicrophone</string>
	</array>
	<key>com.apple.private.tcc.manager</key>
	<true/>
这个tcc应该就是管理app授权的库了。基数据应该是跟keychain一样用sqlite的方式储存在系统的哪个地方。
把事先准备好的iOS92版本的dyld_shared_cache拖到hopper里,果然找到kTCCServicePhotos了这个字段。
在TCC.framework里没找到什么线索,用find命令搜到了他的sqlite文件.
iPhone-15:/ root# find . -name 'TCC'
./private/var/mobile/Library/TCC
用scp拷到电脑上来,用SQL Pro打开发现里面access表里就有我们想要找的字段。
| service |
client |
client_type |
allowed |
prompt_count |
| kTCCServicePhotos |
com.ss.iphone.ugc.Aweme |
0 |
0 |
0 |
| kTCCServiceCamera |
com.ss.iphone.ugc.Aweme |
0 |
0 |
1 |
那只要删掉对应的字段就算是清空了记录了.
delete from access where client = 'com.ss.iphone.ugc.Aweme'
保存下再拷回去试试. 备份,把原TCC.db改成TCC.db_backup, 再就是注意文件的权限是mobile:mobile
chown mobile:mobile TCC.db
找到相应的服务重启一下
iPhone-15:/ root# ps -e|grep TCC
 9205 ??         0:07.34 /System/Library/PrivateFrameworks/TCC.framework/tccd
20145 ttys000    0:00.00 grep TCC
找到 lanchd 对应的加载项重启
iPhone-15:/private/var/mobile/Library/TCC root# cd /System/Library/LaunchDaemons/
iPhone-15:/System/Library/LaunchDaemons root# ls -l|grep tcc
-rw-r--r-- 1 root wheel   562 May  4  2016 com.apple.tccd.plistl
iPhone-15:/System/Library/LaunchDaemons root# launchctl unload -w com.apple.tccd.plist
iPhone-15:/System/Library/LaunchDaemons root# launchctl load -w com.apple.tccd.plist
测试
重新打开Preferences发现,相应的项果然不见了,重新打开抖音,点击保存至相册,也弹出了第一次使用相册一样的提示。说明整个修改是正确的。
使用优化
接下来就做成服务以供客户程序调用就可以了.
- 2018-09-19 iOS11以下获取局域网mac address
##
#define BUFLEN (sizeof(struct rt_msghdr) + 512)
#define SEQ 9999
#define RTM_VERSION	5	// important, version 2 does not return a mac address!
#define RTM_GET	0x4	// Report Metrics
#define RTF_LLINFO	0x400	// generated by link layer (e.g. ARP)
#define RTF_IFSCOPE 0x1000000 // has valid interface scope
#define RTA_DST	0x1	// destination sockaddr present

+(NSString)ip2mac: (NSString)strIP {

    const char *ip = [strIP UTF8String];

    int sockfd;

    unsigned char buf[BUFLEN];

    unsigned char buf2[BUFLEN];

    ssize_t n;

    struct rt_msghdr *rtm;

    struct sockaddr_in *sin;

    memset(buf,0,sizeof(buf));

    memset(buf2,0,sizeof(buf2));


    //17,3

    sockfd = socket(AF_ROUTE, SOCK_RAW, 0);

    //PF_INET6;


    rtm = (struct rt_msghdr *) buf;

    rtm->rtm_msglen = sizeof(struct rt_msghdr) + sizeof(struct sockaddr_in);

    rtm->rtm_version = RTM_VERSION; //5

    rtm->rtm_type = RTM_GET; //4

    rtm->rtm_addrs = RTA_DST; //1

    rtm->rtm_flags = RTF_LLINFO; //1024

    rtm->rtm_pid = 1234;

    rtm->rtm_seq = SEQ;


    sin = (struct sockaddr_in *) (rtm + 1);

    sin->sin_len = sizeof(struct sockaddr_in);

    sin->sin_family = AF_INET;

    sin->sin_addr.s_addr = inet_addr(ip);


    int iiii = rtm->rtm_msglen;


    //len 108

    write(sockfd, rtm, rtm->rtm_msglen);


    int iii = BUFLEN;


    n = read(sockfd, buf2, BUFLEN);

    close(sockfd);


    if (n != 0) {

        int index =  sizeof(struct rt_msghdr) + sizeof(struct sockaddr_inarp) + 8;

        // savedata("test",buf2,n);

        NSString *macAddress =[NSString stringWithFormat:@"%2.2x:%2.2x:%2.2x:%2.2x:%2.2x:%2.2x",buf2[index+0], buf2[index+1], buf2[index+2], buf2[index+3], buf2[index+4], buf2[index+5]];

        //If macAddress is equal to 00:00.. then mac address not exist in ARP table and returns nil. If it retuns 08:00.. then the mac address not exist because it's not in the same subnet with the device and return nil

        if ([macAddress isEqualToString:@"00:00:00:00:00:00"] ||[macAddress isEqualToString:@"08:00:00:00:00:00"] ) {

            return nil;

        }

        return macAddress;

    }

    return nil;

}
- 2018-08-11 iOS私有接口归档.md
Message.framework
-[MFNetworkController wifiManager]
打开别的app
[[LSApplicationWorkspace defaultWorkspace] openApplicationWithBundleID:@”AWZ”];
- 2018-08-09 lldb总结
debugserver *:12345 -a "Aweme"
tcprelay.py -t 12345:12345


process connect connect://127.0.0.1:12345
po [MMServiceCenter _shortMethodDescription]
b 0x100bd04f0


backtrace all
backtrace //Show the stack backtrace for the current thread
bt

next
step in
continue
finish

//基地址
(lldb) image list -o -f Aweme
[  0] 0x0000000000080000 /var/mobile/Containers/Bundle/Application/5CC411F6-166D-439F-8001-577BC4CA99FB/Aweme.app/Aweme(0x0000000100080000)


breakpoint list
breakpoint help

process interrupt


register read/x
po $x1


Read memory from address 0xbffff3c0 and show 4 hex uint32_t values.
(gdb) x/4xw 0xbffff3c0
	(lldb) memory read --size 4 --format x --count 4 0xbffff3c0
(lldb) me r -s4 -fx -c4 0xbffff3c0
(lldb) x -s4 -fx -c4 0xbffff3c0

LLDB now supports the GDB shorthand format syntax but there can't be space after the command:
(lldb) memory read/4xw 0xbffff3c0
(lldb) x/4xw 0xbffff3c0
(lldb) memory read --gdb-format 4xw 0xbffff3c0
https://lldb.llvm.org/lldb-gdb.html
打印.
(lldb) thread backtrace
(lldb) bt
10分钟入门arm64汇编
http://blackteachinese.com/2017/07/12/arm64/
/System/Library/CoreServices/SystemVersion.plist
https://www.theiphonewiki.com/wiki//System/Library/CoreServices/SystemVersion.plist
从lldb 中动态追踪调用
0x1009E5750
address - image base = ida_file_address
- 2018-07-06 关于 NSInvocation 和 Hook Objc Block
怎样取得一个nsblock的返回类型,参数? 函数签名
怎样动态替换这个nsblock指向的函数?
使用 未公开的接口 l2tp ,在ios9,10里面可以成功。在ios8里面不能成功,
ios8里,程序把生成的配置文件,序列化之后发给相应的xpc服务,被xpc service拒绝。
但是在preferences又可以生成相应的配置,成功保存。
可能的原因: 1. entitlements权限不够?
- 再就要具体分析发送的数据了 。
要把os_xpc_object打印出来,
https://developer.apple.com/documentation/xpc/xpc_services_xpc.h?language=objc
_xpc_copy_description

 xpc_dictionary_set_data

 xpc_dictionary_set_int64(r0, "config-operation", 0x3);

nskeyedarchiver  initforwritingwithmutabledata

[r0 setrequiressecurecoding:0x1];

 r4 = [[nsstring stringwithutf8string:"config-object"] retain];

 [r0 encodeobject:*(r11 + 0x18) forkey:r4];


 [r0 finishencoding];

r0 = xpc_dictionary_create(0x0, 0x0, 0x0);
不是权限问题,数据也是一样的,在自己的app里不行,在preferences可以保存。
看样子,要分析一下xpc servcier 实现才行。
问题: 怎么找到对应的xpc service呢
xpc的数据最终是由nehelper发出去的。从nehelper分析起
nehelper里有一个单例
-[nehelper connection]()

stack[2024] = xpc_connection_create_mach_service("com.apple.nehelper", *(stack[2025] + *0x2fe2feac), 0x2);
从这个可看到远端服务的名字叫 com.apple.nehelper
``
the name of the remote service with which to connect. the service name must exist in a mach bootstrap that is accessible to the process and be advertised in a launchd.plist.
在/library/launchdaemons发现一个文件com.apple.nehelper.plist
文件里果然有machservices一项,值为com.apple.nehelper
program一项的值为 /usr/libexec/nehelper
用ldid 看它的权限
<?xml version="1.0" encoding="utf-8"?>

<!doctype plist public "-//apple//dtd plist 1.0//en" "http://www.apple.com/dtds/propertylist-1.0.dtd">

<plist version="1.0">

<dict>

    <key>com.apple.systemconfiguration.scpreferences-write-access</key>

    <array>

        <string>vpn-com.apple.neplugin.ikev2.plist</string>

    </array>

    <key>com.apple.managedconfiguration.vpn-profile-access</key>

    <true/>

    <key>com.apple.private.neconfiguration-write-access</key>

    <true/>

    <key>com.apple.private.necp.match</key>

    <true/>

    <key>com.apple.private.necp.policies</key>

    <true/>

    <key>com.apple.private.nehelper.privileged</key>

    <true/>

    <key>keychain-access-groups</key>

    <array>

        <string>apple</string>

        <string>com.apple.identities</string>

        <string>com.apple.certificates</string>

    </array>

</dict>

</plist>
果然有写vpn配置的权限。用hopper打开分析分析看它接受信息的部分.
应该就是nehelperserver 这个类了
先用knhook 来hook一个这个类,打印它的信息看看
sub_d118
sub_d118
-[nehelperconfigurationmanager saveconfigurationtoprofile:] 这个方法失败了
void * -[nehelperconfigurationmanager saveconfigurationtoprofile:](void * self, void * _cmd, void * arg2) {
    r7 = (sp - 0x14) + 0xc;
    sp = sp - 0x3c;
    r10 = self;
    r6 = [arg2 retain];
    r5 = [[arg2 payloadinfo] retain];
    r7 = r7;
    r8 = [[r5 profileuuid] retain];
    [r5 release];
    r4 = [arg2 copyprofiledictionary];
    [r6 release];
    if (r4 != 0x0) {
            stack[2037] = r10;
            r7 = r7;
            r11 = [[nspropertylistserialization datawithpropertylist:r4 format:0xc8 options:0x0 error:sp + 0x18, stack[2035]] retain];
            r0 = 0x0;
            if (r11 != 0x0) {
                    stack[2035] = r4;
                    stack[2036] = r8;
                    r8 = [r0 retain];
                    r10 = [[mcprofileconnection sharedconnection] retain];
                    r4 = [[stack[2037] bundleid] retain];
                    stack[2038] = r8;
                    r1 = @selector(queuefiledataforacceptance:originalfilename:forbundleid:outerror:);
                    r0 = r10;
                    asm { strd       r4, r5, [sp, #0x34 + var_34] };
                    r6 = [objc_msgsend(r0, r1) retain];
                    r5 = [stack[2038] retain];
                    [r8 release];
                    [r4 release];
                    [r10 release];
                    if (r5 == 0x0) {
                            r8 = stack[2036];
                            r4 = stack[2035];
                            if (r6 != 0x0) {
                                    if (r8 != 0x0) {
                                            [nehelperconfigurationmanager addpendingingestionprofileuuid:r8];
                                            [nehelperconfigurationmanager addpendingingestionprofileuuid:r8];
                                    }
                                    [nehelperconfigurationmanager addpendingingestionprofileuuid:r6];
                                    r5 = 0x0;
                            }
                    }
                    else {
                            r8 = stack[2036];
                            r4 = stack[2035];
                    }
            }
            else {
                    r6 = 0x0;
                    r11 = [r0 retain];
                    r5 = [[stack[2037] clientname] retain];
                    nelogobjc();
                    [r11 release];
                    [r5 release];
                    r5 = [[nserror errorwithdomain:@"neconfigurationerrordomain" code:0x8 userinfo:r6] retain];
                    r11 = 0x0;
            }
    }
    else {
            r4 = [[r10 clientname] retain];
            nelogobjc();
            [r4 release];
            r4 = 0x0;
            r5 = [[nserror errorwithdomain:@"neconfigurationerrordomain" code:0x8 userinfo:r4] retain];
            r6 = 0x0;
            r11 = 0x0;
    }
    [r8 release];
    [r6 release];
    [r4 release];
    [r11 release];
    r0 = r5;
    r0 = [r0 autorelease];
    return r0;
}
根据之前的报错 not saved: error domain=neconfigurationerrordomain code=8 “invalid configuration operation request” userinfo=0x17a9d480 {nslocalizeddescription=invalid configuration operation request}
定位是在这个方法里哪条路径上报出的.
- 2018-06-26 NAT打洞的简单实现
https://tools.ietf.org/html/rfc4787
http://www.52im.net/thread-542-1-1.html
实现基于TCP协议的P2P打洞过程中,最主要的问题不是来自于TCP协议,而是来自于应用程序的API接口。这是由于标准的伯克利(Berkeley)套接字的API是围绕着构建客户端/服务器程序而设计的,API允许TCP流套接字通过调用connect()函数来建立向外的连接,或者通过listen()和accept函数接受来自外部的连接,但是,API不提供类似UDP那样的,同一个端口既可以向外连接,又能够接受来自外部的连接。而且更糟的是,TCP的套接字通常仅允许建立1对1的响应,即应用程序在将一个套接字绑定到本地的一个端口以后,任何试图将第二个套接字绑定到该端口的操作都会失败。
为了让TCP“打洞”能够顺利工作,我们需要使用一个本地的TCP端口来监听来自外部的TCP连接,同时建立多个向外的TCP连接。幸运的是,所有的主流操作系统都能够支持特殊的TCP套接字参数,通常叫做“SO_REUSEADDR”,该参数允许应用程序将多个套接字绑定到本地的一个地址二元组(只要所有要绑定的套接字都设置了SO_REUSEADDR参数即可)。BSD系统引入了SO_REUSEPORT参数,该参数用于区分端口重用还是地址重用,在这样的系统里面,上述所有的参数必须都设置才行。
stun.freeswitch.org
Nat with Independend Mapping and Port Dependent Filter -
VoIP will work with STUN
Does not preserve port number
Supports hairpin of media
Public IP address: 175.11.210.9
- 2018-06-20 usbmuxd
https://www.theiphonewiki.com/wiki/Usbmux
Ituns与iphone的通信协议usbmuxd解析 https://blog.csdn.net/leonpengweicn/article/details/8585857
https://github.com/libimobiledevice/usbmuxd
https://github.com/rsms/peertalk
- 2018-06-20 usbmuxd
https://www.theiphonewiki.com/wiki/Usbmux
Ituns与iphone的通信协议usbmuxd解析 https://blog.csdn.net/leonpengweicn/article/details/8585857
https://github.com/libimobiledevice/usbmuxd
https://github.com/rsms/peertalk
- 2018-06-15 Socks5 Over Websocket
- 2018-06-14 机器学习
https://github.com/exacity/deeplearningbook-chinese
https://exacity.github.io/deeplearningbook-chinese/
- 2018-06-14 iOSRE资源
- 2018-05-23 iOS8 Undocument VPN API
IPA里的neagentdataprovider.vpnplugin,在iOS安装app时会被拷到 一个另外的目录里面去。
neagent 会加载并执行此mach o dylib
installd 会打印出一条消息显示到相应目录.
0x3d81000 -[MIContainer makeContainerLiveReplacingContainer:withError:]: Made container live for com.cisco.anyconnect.applevpn.plugin at /private/var/mobile/Containers/Data/VPNPlugin/BD579B95-919D-42D5-B135-916C6BB2522F
0x3d81000 -[MIContainer makeContainerLiveReplacingContainer:withError:]: Made container live for com.cisco.anyconnect.applevpn.plugin at /private/var/mobile/Containers/Bundle/VPNPlugin/1BB13068-41D9-4FE2-BE70-B071492F5732
/private/var/mobile/Containers/Bundle/VPNPlugin/1BB13068-41D9-4FE2-BE70-B071492F5732
iOS Tun 网卡数据的流动
https://blog.csdn.net/naipeng/article/details/54972404
_Unwind_SjLj_Register
I believe it is exception handling. The problems mostly come up when people try to link to a C++ library built in a different compiler.
objc_sync_enter
objc_sync_exit
@synchronized
dyld: lazy symbol binding failed: Symbol not found: _NEVirtualInterfaceSetReadMultipleIPPacketsHandler
Referenced from: /var/mobile/Containers/Bundle/VPNPlugin/1BB13068-41D9-4FE2-BE70-B071492F5732/AnyConnectDataAgent.vpnplugin/AnyConnectDataAgent
Expected in: /System/Library/Frameworks/NetworkExtension.framework/NetworkExtension
- 2018-05-16 逆向微信相关
微信一些关键的interface在class-dump里面看不到
但是在cycript里面可以动态的打印出来
- 2018-05-16 iOS App Entitlement
授权钥匙指南
(Apple 参考文档)[https://developer.apple.com/library/content/documentation/Miscellaneous/Reference/EntitlementKeyReference/Chapters/AboutEntitlements.html]
(iOS Code Signing 学习笔记)[http://foggry.com/blog/2014/10/16/ios-code-signing-xue-xi-bi-ji/]
授权颁发决定了iOS或macOS app 有哪些权力来执行特定iOS功能或安全许可
通常这个一个xml文件。 比如你在Xcode中的Capabilities中开启了Network Extensions的功能时,它会帮你在项目中自动生成一个xxx.entitlements文件
<?xml version=”1.0” encoding=”UTF-8”?>
<!DOCTYPE plist PUBLIC “-//Apple//DTD PLIST 1.0//EN” “http://www.apple.com/DTDs/PropertyList-1.0.dtd”>
com.apple.developer.networking.networkextension
app-proxy-provider
content-filter-provider
packet-tunnel-provider
在 iOS 上你的应用能做什么依然是沙盒限制的,这些限制大多情况下都由授权文件(entitlements)来决定。授权机制决定了哪些系统资源在什么情况下允许被一个应用使用,简单的说它就是一个沙盒的配置列表。
运行如下命令1:
codesign -d --entitlements - Example.app
在 Xcode 的 Capabilities 选项卡下选择一些选项之后,Xcode 就会生成这样一段 XML。 Xcode 会自动生成一个 .entitlements 文件,然后在需要的时候往里面添加条目。当构建整个应用时,这个文件也会提交给 codesign 作为应用所需要拥有哪些授权的参考。这些授权信息必须都在开发者中心的 App ID 中启用,并且包含在后文介绍的描述文件中。在构建应用时需要使用的授权文件可以在 Xcode build setting 中的 code signing entitlements中设置。
#import “dlfcn.h”
typedefint (*MobileInstallationInstall)(NSString *path, NSDictionary *dict, void *na, NSString *path2_equal_path_maybe_no_use);
m文件
- (int)IPAInstall:(NSString *)path
{
void *lib = dlopen(“/System/Library/PrivateFrameworks/MobileInstallation.framework/MobileInstallation”, RTLD_LAZY);
if (lib)
{
MobileInstallationInstall pMobileInstallationInstall = (MobileInstallationInstall)dlsym(lib, “MobileInstallationInstall”);
if (pMobileInstallationInstall){
int ret = pMobileInstallationInstall(path, [NSDictionarydictionaryWithObject:@”User”forKey:@”ApplicationType”], nil, path);
dlclose(lib);
return ret;
}
}
return -1;
}
##Xcode 跳过代码签名
/Applications/Xcode.app/Contents/Developer/Platforms/iPhoneOS.platform/Developer/SDKs/iPhoneOS5.1.sdk/SDKSettings.plist
CODE_SIGNING_REQUIRED
#!/bin/sh

# WARNING: You may have to run Clean in Xcode after changing CODE_SIGN_IDENTITY!

# Verify that $CODE_SIGN_IDENTITY is set
if [ -z "$CODE_SIGN_IDENTITY" ] ; then
    echo "CODE_SIGN_IDENTITY needs to be non-empty for codesigning frameworks!"

    if [ "$CONFIGURATION" = "Release" ] ; then
        exit 1
    else
        # Codesigning is optional for non-release builds.
        exit 0
    fi
fi

SAVEIFS=$IFS
IFS=$(echo -en "\n\b")

FRAMEWORK_DIR="${TARGET_BUILD_DIR}/${FRAMEWORKS_FOLDER_PATH}"

# Loop through all frameworks
FRAMEWORKS=`find "${FRAMEWORK_DIR}" -type d -name "*.framework" | sed -e "s/\(.*\)/\1\/Versions\/A\//"`
RESULT=$?
if [[ $RESULT != 0 ]] ; then
    exit 1
fi

echo "Found:"
echo "${FRAMEWORKS}"

for FRAMEWORK in $FRAMEWORKS;
do
    echo "Signing '${FRAMEWORK}'"
    `codesign -f -v -s "${CODE_SIGN_IDENTITY}" "${FRAMEWORK}"`
    RESULT=$?
    if [[ $RESULT != 0 ]] ; then
        exit 1
    fi
done

# restore $IFS
IFS=$SAVEIFS

#Save it to a file in your project.
#Mine is called codesign-frameworks.sh.
#Add a “Run Script” build phase right after your “Copy Embedded Frameworks” build phase.
#You can call it “Codesign Embedded Frameworks”.
#Paste ./codesign-frameworks.sh (or whatever you called your script above) into the script editor text field.
#Build your app. All bundled frameworks will be codesigned.
#Updated 2012-11-14: Adding support for frameworks with special characters in their name (this does not include single quotes) to “codesign-frameworks.sh”.
#Updated 2013-01-30: Adding support for special characters in all paths (this should include single quotes) to “codesign-frameworks.sh”.
#Improvements welcome!
# from http://stackoverflow.com/questions/7697508/how-do-you-codesign-framework-bundles-for-the-mac-app-store
- 2018-05-16 Cycript高级技巧
Cycript高级技巧
https://www.jianshu.com/p/fbb824c285d0
http://iphonedevwiki.net/index.php/Cycript_Tricks
function printMethods(className, isa) {
var count = new new Type(“I”);
var classObj = (isa != undefined) ? objc_getClass(className).constructor : objc_getClass(className);
var methods = class_copyMethodList(classObj, count);
var methodsArray = [];
for(var i = 0; i < *count; i++) {
var method = methods[i];
methodsArray.push({selector:method_getName(method), implementation:method_getImplementation(method)});
}
free(methods);
return methodsArray;
}
cy# printMethods(“MailboxPrefsTableCell”)
[{selector:@selector(layoutSubviews),implementation:0x302bf2e9},{selector:@selector(setCurrentMailbox:),implementation:0x302bee0d},…
cy#
- 2018-05-15 iOS系统私有功能
开关系统当前VPN
设置app,从Reveal可以看到,VPN设置页面当前ViewController 是VPNController
VPNController 是属于 /System/Library/PreferenceBundles/VPNPreferences.bundle/VPNPreferences
可以看到此Bundle里的文件如下:
PSHeaderFooterView.h
UIAlertViewDelegate.h
UIApplicationDelegate.h
VPNBundleController.h
VPNCiscoImageHeader.h
VPNConnection.h
VPNConnectionStore.h
VPNController.h
VPNPreferences-Structs.h
VPNPreferences-Symbols.h
VPNPreferences.h
VPNPrimaryTableCell.h
VPNSetupController.h
VPNSetupListController.h
VPNSetupTableCell.h
VPNTableCell.h
VPNToggleCell.h
初步推测
VPNConnection.h
VPNConnectionStore.h
VPNController.h
VPNBundleController.h 这几个文件是比较重要的。
最终发现VPNConnectionStore里有我们想要的功能。
还有一个方便的sharedInstance单例,太明显了.
用cycript折腾了一小段时间之后终于锁定两组个我们需要的方法。
@interface VPNConnectionStore : NSObject
+(id)sharedInstance;
-(VPNConnection *)currentConnectionWithGrade:(unsigned long long)arg1 ;//经实际测试,这个参数传0就可以了
@end


@interface VPNConnection : NSObject
-(BOOL)connected;
-(BOOL)disconnected;
-(void)connect;
-(void)disconnect;
-(void)setEnabled:(BOOL)arg1 ;
-(BOOL)enabled;
@end
从SpringBoard里动态加载系统私有库
直接用dlopen就可以了
    dlopen("/System/Library/PreferenceBundles/VPNPreferences.bundle/VPNPreferences",RTLD_NOW);

   VPNConnectionStore* _vpnStore =  [NSClassFromString(@"VPNConnectionStore") sharedInstance];
这些私有库是放在dyld_shared_cache里的。
关于Dyld_shared_cache的两个链接
www.theiphonewiki.com
iphonedevwiki.net
自动连接指定WiFi
    dlopen("/System/Library/PreferenceBundles/AirPortSettings.bundle/AirPortSettings",RTLD_NOW);

    WiFiManager
- 2018-05-04 Cisco Anyconnect
HomeViewController
bundleid: “com.cisco.anyconnect.gui”
the vpn plugin is loaded by neagent
- 2018-04-14 ios的app组织成deb包安装到用户空间
ios app制作成debian安装包有二种方法:
第一种,参考[iOS App转换为deb格式],这种方法有几个缺点
- 即安装目录在
/Applications下面,占用系统分区的空间
- 各种dylib找不到frameworks的问题
- 再就是appex和app不能通过app group来共享数据
第二种,把app制作成ipa,通过IPA installer cmd 来安装。
- IPAInstaller是通过系统的安装入口来安装app的
app制作成ipa的步骤:
新建Payload文件夹,放入demo.app,压缩Payload成zip包。改名Payload.zip成demo.ipa
	 ipainstaller /var/mobile/Media/SimpleTunnel.ipa
	 ipainstaller -u com.abuyun.http.tunnel
- 2018-04-14 cydia源里debian包的自动更新
- 2018-04-09 IOS App转换为deb格式及获取ROOT权限
debian 文件组织格式为
/Applications/SimpleTunnel.app/
/DEBIAN/control
/DEBIAN/postinst
使用手机里的dpkg-deb 命令打包 (手机设备本来环境与目标安装环境一致)
先修改几个程序文件的属性
chmod 755 DEBIAN/*
chmod 755 Applications/SimpleTunnel.app/PlugIns/PacketTunnel.appex/PacketTunnel
chmod 755 Applications/SimpleTunnel.app/SimpleTunnel
生成deb
dpkg-deb -b deb/ com.abuyun.ios.deb
修改app的运行权限为ROOT
-
修改Info.plist里面的Executable file键值指向脚本fake文件
fake脚本指向原来的主程序执行文件
 #!/bin/bash
 root=$(dirname "$0")
 exec "${root}"/SimpleTunnel
-
在postinst中
  chmod 0775 fake
  chown root:wheel SimpleTunnel
  chmod 6775 SimpleTunnel
-
main() function add setuid(0)
 if (setuid(0) == 0 && setgid(0) == 0)
 {
     NSLog(@"提权成功.");
 }
 else{
     NSLog(@"提权失败");
 }
- 2018-04-01 Network Extension相关
AppEx attach to debug
    dispatch_after(dispatch_time(DISPATCH_TIME_NOW, (int64_t)( 10 * NSEC_PER_SEC)), dispatch_get_main_queue(), ^{


    NEPacketTunnelProviderEx* weakself = self;

    weakself.inner = [PacketTunnelProvider new];
    [weakself.inner startTunnelWithOptions:options completionHandler:completionHandler];

    });
{
“lo0/ipv4” = “127.0.0.1”;
“lo0/ipv6” = “fe80::1”;
“pdp_ip0/ipv4” = “10.132.76.168”;
“utun0/ipv6” = “fe80::72c3:e25e:da85:b730”;
}
{
““awdl0/ipv6”” = ““fe80::c018:9fff:feb2:988””;
““en0/ipv6”” = ““fe80::181a:2e43:f91b:db2b””;
““lo0/ipv4”” = ““127.0.0.1””;
““lo0/ipv6”” = ““fe80::1””;
““pdp_ip0/ipv4”” = ““10.48.10.210””;
““utun0/ipv4”” = ““192.168.99.2””;
}
{
“lo0/ipv4” = “127.0.0.1”;
“lo0/ipv6” = “fe80::1”;
“pdp_ip0/ipv4” = “10.49.187.23”;
“utun0/ipv6” = “fe80::5748:5b5d:2bf0:658d”;
“utun1/ipv4” = “192.168.99.2”; //the real one
}
Not all utun interfaces are for VPN. There are other OS features that use utun interfaces.
#define IOS_CELLULAR @”pdp_ip0”
#define IOS_WIFI @”en0”
//#define IOS_VPN @”utun0”
#define IP_ADDR_IPv4 @”ipv4”
#define IP_ADDR_IPv6 @”ipv6”
lo 回环接口(loop back) 或者 本地主机(localhost)
gif 通用 IP-in-IP隧道(RFC2893)
stf 6to4连接(RFC3056)
en 以太网或802.11接口
fw IP over FireWire(IEEE-1394), macOS特有
p2p Point-to-Point 协议
awdl airdrop peer to peer(一种mesh network), apple airdrop设备特有
bridge 第2层桥接
vlan 虚拟局域网络
pdp_ip 蜂窝数据连接
utn0 vpn
在VPN连上之后可以看到地址为192.168.2.2
"awdl0/ipv6" = "fe80::e0fd:3fff:feb0:a707";
"en0/ipv4" = "192.168.3.4";
"en0/ipv6" = "fe80::1cc3:2d4d:cbbb:ab46";
"en2/ipv4" = "169.254.210.227";
"en2/ipv6" = "fe80::84a:88fa:c305:94ea";
"lo0/ipv4" = "127.0.0.1";
"lo0/ipv6" = "fe80::1";
"pdp_ip0/ipv4" = "10.119.118.86";
"utun0/ipv6" = "fe80::9c52:3706:6eda:ac27";
"utun1/ipv4" = "192.168.2.2";
nw_network_agent_add_to_interface_internal Successfully added agent to “utun1”
ps -aux
debug root 运行 进程 attach process
simpleserver 绑定的接口 utun 发出的dns没有得到回应
https://forums.developer.apple.com/thread/69962
mac os 端口 转发
NEProxySettings *proxy = [NEProxySettings new];
proxy.autoProxyConfigurationEnabled = YES;
proxy.proxyAutoConfigurationJavaScript = [dymain pacSource];
proxy.excludeSimpleHostnames = true;
proxy.matchDomains = @[@""];
networkSettings.proxySettings = proxy;

    networkSettings.IPv4Settings = [[NEIPv4Settings alloc] initWithAddresses:@[@"192.169.89.1"]  subnetMasks:@[@"255.255.255.0"]];
“utun0/ipv6” = “fe80::9c52:3706:6eda:ac27”; //对应ipv6settings
“utun1/ipv4” = “192.168.2.2”; //对应ipv4settings的地址
includedRoutes 匹配到这个数组的routes 将会routed through VPN 对应的虚拟接口,这里为utun1
excludedRoutes, 将会送到设备当前的主物理接口,wifi和cellar
NEIPv4Route.default() 为 0.0.0.0
AppEx 里所依赖的库最好是以lib.a的形式,要不就添加到App的 Embeddeb binaries里。
使用charles 的socks代理时,最好把 http over socks关了
使用ProjectName-Swift.h
Project Defines modual 设置为YES,XCODE自动为swift生成x-Swift.h头文件。
targetManager.connection as? NETunnelProviderSession 来传消息sendProviderMessage 到provider
一个沙箱账号只能用在一台机器上
xcode9 的 attach process 可以调试appex
/private/etc/apt/sources.list.d/wl.list
iOS的OpenSSH 也是建立在tun网络接口上
https://github.com/openssh/openssh-portable/blob/master/README.tun
如果ios8里也能够添加vpn,那他也是创建了一块tun接口。
只是没有开放成IOS9里面的vpn组件而已。
/usr/libexec/nehelper checkInterfaceSettings checking interface settings for (
utun1
)
configd : Data too large for ProxyAgent-@utun1 (1145 bytes)!
NEHelperConfigurationManager initWithConnection
value1:OS_xpc_connection–><OS_xpc_connection: <connection: 0x10042b6b0> { name = com.apple.nehelper (peer), listener = false, pid = 28172, euid = 0, egid = 0, asid = 0 }>
28172 就是simpleTunnel
-(BOOL) NEHelperConfigurationManager loadedConfigurationExists:newConfiguration:(have 2 value)
return:0
value1:(null)–>(null)
value2:NEConfiguration–>{
name = 阿布云
identifier = C8572552-37E9-4AA2-89FC-5901E26CD51E
applicationName = 手机隧道
application = com.abuyun.http.tunnel
grade = 1
VPN = {
enabled = YES
onDemandEnabled = NO
protocol = {
type = plugin
identifier = C2144B23-D00C-4138-B209-01DC87D1FE8A
serverAddress = socks服务器
identityDataImported = NO
disconnectOnSleep = NO
disconnectOnIdle = NO
disconnectOnIdleTimeout = 0
disconnectOnWake = NO
disconnectOnWakeTimeout = 0
pluginType = com.abuyun.http.tunnel
authenticationMethod = 0
reassertTimeout = 0
}
}
}
object:<NEHelperConfigurationManager: 0x10041ab30>
CF_EXPORT CFTypeRef _CFRuntimeCreateInstance(CFAllocatorRef allocator, CFTypeID typeID, CFIndex extraBytes, unsigned char *category);
- (void)[ readPacketsWithCompletionHandler:(void (^)(NSArray<NSData *> *packets, NSArray<NSNumber *> *protocols))completionHandler;
- 2018-03-15 微信公众号相关
微信域名返回
dns.wexin.qq.com

<domainlist>
<domain name="extshort.weixin.qq.com" timeout="1800">
<ip>180.163.25.140</ip>
<ip>101.89.15.101</ip>
<ip>101.89.15.100</ip>
<ip>101.227.162.140</ip>
<ip>101.226.211.44</ip>
<ip>101.226.211.101</ip>
</domain>
<domain name="localhost" timeout="1800">
<ip>127.0.0.1</ip>
</domain>
<domain name="long.weixin.qq.com" timeout="1800">
<ip>180.163.25.149</ip>
<ip>101.89.15.106</ip>
<ip>101.227.162.148</ip>
<ip>101.227.162.139</ip>
<ip>101.226.211.46</ip>
<ip>101.226.211.105</ip>
</domain>
bundleid: com.tencent.xin
目前微信对每个正常的微信号每天限制访问一定数量的公众号
保存微信公众号历史消息列表页所需要的关键参数:biz,uin,key,pass_ticket
-
uin 为我们自己的微信账号ID,一般不变
-
biz 微信公众号唯一ID, base64编码格式,一般不变
-
key为微信的加密参数,动态变化,一个新的key有一定的有效期,大致30分钟
-
pass_ticket为微信的加密参数,一般不变
4个关键参数中,biz为所需要抓取的公众号的ID,需要自己找齐;uin和pass_ticket为一个微信号基本固定的信息;key为有时效的口令。
获取阅读点赞接口有频率限制, 测试的结果是一个微信号5分钟可以查看30篇文章的阅读点赞
##微信公众号文章的永久链接mp.weixin.qq.com
让互联网更快的协议,QUIC在腾讯的实践及性能优化
//永久链接 http://www.52im.net 里给出的链接形式,微信最新推广的永久链接
https://mp.weixin.qq.com/s/_RAXrlGPeN_3D6dhJFf6Qg
https://mp.weixin.qq.com/s/cZQ3FQxRJBx4px1woBaasg
//搜狗可以搜出来的,有时效的链接
https://mp.weixin.qq.com/s?src=11×tamp=1523451324&ver=810&signature=bAhhdjZSf6hIY3hYWuLVQHc56RAsr15PQvofwn8KjEBziWf9ycbAOdoRPpydfP-UhT7WE-Rj-PgG7WioHQwqQWGKmLaA-bQhADvnHaM0Mkr2h-vyAoH1VxKchjqXxX&new=1
可以拼出来的永久链接形式
https://mp.weixin.qq.com/s?__biz=MjM5MDE0Mjc4MA==&mid=2651000580&idx=3&sn=9b9b24ed45ee113e774bc0e4a4cbb585&scene=19#wechat_redirect
https://mp.weixin.qq.com/s?src=11×tamp=1523453088&ver=810&signature=bAhhdjZSf6hIY3hYWuLVQHc56RAsr15PQvofwn8KjEBI3hTTWLYX4C8DFS7sWdsT8JM9VsI2xUBF7JIO65ed-9qMEWSnD56u1YNc5EAmpzarYHRNwnPqLmR9KcVUDd&new=1
微信里MMURLControl给出的格式
http://mp.weixin.qq.com/s?__biz=MjM5MDE0Mjc4MA==&mid=2651006791&idx=1&sn=09ae9dcbb818653d918a15c3f0ec6e91&chksm=bdbedf148ac9560269432dedf52f9c99fa713c56d042cf273a11898f5f8eedf3b1e2e3c22c8d&scene=27#wechat_redirect
拼接格式
http://mp.weixin.qq.com/mp/rumor?action=info&__biz=”+biz+”&mid=”+mid+”&idx=”+idx+”&sn=”+sn+”#wechat_redirect
biz:公众号id
mid:图文素材id
sn:文章id
idx:在当日文章的序列
参数
var biz = ""||"MjM5MDE0Mjc4MA==";  //公众号id
var sn = "" || ""|| "";
var mid = "" || ""|| "2651006625";   //公众号历史文章id
var idx = "" || "" || "4";
http://blog.chenpeng.info/html/3779
- 2018-03-12 IOSRE常用命令
Cycript
显示app窗口结构:
[[UIApp keyWindow] recursiveDescription].toString()
微信历史版本
微信历史版本可以pp助手越狱版(apt.25pp.com)里历史版本里找到。
# Reveal 破解版下载
爱情守望者->Reveal
在cydia源里
cleanmymac 破解版下载
LLDB
iOS逆向工程之Hopper+LLDB调试第三方App
使用LLDB调试程序
bash
组合键Ctrl+r 进入reverse-i-search模式,可以命令的前面几个字母来查找
如果匹配了多个条目的话可以用上下键来选择
比如下面,用k字就匹配到了上面一条命令
5C01:/Library/Logs/CrashReporter root# killall backboardd
(reverse-i-search)`k': killall backboardd
rvictl
此命令可以开启远程虚拟接口进行wireless抓包
参数为设置的UDID
Remote Virtual Interface Tool starts and stops a remote packet capture instance
for any set of attached mobile devices. It can also provide feedback on any attached
devices that are currently relaying packets back to this host.

Options:
	-l, -L		List currently active devices
	-s, -S		Start a device or set of devices
	-x, -X		Stop a device or set of devices
SSH
ssh-copy-id命令可以把本地主机的公钥复制到远程主机的authorized_keys文件上,ssh-copy-id命令也会给远程主机的用户主目录(home)和~/.ssh, 和~/.ssh/authorized_keys设置合适的权限。
ssh-copy-id [-i [identity_file]] [user@]machine
1、把本地的ssh公钥文件安装到远程主机对应的账户下:
ssh-copy-id user@server
ssh-copy-id -i ~/.ssh/id_rsa.pub user@server
ObjectiveC中打印Call Stack的若干方法
NSLog(@"%@", [NSThread callStackSymbols]);
通过backtrace_symbols_fd
#import <execinfo.h>
#import <unistd.h>

void PrintCallStack() {
  void *stackAdresses[32];
  int stackSize = backtrace(stackAdresses, 32);
  backtrace_symbols_fd(stackAdresses, stackSize, STDOUT_FILENO);
}
通过NSException
@catch (NSException *exception)
{
    NSLog(@"%@", [exception callStackSymbols]);
}
当然也可以在UncaughtExceptionHandler中拿到NSException
NSSetUncaughtExceptionHandler(&uncaughtExceptionHandler);
void uncaughtExceptionHandler(NSException *exception)
{
    NSLog(@"reason:%@ exception nanme:%@",[exception reason], [exception name]);
    NSLog(@"call stack:%@",[exception callStackSymbols]); } [iOS安全–使用introspy追踪IOS应用](http://www.blogfshare.com/ioss-introspy.html)
刚刚试用snoopit ,结果它在IOS8里面出BUG,把我的/Applications文件夹都删了。
还好我还有一台IOS8.2的设备,把里面的文件拷到这个机器上,再把文件的权限设置一下,又可以跑了。
cydia 自动源
/private/etc/apt/sources.list.d/cydia.list
更新bash_profile
Stripping Unwanted Architectures From Dynamic Libraries In Xcode
APP_PATH="${TARGET_BUILD_DIR}/${WRAPPER_NAME}"

# This script loops through the frameworks embedded in the application and
# removes unused architectures.
find "$APP_PATH" -name '*.framework' -type d | while read -r FRAMEWORK
do
    FRAMEWORK_EXECUTABLE_NAME=$(defaults read "$FRAMEWORK/Info.plist" CFBundleExecutable)
    FRAMEWORK_EXECUTABLE_PATH="$FRAMEWORK/$FRAMEWORK_EXECUTABLE_NAME"
    echo "Executable is $FRAMEWORK_EXECUTABLE_PATH"

    EXTRACTED_ARCHS=()

    for ARCH in $ARCHS
    do
        echo "Extracting $ARCH from $FRAMEWORK_EXECUTABLE_NAME"
        lipo -extract "$ARCH" "$FRAMEWORK_EXECUTABLE_PATH" -o "$FRAMEWORK_EXECUTABLE_PATH-$ARCH"
        EXTRACTED_ARCHS+=("$FRAMEWORK_EXECUTABLE_PATH-$ARCH")
    done

    echo "Merging extracted architectures: ${ARCHS}"
    lipo -o "$FRAMEWORK_EXECUTABLE_PATH-merged" -create "${EXTRACTED_ARCHS[@]}"
    rm "${EXTRACTED_ARCHS[@]}"

    echo "Replacing original executable with thinned version"
    rm "$FRAMEWORK_EXECUTABLE_PATH"
    mv "$FRAMEWORK_EXECUTABLE_PATH-merged" "$FRAMEWORK_EXECUTABLE_PATH"

done
ipainstaller 安装ipa到用户空间
| postinst 脚本用 > /dev/null |
|
true 来隐藏错误返回 |
清空日志文件
可以通过cat /dev/null > /var/log/syslog来清空它
禁用Xcode的代码签名功能
/Applications/Xcode.app/Contents/Developer/Platforms/iPhoneOS.platform/Developer/SDKs/iPhoneOSx.x.sdk/SDKSettings.plist
CODE_SIGNING_REQUIRED YES 改为 NO
重启Xcode
备注:这里可能会遇到系统提示【“SDKSettings.plist” is locked for editing……】,这是因为文件读写的权限问题,解决办法如下:
首先,修改文件夹权限,此时我们所在目录是iPhoneOS8.0.sdk,如果输入指令“cd ..”返回上级目录,“ls -al”查看所有文件,会发现系统显示iPhoneOS8.0.sdk -> iPhoneOS.sdk,这表示iPhoneOS8.0.sdk是指向iPhoneOS.sdk的快捷方式,所以我们要修改的真正文件夹是iPhoneOS.sdk,指令如下:
1 sudo chmod -R 777 iPhoneOS.sdk
然后,修改文件夹内所有文件的读写权限:
1 sudo chmod 777 *
现在双击打开SDKSettings.plist,你会发现,刚才不能修改的属性可以修改了!
清空iOS日志
用iTunes同步。
iOS10.0.2 yalu越狱之后无法使用openssh的问题
具体方法:
1.卸载手机上的OpenSSL和Openssh
2.添加源:http://cydia.ichitaso.com/test
3.进入上面这个源里重新下载:dropbear
4.安装完毕,执行ssh root@deviceIP,默认密码为alpine(也可以在iPhone里下载ssh软件进行连接测试)
5.成功后,再重新安装openssh和OpenSSL了(经测试不会影响SSH连接iPhone)。
参考链接:https://www.jianshu.com/p/91e0c22a6ea7
如果在cycript里遇到 @”\xe7\xbd\x91\xe9\xa1\xb5\xe5\xbe\xae\xe4\xbf\xa1\xe5\xb7\xb2\xe7\x99\xbb\xe5\xbd\x95” 这种显示形式的字符串
echo -e “\xe7\xbd\x91\xe9\xa1\xb5\xe5\xbe\xae\xe4\xbf\xa1\xe5\xb7\xb2\xe7\x99\xbb\xe5\xbd\x95”
网页微信已登录
iOS9,10 去掉 NO SIM Alert
iOS8里有个插件NoNoSim,在iOS9里可以用下面的方法
%hook SBSIMLockManager
-(BOOL)_shouldSuppressAlert { return YES; }
%end
iOS10 用yalu越狱之后无法使用ssh scp 的问题
1.卸载手机上的OpenSSL和Openssh
2.添加源安装 http://cydia.ichitaso.com/test 重新安装dropbear
openssh 在iOS10上有兼容问题,所以yalu的作者使用了安全性更好的dropbear。
因为没有scp所以,可以在安装OPENSSH之后把scp 依赖的库/usr/lib/libcrypto.0.9.8.dylib拷贝一份。
再从OPENSSH的依赖项里把openssl去掉。
这样即可以用ssh又可以用scp了。
怎么修改deb包之后又打包回去
dpkg-deb -X 释放普通文件
dpkg-deb -e 释放控制文件 置于DEBIAN 文件夹里
dpkg-deb -b 打包回去
下载cydia里的deb 文件
爬虫网站 http://ipod-touch-max.ru/cydia/index.php?cat=package&id=32694
http://cydiaupdates.com/
app https://github.com/borishonman/cydownload/releases
wireshark 抓包时出现 you don’t have permission to capture on that device
https://stackoverflow.com/questions/41126943/wireshark-you-dont-have-permission-to-capture-on-that-device-mac
确认/dev/bpf0 到 /dev/bpf9 权限都是 liaogang:admin 而不是 root:wheel
xcode 调试第三方应用
http://iosre.com/t/xcode/8567
直接在设备上用ldid给app/exec中的授权证书添加如下字段即可:
    <key>get-task-allow</key>
    <true/>
查看exec加载了哪些符号
otool -L exec
获取设备UDID
https://www.jianshu.com/p/9d059c17481d
应用程序包路径
沙盒路径: /var/mobile/Containers/Data/Application/8CF3DA4E-BF8E-4509-93D7-D131E12F7176
bundle路径: /var/containers/Bundle/Application/5044D35F-ECB1-4E00-872C-7805F8C14AD8/Aweme.app/Aweme
在SpringBoard里使用定时器不是一个好的做法
使用dispatch_after来代替
多个Tweak钩一个类的同一个方法
除了第一个钩住的,后面的都会失效?
##sqlite 数据导出为excel表格格式
首先用sqlite3命令导出sqlite表为cvs文件。再用numbers打开,导出为excel
order by a
limite 0,1000
sqlite3 c:/sqlite/chinook.db
sqlite> .headers on
sqlite> .mode csv
sqlite> .output data.csv
sqlite> SELECT customerid,
…> firstname,
…> lastname,
…> company
…> FROM customers;
sqlite> .quit
–select userID,min(rowid) from Collected_Account
–select * from Collected_Account where userID is ‘105184085394’
–select distinct userID from Collected_Account
–select * from Collected_Account where userID in (select distinct userID from Collected_Account)
–select userID from Collected_Account group by userID having count() >= 2
–delete from Collected_Account where rowid in (select rowid from Collected_Account group by userID having count() >= 2)
delete from Collected_Account where userID is ‘99744665393’
IDAPro F5出现too big function 解决
修改配置文件IDA 7.0\cfg\hexrays.cfg
MAX_FUNCSIZE            = 64        // Functions over 64K are not decompiled

// 修改为:
MAX_FUNCSIZE            = 1024        // Functions over 64K are not decompiled
- 2018-03-12 use dumpdecrypted to crack app
编译dumpdecrypted 成生动态库 dumpdecrypted.dylib
“砸壳”前的准备工作
找到目标进程的程序目录
A2:~ root# ps -e|grep WeChat
3016 ??         0:03.55 /var/containers/Bundle/Application/A687AEA0-AB28-497F-9E82-3E6798488BA3/WeChat.app/WeChat
和沙盒目录
cy# NSSearchPathForDirectoriesInDomains(NSDocumentDirectory, NSUserDomainMask, YES)
@["/var/mobile/Containers/Data/Application/4E79AA5B-60DE-4653-B87D-064F17B49E93/Documents"]
开始砸壳
把刚才的.dylib 拷到沙盒下Documents目录
liaogangdeMac-mini:dumpdecrypted liaogang$ scp -P  2222   dumpdecrypted.dylib      root@localhost:/var/containers/Bundle/Application/A687AEA0-AB28-497F-9E82-3E6798488BA3/WeChat.app/Documents
Warning: Permanently added '[localhost]:2222' (RSA) to the list of known hosts.
dumpdecrypted.dylib                                                                  100%  193KB   4.7MB/s   00:00
切换到刚才的Documents目录,执行下面的命令:
DYLD_INSERT_LIBRARIES=dumpdecrypted.dylib /var/mobile/Applications/3DC16044-E5BB-4038-9E31-CFE3C7134A7B/WeChat.app/WeChat
如果出现:
This mach-o file is not encrypted. Nothing was decrypted.
说明这个文件就是未签名的文件,不需要再脱壳了.
ipa安装
Cydia Impactor 和 MonkeyDev 的app模板进行安装
–
9.3.3 上
执行dumpdecrypted出现 kill 9的解决方法 github issue
1, copy dumpdecrypted.dylib into /usr/lib. Make sure it has appropriate permissions so that user mobile can read and execute it
-rwxr-xr-x 1 root wheel 197528 Aug 14 16:22 dumpdecrypted.dylib
2, change user to mobile:
su mobile
3, change directory into somewhere that mobile can write to:
cd /var/mobile/Documents
4, execute the command with absolute paths:
DYLD_INSERT_LIBRARIES=/usr/lib/dumpdecrypted.dylib /var/containers/Bundle/Application/59CEB222-4C4D-4A34-BC0F-8D38B9E3853D/MyApp.app/MyApp
5, then, you’ll have the MyApp.decrypted file in the current directory
Tested on Pangu jailbroken iOS 9.3.3
- 2018-02-03 如何追查Tweak里的bug
假如tweak附着的进程是SpringBoard
日志位于手机的
/private/var/mobile/Library/Logs/CrashReporter/
root 权限的app crash log 在这个目录里:
/Library/Logs/CrashReporter/
iTunes同步之后在相应的路径
~/Library/Logs/CrashReporter/MobileDevice/
使用 symbolicatecrash 符号化crash日志 ,如果报错的话那需要把环境变量导一下
export DEVELOPER_DIR=/Applications/Xcode.app/Contents/Developer
./symbolicatecrash –dsym=abstatus.dSYM/ SpringBoard.crash –output=a.crash
./symbolicatecrash -dsym=MyProvider.dsym/ neagent_2018-06-11-194801_A01-03.ips -o a.crash
* 这里会用到dSYM调试符号文件
	从.theos下面找到目标文件
	使用dsymutil 生成dSYM
	dsymutil abstatus.dylib -o abstatus.dSYM
theos打包时可以加上脚本自动生成dsym文件到指定目录,如:
after-stage::
       dsymutil .theos/_/Applications/abuyun.app/abuyun -o ~/dsym/abuyun.dsym
- 2018-02-03 iOS里用LLDB调试第三方App
usbmuxd虽然目前最新的版本是1.1.0,但是1.1.0版本和1.0.9版本仅支持Linux系统,也就是说我们的Mac还是得下载v1.0.8的版本,下载地址(usbmuxd-v1.0.8)。下载完后,将下载的文件进行解压
首先我们得找到iOS设备中debugserver,并将其拷贝到Mac上进行处理,下方就是位于/Developer/usr/bin目录下的debugserver。此debugserver只支持调试我们自己的App, 如果需要调试其他人的App的话,需要对此debugserver进行处理,处理过程见下文。
<!DOCTYPE plist PUBLIC "-//Apple//DTD PLIST 1.0//EN" "http://www.apple.com/DTDs/PropertyList-1.0.dtd">
<plist version="1.0">
<dict>
        <key>com.apple.springboard.debugapplications</key>
        <true/>
        <key>get-task-allow</key>
        <true/>
        <key>task_for_pid-allow</key>
        <true/>
        <key>run-unsigned-code</key>
        <true/>
</dict>
</plist>
在给debugserver符权限时,我们需要使用到ldid命令,如果你的Mac上没有安装ldid命令,那么请用brew进行install。执行下方的命令行就可以给我们的debugserver赋上task_for_pid权限。需要注意的是-S与ent.xml文件名中是没有空格的
ldid -Sent.xml debugserver
最后一步就是将处理好的debugserver拷贝到我们的越狱设备中,并且给debugserver赋上可执行的权限。因为/Developer/usr/bin目录下的debugserver是只读的,所以你不能将处理好的debugserver拷贝到上述文件,你要将处理好的debugserver拷贝到/usr/bin/目录下
chmod +x debugserver
- 2016-08-27 巴溪洲水上乐园
- 2016-08-24 洋湖湿地公园
- 2016-08-22 湘江夜景
- 2016-04-26 失落的三天
人生最残忍的事莫过于给别人看到希望,又拿走它了。
一颗真诚的心留下了伤痕,只好自己流泪来抹平。
至少有一件事能让我平静下来:跑步。
用尽所有力气来跑步,
跟着大部队装模作样的前进,呐喊,孤独怪物也收敛了不少。
等到精疲力尽之后,身体的疲惫能抹平心里的失落。
这时如果再有一瓶水,那便能给人最原始的满足感了。
我希望我能得到平静。
- 2016-03-24 Robovm的缺点
- 文档不全,用的人少,遇到问题没地方找答案
- 编译时间太久
- 没法方便快速的debug,只能用打印信息来调试
- 有些发消息的crash,信息,必须用xcode的日志来查看
- 没法实时查看内存,cpu占用。
- 没法用Instruments工具来调试。
- 工程大了之后,故事板打开出错
- 2016-02-18 Depth-first search
Wiki: Depth-First Search
深度优先搜索算法(英语:Depth-First-Search,简称DFS)是一种用于遍历或搜索树或图的算法。沿着树的深度遍历树的节点,尽可能深的搜索树的分支。当节点v的所在边都己被探寻过,搜索将回溯到发现节点v的那条边的起始节点。这一过程一直进行到已发现从源节点可达的所有节点为止。如果还存在未被发现的节点,则选择其中一个作为源节点并重复以上过程,整个进程反复进行直到所有节点都被访问为止。属于盲目搜索。
深度优先搜索是图论中的经典算法,利用深度优先搜索算法可以产生目标图的相应拓扑排序表,利用拓扑排序表可以方便的解决很多相关的图论问题,如最大路径问题等等。
	struct Node
	{
	   int self; //数据
	   Node *left; //左节点
	   Node *right; //右节点
	};

	const int TREE_SIZE = 9;
	std::stack<Node*> unvisited;
	Node nodes[TREE_SIZE];
	Node* current;

	//初始化树
	for(int i=0; i<TREE_SIZE; i++)
	{
	  nodes[i].self = i;
	  int child = i*2+1;
	  if(child<TREE_SIZE) // Left child
	    nodes[i].left = &nodes[child];
	  else
	    nodes[i].left = NULL;
	  child++;
	  if(child<TREE_SIZE) // Right child
	    nodes[i].right = &nodes[child];
	  else
	    nodes[i].right = NULL;
	}

	unvisited.push(&nodes[0]); //先把0放入UNVISITED stack

	// 只有UNVISITED不空
	while(!unvisited.empty())
	{
	  current=(unvisited.top()); //当前应该访问的
	  unvisited.pop();
	  if(current->right!=NULL)
	    unvisited.push(current->right); // 把右边压入 因为右边的访问次序是在左边之后
	  if(current->left!=NULL)
	    unvisited.push(current->left);
	  cout<<current->self<<endl;
	}
- 2016-02-03 NSBrief 60 Matt Thompson
Matt Thompson (@matt) 是一位多产的IOS与Ruby开发者。你或许从AFNetworking知道他了,同时他也是NSHipster背后的策划者,和一些其它超棒cocoa博客和工具。
NSBrief 60 Matt Thompson
- 2016-01-19 My Favorite Guitar Songs
- 2015-11-03 smine开发界面
- 2015-10-28 Mac使用心得
Disable the Character Accent Menu and Enable Key Repeat
defaults write -g ApplePressAndHoldEnabled -bool false
- 2015-10-13 mac系统里关闭字符重音提示开启重复按键
You can try the following on Yosemite in the Terminal. Works in Mavericks, but may not in Yosemite.
defaults find ApplePressAndHoldEnabled
If it returns 0 or not found, then:
Quit the application in which you were unable to use the long keypress.
defaults write -g ApplePressAndHoldEnabled -bool true
killall Finder
If the prolonged keyboard press still does not produce results, then in System Preferences > Keyboard > Input Sources, add a Spanish Keyboard, and then reboot. Try the long keypress again, and hopefully, you now have the pop-up accents.
- 2015-09-23 简单美食
- 2015-08-18 想去的地方
- 2015-07-09 关于位操作的奇淫技巧
Determining if an integer is a power of 2
unsigned int v; // we want to see if v is a power of 2
bool f; // the result goes here
f = (v & (v - 1)) == 0;
Note that 0 is incorrectly considered a power of 2 here. To remedy this, use:
f = v && !(v & (v - 1));
这里用到了一个很常用的技巧,2的乘方必然是以这个形式出现: 最高一位为1后面的位全部为0. v-1就是那个最高位变成了0,其余全为1. 这就好像10进制里1000和999的关系一样. 反之关系也一样成立.
Refrence
Stanford大学一个家伙写的Bit Twiddling Hacks
- 2015-07-08 异形系列
《异形》(Alien)是好莱坞非常成功的系列恐怖科幻电影,分别是《异形1》、《异形2》、《异形3》、《异形4》。1979年第一部问世,在全世界范围内引起了巨大轰动。随后《异形》系列影片接连出世,一直深受好评。该系列片的导演都鼎鼎大名,分别是雷德利·斯科特、詹姆斯·卡梅隆、大卫·芬奇、让-皮埃尔·热内。
- 2015-06-26 KMP Algorithm
Given a text txt[0..n-1] and a pattern pat[0..m-1], write a function search(char pat[], char txt[]) that prints all occurrences of pat[] in txt[]. You may assume that n > m.
Examples:
1) Input:
  txt[] =  "THIS IS A TEST TEXT"
  pat[] = "TEST"
Output:
Pattern found at index 10
2) Input:
  txt[] =  "AABAACAADAABAAABAA"
  pat[] = "AABA"
Output:
   Pattern found at index 0
   Pattern found at index 9
   Pattern found at index 13
Pattern searching is an important problem in computer science. When we do search for a string in notepad/word file or browser or database, pattern searching algorithms are used to show the search results.
We have discussed Naive pattern searching algorithm in the previous post. The worst case complexity of Naive algorithm is O(m(n-m+1)). Time complexity of KMP algorithm is O(n) in worst case.
KMP (Knuth Morris Pratt) Pattern Searching
The Naive pattern searching algorithm doesn’t work well in cases where we see many matching characters followed by a mismatching character. Following are some examples.
   txt[] = "AAAAAAAAAAAAAAAAAB"
   pat[] = "AAAAB"

   txt[] = "ABABABCABABABCABABABC"
   pat[] =  "ABABAC" (not a worst case, but a bad case for Naive)
The KMP matching algorithm uses degenerating property (pattern having same sub-patterns appearing more than once in the pattern) of the pattern and improves the worst case complexity to O(n). The basic idea behind KMP’s algorithm is: whenever we detect a mismatch (after some matches), we already know some of the characters in the text (since they matched the pattern characters prior to the mismatch). We take advantage of this information to avoid matching the characters that we know will anyway match.
KMP algorithm does some preprocessing over the pattern pat[] and constructs an auxiliary array lps[] of size m (same as size of pattern).
KMP算法对pat[]做了一些预处理并且构建了一个长度为m的辅助的列表 lps[]
Here name lps indicates longest proper prefix which is also suffix..
For each sub-pattern pat[0…i] where i = 0 to m-1, lps[i] stores length of the maximum matching proper prefix which is also a suffix of the sub-pattern pat[0..i].
Examples:
For the pattern “AABAACAABAA”, lps[] is [0, 1, 0, 1, 2, 0, 1, 2, 3, 4, 5]
For the pattern “ABCDE”, lps[] is [0, 0, 0, 0, 0]
For the pattern “AAAAA”, lps[] is [0, 1, 2, 3, 4]
For the pattern “AAABAAA”, lps[] is [0, 1, 2, 0, 1, 2, 3]
For the pattern “AAACAAAAAC”, lps[] is [0, 1, 2, 0, 1, 2, 3, 3, 3, 4]
Searching Algorithm
Unlike the Naive algo where we slide the pattern by one, we use a value from lps[] to decide the next sliding position.
Let us see how we do that.
When we compare pat[j] with txt[i] and see a mismatch, we know that characters pat[0..j-1] match with txt[i-j+1…i-1], and we also know that lps[j-1] characters of pat[0…j-1] are both proper prefix and suffix which means we do not need to match these lps[j-1] characters with txt[i-j…i-1] because we know that these characters will anyway match.
See KMPSearch() in the below code for details.
Preprocessing Algorithm
In the preprocessing part, we calculate values in lps[].
To do that, we keep track of the length of the longest prefix suffix value (we use len variable for this purpose) for the previous index.
We initialize lps[0] and len as 0.
If pat[len] and pat[i] match, we increment len by 1 and assign the incremented value to lps[i].
If pat[i] and pat[len] do not match and len is not 0, we update len to lps[len-1].
See computeLPSArray () in the below code for details.
#include<stdio.h>
#include<string.h>
#include<stdlib.h>

void computeLPSArray(char *pat, int M, int *lps);

void KMPSearch(char *pat, char *txt)
{
    int M = strlen(pat);
    int N = strlen(txt);

// create lps[] that will hold the longest prefix suffix values for pattern
int *lps = (int *)malloc(sizeof(int)*M);
int j  = 0;  // index for pat[]

// Preprocess the pattern (calculate lps[] array)
computeLPSArray(pat, M, lps);

int i = 0;  // index for txt[]
while (i < N)
{
  if (pat[j] == txt[i])
  {
    j++;
    i++;
  }

  if (j == M)
  {
    printf("Found pattern at index %d \n", i-j);
    j = lps[j-1];
  }

  // mismatch after j matches
  else if (i < N && pat[j] != txt[i])
  {
    // Do not match lps[0..lps[j-1]] characters,
    // they will match anyway
    if (j != 0)
     j = lps[j-1];
    else
     i = i+1;
  }
}
free(lps); // to avoid memory leak
}

void computeLPSArray(char *pat, int M, int *lps)
{
    int len = 0;  // lenght of the previous longest prefix suffix
    int i;

lps[0] = 0; // lps[0] is always 0
i = 1;

// the loop calculates lps[i] for i = 1 to M-1
while (i < M)
{
   if (pat[i] == pat[len])
   {
     len++;
     lps[i] = len;
     i++;
   }
   else // (pat[i] != pat[len])
   {
     if (len != 0)
     {
       // This is tricky. Consider the example AAACAAAA and i = 7.
       len = lps[len-1];

       // Also, note that we do not increment i here
     }
     else // if (len == 0)
     {
       lps[i] = 0;
       i++;
     }
   }
}
}

// Driver program to test above function
int main()
{
   char *txt = "ABABDABACDABABCABAB";
   char *pat = "ABABCABAB";
   KMPSearch(pat, txt);
   return 0;
}
Refrence
http://www.geeksforgeeks.org/searching-for-patterns-set-2-kmp-algorithm
- 2015-06-25 learning guitar
To prevent your fret hand from injury, keep your calluses in check.
为了防止你按弦的手受伤,经常检查你的老茧。
Take a buffer board to your fingertips once or twice a week.
在指尖上带上(胶带?)每周一或两次。
Buffing and filing your calluses IS important.
抛光和整理你的老茧很重要。
Over time the outermost layer of skin will begin to peel.
随着时间的推移皮肤最外面一层会开始脱落。
It’s imperative at that time to buff the callous smooth, or you risk getting a string caught in an open groove of your callous when changing chords.
那时抛光处理老茧是必不可少的,否则你换弦时老茧的开槽处可能把琴弦粘起。
相关网站
国外民谣吉它专业测评
http://www.guitar-bass.net/tag/acoustic-guitars/page/
Refrence
http://www.wikihow.com/Rapidly-Learn-to-Play-the-Acoustic-Guitar-Yourself
琴弦与第一音品的间距,一般为1.0/1.2mm,与第十二音品的间距,为4.5/5/0mm。高于这个数据,不仅造成按弦的困难,而且会导致“走音”,这类吉他可以请有经验的吉他老师,把弦距调整后再使用
琴颈这东西很容易随着湿度和温度的改变产生一些变化,有人长时间不弹 吉他也没有松弦会看到琴颈弓了起来,这个时候想调都没有办法了,导致吉他 给报废了。所以调整琴颈是你买回吉他的第一步,也是你今后经常要做的一步。首先,你要用2手食指分别按住6弦的第1品与最后一品,然后从指板侧面观察 第5品到第7品之间琴弦与琴品的距离,标准在0.5至1MM之间,如果近了 说明琴颈有些向后弯了,这时候琴颈里的钢筋应往逆时针的方向拧以适度放松, 让琴颈向前复原。如果琴颈与琴品的距离超过1MM以上,则表示琴颈有向前弯曲 的现象,这个时候则要以顺时针的方向拧钢筋把他上紧,让琴颈向后调整。 不规则的琴颈有时会有严重的打品现象,这就要你进行细微的调整了,取得两者的折中
不同的人喜欢的吉他弦离指板的距离是不同的,这点充分的体现了个人的演奏风格。我的建议是琴弦靠吉他的品格越近越好,这样可以不费劲的把音弹出来好了。请你注意,12品上琴弦与品格的距离,理想值是在6弦两者相差2MM/ 第1弦两者相差1.5MM,当然一般来讲你很难买到这么理想的琴,那么就只有以不打品为原则调整它们的距离了
Knocking on Heaven‘s door 吉他 教学 01 licklibrary
http://v.youku.com/v_show/id_XNjMyNTMxNDQ4.html?from=s1.8-1-1.2
- 2015-05-25 About DLNA
1.1 Architectures and Protocols体系结构和协议
The Interoperability Guidelines consists of ten parts covering Architecture and Protocols, Media Formats, Link Protection, DRM Interoperability Systems, Device Profiles, HTML RUI, Authentication, Diagnostics, HTTP Adaptive Delivery, and Low Power Mode.
这个操作指南包含十部分: 体系结构和协议,媒体格式,链接保护,DRM互操作系统,设备描述,HTML RUI,身份认证,诊断,HTTP自适应交付和低功率模式。
It provides vendors with the information needed to build interoperable networked platforms and devices for the digital home.
它提供了vendors with the information needed to build可互操作的网络化Platforms and devices for the数字家庭。
The necessary standards and technologies are available now to enable products to be built for networked entertainment centric usages.
upnp av ContentDirectory v1 Service
2.8.9_Playlist Manipulation 播放列表控制
2.8.9.1 Playlist file representation in CDS
A playlist file is represented as an object of the playlist class (object.item.playlist).
The format of the playlist is indicated by the MIME type section of the res@protocolInfo property on the playlist object.
If a search were performed for all objects of class object.item.playlist in the content directory, it would return a result of the following form:
Searching 搜索动作
The Search() action is designed to allow a control point to search for objects in the content directory that match a given search criteria (see section 2.5.5).
Search() 动作被设计用于允许一个control point来搜索要求的匹配对象
In addition, the Search() action supports the following features:
-
Incremental result retrieval i.e. in the context of a particular request the control point can restrict the number (and the starting offset) of objects returned in the result.
增量结果检索 , 例如,设置相应搜索条件,control point能限制搜索返回结果的对象的数量(和开始下标)。
-
Sorting. The result can be requested in a particular sort order. The available sort orders are expressed in the return value of the GetSortCapabilities action.
排序.
-
Filtering. The result data can be filtered to only include a subset of the properties available on the object (see section 2.5.7). Note that certain properties may not be filtered out in order to maintain the validity of the result data fragment. If a non-filterable property is left out of the filter set, it will still be included in the result.
过滤。
- 2015-05-13 粘贴板编程指南
自定义数据
要被粘贴板使用,一个对象必须符合NSPasteboardWriting和/或NSPasteboardReading协议。你可以使用自定义对象或包含自定义数据的NSPasteboardItem。
概述
任何放入粘贴板的对象必须符合NSPasteboardWriting协议; 要从粘贴板取回对象的实例,它必须符合NSPasteboardReading协议。一些常用Foundation和Application Kit类都实现了这两个协议,包括NSString, NSImage, NSURL, NSColor, NSAttributedString, and NSPasteboardItem。
If you want to be able to write your custom object to a pasteboard, or initialize an instance of your custom class from a pasteboard, your class must also adopt the corresponding protocol. In some situations, it may be appropriate to use NSPasteboardItem.
Custom Class
对于下面的例子,
@interface Bookmark : NSObject
<NSCoding, NSPasteboardWriting, NSPasteboardReading>
@property (nonatomic, copy) NSString *title;
@property (nonatomic, copy) NSString *notes;
@property (nonatomic, retain) NSDate *date;
@property (nonatomic, retain) NSURL *url;
@property (nonatomic, retain) NSColor *color;
@end
Notice that the class adopts the NSCoding protocol so that it can be archived and unarchived.
Writing
NSPasteboardWriting协议
@protocol NSPasteboardWriting <NSObject>
@required
- (NSArray *)writableTypesForPasteboard:(NSPasteboard *)pasteboard;
@optional
- (NSPasteboardWritingOptions)writingOptionsForType:(NSString *)type pasteboard:(NSPasteboard *)pasteboard;
@required
- (id)pasteboardPropertyListForType:(NSString *)type;
@end
第一个方法:
- (NSArray *)writableTypesForPasteboard:(NSPasteboard *)pasteboard
This method returns an array of UTIs for the data types your object can write to the pasteboard.
The order in the array is the order in which the types should be added to the pasteboard—this is important as only the first type is written initially, the others are provided lazily (see Promised Data).
The method provides the pasteboard argument so that you can return different arrays for different pasteboards. You might, for example, put different data types on the dragging pasteboard than you do on the general pasteboard, or you might put on the same data types but in a different order. You might add to the dragging pasteboard a special representation that indicates the indexes of items being dragged so that they can be reordered.
第二个方法:
-(NSPasteboardWritingOptions)writingOptionsForType:(NSString *)type pasteboard:(NSPasteboard *)pasteboard
This method is optional. It returns the options for writing data of a type to a pasteboard.
The only option currently supported is “promised”. You can use this if you want to customize the behavior—for example, to ensure that one particular type is only promised.
第三个方法:
- (id)pasteboardPropertyListForType:(NSString *)type
This method returns the appropriate property list object representation of your object for the specified type.
Pasteboard Programming Guide
- 2015-03-19 C string with multi lines
第一种方法
char s[] =
"asdf\
bfda\
asdf";
第二种方法
char s[] =
"asdf"
"bfda"
"asdf";
- 2015-03-18 Learning lisp
环境配置
在mac里brew里安装clisp.
在安装目录下面有个bin/clisp.
可以直接进入交互前端,或指定要输入的文件.
具体用法: clisp
教程: ANSI Common Lisp 中文版
简明lisp参考手册: Simplified Common Lisp reference
怎样注释
在scheme里注释一行可以使用分号: ;
常用函数
null
not
car
cons
cdr
语法:
format 目录 控制字符串 参数 (0个或几个) ==> string or nil
参数描述:
destination: t,nil,stream or string with fill-pointer
do 宏
(variable initial update)
Common Lisp 习题
- 只使用本章所介绍的操作符,定义一个函数,它接受一个列表作为实参,如果有一个元素是列表时,就返回真。
- 2015-03-16 提取与本地化XIBS
第三方式工具
iLocalize(http://www.arizona-software.ch/ilocalize)
从XIBS中提取.string文件
ibtool --export-strings-file zh-Hans.lproj/base.strings Base.lproj/Main.storyboard
Change the export string file is not in utf-8 format.
Merge the new strings in vimdiff.
vimdiff a.string b.stirng
Refrence
Extracting & Localizing XIBs (IBTOOL)
- 2015-03-10 注册mac程序所支持的文件类型
- 2015-03-06 My Mac Style
Apple’s Mac Os X is beautiful.
| classify |
target |
| 聊天工具 |
QQ |
| 输入法 |
清歌输入法 |
| 浏览器 |
Mozlilla FireFox |
| MarkDown |
MacDown |
| 邮件收发 |
Sparrow |
| 云盘存储 |
金山快盘 |
| 音乐播放 |
uPlayer |
| Git界面 |
SourceTree |
| 文本编辑 |
Sublime Text or Vim |
- 2015-03-06 2014 Readed
- C++程序设计原理与实践
- Cross Platform Development in C++
- 霍金讲演录
- 黑客与画家
- 时间简史(全彩页高清晰)
- 大设计(英)霍金、蒙洛迪诺着 吴忠超译
- 哥德尔、艾舍尔、巴赫——集异璧之大成
- Unix编程艺术
- UNIX痛恨者手册
- OReilly.Learning.the.vi.and.Vim.Editors.7th.Edition.Jul.2008
- vim reference-1.9.0_cn
- ANSI Common Lisp 中文版
- 2015-03-03 Git source code review
bref
git 最开始是由几个简洁的程序粘合而成的。
init-db
commit-tree
read-tree
write-tree
read-cache
update-cache
show-diff
init-db
init-db 在当前目录建立一个数据库
即.dircache/objects/
获取sha1对应的文件名,在SHA1_FILE_DIRECTORY环境变量里,或默认的.dircache/objects里
char *sha1_file_name(unsigned char *sha1)
把buf写入到sha1z对应的文件中
int write_sha1_buffer(unsigned char *sha1, void *buf, unsigned int size)
压缩buf,存入到对应的sha1 cache里去。
int write_sha1_file(char *buf, unsigned len)
add ‘path’ to database
static int add_file_to_cache(char *path)
git 命名方式
也是很有意思,git里的函数名没有用首字母大写的方式,而是用了小写的方式,各个单词之间用下划线连起来了。
如get_sha1_hex ,sha1_to_hex.
_
最近发现firefox 也在使用与git缓存目录方件夹相同的命名方式。 十六进制的0到f,各个文件侠里也有相同的一层。共二层。
- 2015-01-14 The Fellowship of the Ring
opening_words
I amar prestar aen. (ee amar prestar ein)
The world has changed.
Han mathon ne nen. (han mathon ne nen)
I feel it in the water.
Han mathon ne chae. (han mathon ne hai)
I feel it in the earth.
A han nostron ned wilith. (ahan nothon ne gwilith)
(and?) I smell it in the air.
Much that once was, is lost
For none now live who remember it.
It began with the forging of the great rings.
Three were given to the Elves:
Immortal, wisest and fairest of all beings.
Seven to the dwarf lords:
Great miners and craftsmen of the mountain halls.
And nine, nine rings were gifted to the race of men who,
above all else, desire power.
For within these rings was bound the strength
and the will to govern each race.
But they were, all of them, deceived;
for another ring was made.
In the land of Mordor, in the fires of Mount Doom,
the Dark Lord Sauron forged, in secret, a master ring.
And into this ring he poured his cruelty, his malice
and his will to dominate all life.
One ring to rule them all.
One by one, the free lands of Middle-earth fell
to the power of the ring.
Scene 2: The Last Alliance
(All lines in this scene are spoken by Galadriel)
But there were some who resisted.
A Last Alliance of Men and Elves
marched against the armies of Mordor.
Scene 3: Meeting Sauron’s Forces
(All lines in this scene are spoken by Galadriel)
And on the slopes of Mount Doom they fought
for the freedom of Middle-earth.
Victory was near,
but the power of the Ring could not be undone.
(Sauron appears and wreaks havoc)
Scene 4: The Fall of Sauron
(Except where noted below, all lines are spoken by Galadriel)
It was in this moment, when all hope had faded,
that Isildur, son of the King, took up his father’s sword.
Sauron, the enemy of the free peoples of Middle-earth,
was defeated.
The ring passed to Isildur,
who had this one chance to destroy evil forever.
But the hearts of men are easily corrupted,
And the ring of power has a will of its own.
It betrayed Isildur to his death
And some things that should not have been forgotten,
were lost.
History became legend, legend became myth,
and for two-and-a-half thousand years,
the Ring passed out of all knowledge.
Until, when chance came, it ensnared a new bearer.
(My precious…)
The ring came to the creature Gollum, who took it
deep into the tunnels of the Misty mountains.
And there, it consumed him.
(It came to me, my own, my precious…)
The ring brought to Gollum unnatural long life.
For five hundred years, it poisoned his mind.
And in the gloom of Gollum’s cave, it waited.
Darkness crept back into the forests of the world.
Rumor grew of a shadow in the East,
whispers of a nameless fear.
And the Ring of power perceived:
its time had now come.
It abandoned Gollum.
But something happened then, the ring did not intend.
It was picked up by the most unlikely creature imaginable:
(What’s this?)
A hobbit, Bilbo Baggins of the Shire.
(A ring?)
(Gollum’s cries in the background).
For the time will soon come when hobbits
will shape the fortunes of all…
Refrence
辛达林英国作家J.R.R.托尔金为他的小说魔戒创作了多种语言辛达林隶属于其中的精灵语
灰精靈的語言
Sindarin wikia
Galadriel’s Prologue
- 2015-01-08 cplusplus lambda functions
所谓lambda,在c++中就是一个闭包函数:能够捕获域内变量的未命令的函数对象。
语法
| # |
语法 |
| 1 |
[ capture-list ] ( params ) mutable(optional) exception attribute -> ret { body } |
| 2 |
[ capture-list ] ( params ) -> ret { body } |
| 3 |
capture-list ] ( params ) { body } |
| 4 |
[ capture-list ] { body } |
-
完整声明。
-
lambda常量的声明:以复制的方式捕获对象,对象不可修改。
- 省略了尾部的返回类型:闭包的operator()的返回类型根据以下规则确定:
c++14之前:
- if the body consists of nothing but a single
return statement with an expression, the return type is the type of the returned expression (after rvalue-to-lvalue, array-to-pointer, or function-to-pointer implicit conversion) .
- 否则,返回类型为
void。
c++14或之后:
The return type is deduced from return statements as if for a function whose return type is declared auto.
- Omitted parameter list: function takes no arguments, as if the parameter list was () .
Refrence
refrence from cppreference
- 2015-01-05 岳阳金鄂山公园
- 2015-01-05 Using last.fm api
layout: post\
title: Using Last.fm API
date: 2015-01-05-09:27
categories: tech
##MusicBrainz Identifier
https://musicbrainz.org/doc/MusicBrainz_Identifier
One of MusicBrainz’ aims is to be the universal lingua franca for music by providing a reliable and unambiguous form of music identification; this music identification is performed through the use of MusicBrainz Identifiers (MBIDs).
In a nutshell, an MBID is a 36 character Universally Unique Identifier that is permanently assigned to each entity in the database, i.e. artists, release groups, releases, recordings, works, labels, areas, places and URLs. MBIDs are also assigned to Tracks, though tracks do not share many other properties of entities. For example, the artist Queen has an artist MBID of 0383dadf-2a4e-4d10-a46a-e9e041da8eb3, and their song Bohemian Rhapsody has a recording MBID of ebf79ba5-085e-48d2-9eb8-2d992fbf0f6d.
An entity can have more than one MBID. When an entity is merged into another, its MBIDs redirect to the other entity.
##Scrobble
To “scrobble” a song means that when you listen to it, the name of the song is sent to a Web site (for example, Last.fm) and added to your music profile.
可以理解为抓取一个或几个音乐播放记录到网页用户配置上。
##Now Playing Requests或Scrobble Requests的区别
顾名思义Now Playing Requests显示用户当前正在播放的项目.
而scrobble requests显示用户有效播放过的项目,所谓有效播放即:
- 此音轨时间长度应该大于30秒。
- 当前播放长度该大于总长度的一半,或大于4分种.
当这些条件达成时,一个scrobble request就生成了。但最方便的就是在音轨播放结束时提交这个scrobble记录。
- 2014-12-30 Range-based for loop in c++ 11
from cppreference.com
C++11 range-based for loops
执行在一个区域上的遍历。
Range-based for loops 的基本语法
vector<int> vec;
vec.push_back( 10 );
vec.push_back( 20 );

for (int i : vec )
{
    cout << i;
}
也可以使用 auto 关键字
map<string, string> address_book;
for ( auto address_entry : address_book )
{
            cout  << address_entry.first << " < " << address_entry.second << ">" << endl;
}
修改Vector的内容
vector<int> vec;
vec.push_back( 1 );
vec.push_back( 2 );

for (int& i : vec )
{
    i++; // increments the value in the vector
}
for (int i : vec )
{
    // show that the values are updated
    cout << i << endl;
}
What does it mean to have a range?
Strings,arrays, 和所有的STL容器。
- 2014-12-16 shortcut key in 'player'
below:
- shortcut keys
- function command (string format)
- functions (function pointer)
map<#1,#2> in json format , will load from or save to a file.
map<#2,#3> is init as the program startup.
由于快捷键分为全局和非全局二种:
所以我把json格式设计为如下:
{
	"local":
	{
		"super+shift+n":"new_window",
		"ctrl+a":"new_window",
		"f3":"show_search_window",
		"ctrl+f":"show_search_window"
	}
	,
	"global":
	{

	}
}
- 2014-12-09 ARC Retain Cycles in Blocks
block对象
所谓block对象
Use __block Variables to Share Storage
如果你想能够改变一个block内部捕捉到的变量的值,你可以使用_block修饰符来改变原始变量的声明。这意味着这个变量生存期延长到了blocks内部。
所谓Retain cycle是一种循环,当一个对象A保留了对象B的一个引用,同时B也保留A的一个引用。这种情况下,两个对象都不能被释放。从面向对象的角度来看,这也是一个不合逻辑的现象。A包含了B,B不可能同时也包含了A。
这样一来,这两个对象占用的内存都得不到释放,直到程序终止。
这本来跟blocks没有什么关系。
[myArray enumerateObjectsUsingBlock:^(id obj, NSUInteger idx, BOOL *stop){
   [self doSomethingWithObject:obj];
}];
这个Block保留了self的引用,但是self没有保留block的引用。当其中一个被释放时,没有循环生成,一切都会正常的被释放。
在非自动计数模式下,_block id x;并没有使x引用计数加一. 在ARC模式下,_block id x;默认使x的引用计数加一。若要在ARC模式下获得非自动计数的行为,你应该使用_unsafe_unretained _block id x;就像它的修饰名字_unsafe_unretained一样,它可能造成野指针的危险行为。所以两个更好的解决方案是使用_weak,或设置_block值为nil来打破Retain Cycle。
- 2014-12-01 Objc Runtime
Messaging
本章介绍了message expressions转换成objc_msgSend函数调用的。你怎么来参考方法的名字。然后解释了你可以如何利用objc_msgSend,如何规避动态绑定。
The objc_msgSend Function
在Objective-C里,消息是在运行的时候才绑定到具体实现的。
当你写出一句发送消息的Objective-C代码:
[receiver message]
编译器就会生成一个objc_msgSend的函数调用:
objc_msgSend(receiver,selector);
objc_msgSend(receiver, selector, arg1, arg2, ...)
这个消息函数做了用来动态绑定的一切事情:
- 首先它找到selector到对应的具体方法实现。由于有相同名字方法可能在不同的类里对应不同的实现。它能准确的找到receiver的类所对应的实现。
- 然后调用例程,传入对象receiver还有任何指定的参数。
- 最后,它传回例程的返回值。
发送消息的关键依赖于编译器为每一个类和对象的所打造的特殊结构。每一个类的结构包含两个重要的元素:
- 一个指向父类的指针
- 一个dispatch table.这个表记录了每一个类方法的地址。
当一个新的对象被创建时,对应的内存被分配,成员变量被初始化。对象的最开始的变量是一个指向类结构的指针。这个指针就叫isa,它给出了来访问其类结构路径,通过这个类结构来访问父类的路径:
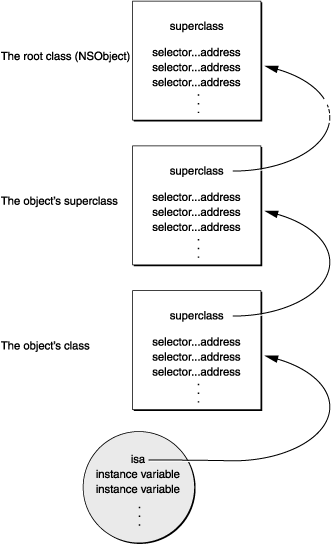
When a message is sent to an object, the messaging function follows the object’s isa pointer to the class structure where it looks up the method selector in the dispatch table. If it can’t find the selector there, objc_msgSend follows the pointer to the superclass and tries to find the selector in its dispatch table. Successive failures cause objc_msgSend to climb the class hierarchy until it reaches the NSObject class. Once it locates the selector, the function calls the method entered in the table and passes it the receiving object’s data structure.
This is the way that method implementations are chosen at runtime—or, in the jargon of object-oriented programming, that methods are dynamically bound to messages.
To speed the messaging process, the runtime system caches the selectors and addresses of methods as they are used. There’s a separate cache for each class, and it can contain selectors for inherited methods as well as for methods defined in the class. Before searching the dispatch tables, the messaging routine first checks the cache of the receiving object’s class (on the theory that a method that was used once may likely be used again). If the method selector is in the cache, messaging is only slightly slower than a function call. Once a program has been running long enough to “warm up” its caches, almost all the messages it sends find a cached method. Caches grow dynamically to accommodate new messages as the program runs.
Dynamic Method Resolution
这一章描述了如何动态为一个方法提供一个具体实现
Dynamic Method Resolution
在一些情况下,你可能想要动态的改变一个方法的具体实现。比如,一个用@dynamic修饰的成员属性:
@dynamic propertyName;
这会告诉编译器这个属性的对应方法,给被动态的绑定。
You can implement the methods resolveInstanceMethod: and resolveClassMethod: to dynamically provide an implementation for a given selector for an instance and class method respectively.
一个Objctive-C方法其实简单的等于一个C 函数。它需要至少两个参数:self和_cmd。 你可以用函数class_addMethod来为一个类添加一个方法:
void dynamicMethodIMP(id self, SEL _cmd)
{
    // implementation ....
}
Refrence
Objective-C Runtime Reference
Objective-C Runtime Programming Guide
Let’s Build objc_msgSend
stack overflow
以下定义取自 <objc/objc.h>:
/// An opaque type that represents an Objective-C class.
typedef struct objc_class *Class;

/// Represents an instance of a class.
struct objc_object {
    Class isa;
};

/// A pointer to an instance of a class.
typedef struct objc_object *id;
#endif

/// An opaque type that represents a method selector.
typedef struct objc_selector *SEL;

/// A pointer to the function of a method implementation.
#if !OBJC_OLD_DISPATCH_PROTOTYPES
typedef void (*IMP)(void /* id, SEL, ... */ );
#else
typedef id (*IMP)(id, SEL, ...);
#endif
- 2014-12-01 理解Dispatch Queues
Grand Central Dispatch (GCD) dispatch queues 是一个处理任务的强大的工具。 Dispatch queues 让你处理任务的一块代码异步或同步地。与对应的线程代码相比,更加易用;执行任务时,效率更高。
关于Dispatch Queues
你可以定制相应的代码,使用function或block object,来把一个任务加入dispatch queue.
A dispatch queue is an object-like structure that manages the tasks you submit to it. All dispatch queues are first-in, first-out data structures.所以任务总是按你添加的顺序先后执行。GCD提供一些dispatch queues,但你也可以自己创建,来完成特殊的任务。
| 类型 |
描述 |
| Serial,串行 |
Serial 又称private dispatch queues,每个时刻只执行一个任务。Serial queue通常用于同步访问特定的资源。当你创建多个Serial queue时,虽然它们各自是同步执行的,但Serial queue与Serial queue之间是并发执行的。 |
| Concurrent,并行 |
Concurrent 又称global dispatch queue,可以并发地执行多个任务。你只能使用系统提供的4种global dispatch queue,不能自己创建。(iOS 5.0之前是3种)。 |
| Main dispatch |
Main dispatch queue 它是全局可用的serial queue,它是在应用程序主线程上执行任务的。 |
When it comes to adding concurrency to an application, dispatch queues provide several advantages over threads. The most direct advantage is the simplicity of the work-queue programming model. With threads, you have to write code both for the work you want to perform and for the creation and management of the threads themselves. Dispatch queues let you focus on the work you actually want to perform without having to worry about the thread creation and management. Instead, the system handles all of the thread creation and management for you. The advantage is that the system is able to manage threads much more efficiently than any single application ever could. The system can scale the number of threads dynamically based on the available resources and current system conditions. In addition, the system is usually able to start running your task more quickly than you could if you created the thread yourself.
Although you might think rewriting your code for dispatch queues would be difficult, it is often easier to write code for dispatch queues than it is to write code for threads. The key to writing your code is to design tasks that are self-contained and able to run asynchronously. (This is actually true for both threads and dispatch queues.) However, where dispatch queues have an advantage is in predictability. If you have two tasks that access the same shared resource but run on different threads, either thread could modify the resource first and you would need to use a lock to ensure that both tasks did not modify that resource at the same time. With dispatch queues, you could add both tasks to a serial dispatch queue to ensure that only one task modified the resource at any given time. This type of queue-based synchronization is more efficient than locks because locks always require an expensive kernel trap in both the contested and uncontested cases, whereas a dispatch queue works primarily in your application’s process space and only calls down to the kernel when absolutely necessary.
尽管你会指出,两个运行在一个serial queue中的任务不是并发的, 但你要记得,如果两个线程需要访问同一个锁,那并发就没有意义了。更重要的是,线程模型要求创建两个线程,它占用了内核和用户空间资源。Dispatch queues则不需要,并且它所使用的线程可以保持工作而不堵塞。
需要记住的一些重要的关于dispatch queues事项包括如下:
- 不同的Dispatch queues之间可以并发地执行任务。 序列化执行是对同一个dispatch queue里的任务而言。
- 系统会决定同一时间并发的最大数额。因此,一个包含100个queues里的100个任务的应用,可能不会全部都是并发执行的(除非系统有100以上的有效芯)。
- 系统选择一个新任务去开始执行时,它会考虑该任务列队的优先级。
- Tasks in a queue must be ready to execute at the time they are added to the queue. (If you have used Cocoa operation objects before, notice that this behavior differs from the model operations use.)
- Private dispatch queues 是一个基于计数的对象。要注意dispatch sources也可以被绑定到一个queue,使其引用计数加一。Thus, you must make sure that all dispatch sources are canceled and all retain calls are balanced with an appropriate release call. For more information about retaining and releasing queues, see Memory Management for Dispatch Queues. For more information about dispatch sources, see About Dispatch Sources.
For more information about interfaces you use to manipulate dispatch queues, see Grand Central Dispatch (GCD) Reference.
Implementing Tasks Using Blocks
Creating and Managing Dispatch Queues
Getting the Global Concurrent Dispatch Queues
Although dispatch queues are reference-counted objects, you do not need to retain and release the global concurrent queues. Because they are global to your application, retain and release calls for these queues are ignored. Therefore, you do not need to store references to these queues. You can just call the dispatch_get_global_queue function whenever you need a reference to one of them.
Creating Serial Dispatch Queues
Getting Common Queues at Runtime
Memory Management for Dispatch Queues
Note: You do not need to retain or release any of the global dispatch queues, including the concurrent dispatch queues or the main dispatch queue. Any attempts to retain or release the queues are ignored.
Storing Custom Context Information with a Queue
Providing a Clean Up Function For a Queue
Refrence
IOS Developer LIbrary –> Concurrency Programming Guide
- 2014-11-28 你可能不知道frames和bounds
View有两个属性:frame和bound.
frame表示的view坐标位置及大小是基于父坐标系的。
bound表示的view坐标位置及大小是基于这个view自己的坐标系的。
如果使用frame属性,那必须小心,这些值是表示子视图在父视图中的位置,包括旋转和缩放。
这意味着使用self.view.bounds.size可以相对可靠的获得一个视图控制器的视图尺寸。
如果你在上面的绿色的视图控制器里,然后尝试添加一个子视图到绿色的视图里,如果你使用frame来获取绿色视图的坐标位置,你会得到怪异的结果。
hotNewSubview.frame = self.view.frame;  //HORRIBLY, HORRIBLY WRONG
hotNewSubview.frame = self.view.bounds; //Better, but still not good
bounds的origins通常情况下都是0。都不一定全都是0。
坐标变换可以影响它自己的origin。比如在一个滚动视图里,向上滚动10个单位,那它的bounds origin就成为了(0,-10)。
Objective-c开发者经常使用self.view.frame或self.view.bounds来创建一个新的子视图,用来占据整个父视图可见空间。这是错误的,我们来看看:
hotNewSubview.frame = self.view.frame;  //HORRIBLY, HORRIBLY WRONG
hotNewSubview.frame = self.view.bounds; //Better, but still not perfect
hotNewSubview.frame = CGRectMake(0, 0,
    CGRectGetWidth(self.view.bounds),
    CGRectGetHeight(self.view.bounds)); //Best
所以结论是,你应该理解自己所做的事。View hierarchies占了构建app的一大部分内容。确保你完全理解视图及其坐标系统。
Refrence
You Probably Don’t Understand frames and bounds
hotNewSubview.frame = self.view.bounds; //Better, but still not perfect
我觉得这个也可以。如果获取坐标值时间与addsubview的时间间隔里,这个view的位置没有变动的话。
- 2014-11-27 长度为零的数组
零长度的数组在GNU C里是合法的。这是个非常有用的技巧,如果把一个结构体的最后一个元素当成一个变长的对象头地址:
struct line
{
	int length;
	char contents[0];
}

struct line *thisline = (struct line*)malloc(sizeof(struct line) + this_length);
thisline->length = this_length;
在ISO C90标准里,你必须给contents指定一个1的长度,这意味着你浪费了空间,又把malloc的参数给复杂化了。
在ISO C99标准里,你可以使用一个柔性数组成员,它在语法和语义有都有细微的差别:
- 柔性数组成员必须写成
contents[] ,没有0。
- 柔性数组成员是不完整的类型,所以不支持
sizeof操作符。 最原始的柔性数组的sizeof实现是给定为零。
- 柔性数组成员只能出现在
struct的元素的最后一个。
- 一个包含柔性数组成员的
struct或一个包含这样的struct的union(或者是递归形式),是不允许成为一个结构的成员或一个数组的元素的。(然而,这些用法在GCC扩展语法里是合法的)。
GCC-3.0以下的版本是允许零长度数组被静态初始化的,柔性数组也是一样的。
- 2014-11-27 理解RoopLoop
Run Loop是一个抽象的概念,它提供了一种机制来处理系统的输入源(sockets,端口,文件,键盘,鼠标,定时器,等等).如同windows消息机制里面的消息源一样。
每一个NSThread都有它自己的Run Loop,可以通过currentRunLoop方法来访问。
通常你无需直接访问Run Loop,虽然有一些(网络)组件,可以允许您指定用来I/O处理的Run Loop。
Run Loop 解剖
Run Loop其实非常像它字面上的意思。就是一个循环你的线程进入然后处理各种消息。
Run loop接收来源于两种源的事件:Input sources和Timer sources。Input sources派发异步的事件,可能来自另一个线程或应用程序。Timer sources派发同步消息, occurring at a scheduled time or repeating interval.
Run Loop 模式
Table 3-1 Predefined run loop modes
| Mode |
Name |
Description |
| Default |
NSDefaultRunLoopMode (Cocoa) kCFRunLoopDefaultMode (Core Foundation) |
几乎包括所有输入源 |
| Connection |
NSConnectionReplyMode (Cocoa) |
处理NSConnection事件,属于系统内部,用户基本不用 |
| Modal |
NSModalPanelRunLoopMode (Cocoa) |
处理modal panels |
| Event tracking |
NSEventTrackingRunLoopMode (Cocoa) |
如组件拖动输入源 |
| Common modes |
NSRunLoopCommonModes (Cocoa) kCFRunLoopCommonModes (Core Foundation) |
NSRunLoopCommonModes 这是一组可配置的通用模式。将input sources与该模式关联则同时也将input sources与该组中的其它模式进行了关联。 |
参考
Threading Programming Guide
自己调研的一些关于NSRunLoop与NSTimer的知识
- 2014-11-24 Zombies细节详探
The Inner Life Of Zombies
有人建议我探讨一下NSZombie的工作原理.
Zombie概述
一个Objective-C对象是一块已分配好的内存。
其内部的第一个对象是一个isa指针,指向对象的类。
块的其余的部分包含了所指对象的成员。
当一个对象被销毁时,它占有的内存块就会被释放。通常这只是意味着它会被标记,以便重新使用。如果你糊涂地保留了一个指向它的指针,那可能会发生无法预料的奇怪事情。
某些情况下,你的使用这些已被销毁的对象的代码会正常工作。如果这些被标记为已销毁的内存没有被覆盖之前,如同一个正常的Objective-C对象一样。
这些已被标记为可销毁的对象,可能被一个新对象覆盖,如果这时使用一个旧的指针来发送消息到新的对象上,会发现令人困惑的结果。
然而在某些情况下,这些内存被覆盖,但不是一个对象,这时你的代码会导致crash。但这些错误最快的会告诉你什么出错了。
Zombies(僵尸)极大的改善了这种情况。 相比于简单的放置被销毁的对象内存不管,zombies接管了它,把它替换为一个可以追踪所有试图访问它的对象。这就是术语Zombie:死去的对象被复活成为一个不死的东西。当一个zombie对象接收到消息,它会记录它,并崩溃,提供一个方便的回溯跟踪,这时你便可以清楚的找到问题根源。
Zombies的使用
设置环境变量NSZombieEnabled为YES即可开启Zombies。但是注意一点,zombies默认为永远不会被释放,所以你的app的内存量使用会变得异常的高。
另一个有用的选项就是在Instruments中的Zombies Instruments. 它这不仅打开了zombies,还能跟踪对象的引用计数。
Refrence
原文链接 by Mike Ash
- 2014-09-04 Knocking On Heaven’s Door
Knocking On Heaven’s Door - by Bob Dylan
Mama take this badge off of me
I can’t use it anymore
It’s gettin’ dark, too dark to see
I feel I’m knockin’ on heaven’s door
Knock, knock, knockin’ on heaven’s door
Knock, knock, knockin’ on heaven’s door
Knock, knock, knockin’ on heaven’s door
Knock, knock, knockin’ on heaven’s door
Mama put my guns in the ground
I can’t shoot them anymore
That long black cloud is comin’ down
I feel I’m knockin’ on heaven’s door
Knock, knock, knockin’ on heaven’s door
Knock, knock, knockin’ on heaven’s door
Knock, knock, knockin’ on heaven’s door
Knock, knock, knockin’ on heaven’s door
- 2014-08-21 岳麓山
- 2014-08-17 give in to me
今天是星期天,我在加班 .
下午一个人在这,听着michael的歌.
脑海里不断的闪现着歌里的句子.
give in to me - mv in baidu ting
- 2014-08-14 收藏的书签
- 2014-08-07 关于 C++ 里的 New
- new expression : new 表达式
- operator new : 操作符函数,用来分配内存.
- placement new :定位表达式,用来初始化已分配的内存.
例
第一种用法 : type a = new type;
第二种用法: void *a = ::operator new(int size);
第三种用法:
new (place address) type [initialiser list]
//如:
void * a = malloc (xxx);)
new (a) a_type ;
- 2013-10-14 狼之子雨与雪
简介
在某国立大学念书的花(宫崎葵 配音)与偶然来校旁听的男子(大泽隆夫 配音)坠入爱河,即使对方是一名狼人,她也义无反顾投入对方怀抱。此后的岁月里,花先后生下女儿小雪和儿子小雨。谁知厄运突然降临,温柔的丈夫撒手人寰。柔弱而坚强的花竭尽全力抚养两个孩子长大,吃穿用度,衣食住行,无一不牵扯她的心思。而子女狼人的身份也迫使他们离开繁华大都市,前往宁静的山野乡村求生。他们在一栋古旧的民房内落脚,小雪顽劣张扬,小雨纤细内敛,姐弟俩以狼的身姿穿行与深山密林,享受着前所未有的快乐与自由。在此期间,以韭崎爷爷(菅原文太 配音)为代表的村民也给花一家带来无微不至的关怀。小雪和小雨渐渐长大,他们也终于迎来决定身份和前路的重要时刻……
最后,姐姐小雪选择以人类的身份生活下去,而小雨选择以狼的身份生活下去. 小雨在狼的本性的支配下,要离开母亲小雨,独自进入深山之中生活 .母亲小花与忍不住自己的孩子分别泪如雨下.而小雨不顾母亲的眷恋与揪心沉默着一步步坚定的离开. 这一刻,我真的被感动了.
- 2013-07-28 Antialiasing: Wu Algorithm(反走样直线画法)
Code Project上的源代码.
http://www.codeproject.com/Articles/13360/Antialiasing-Wu-Algorithm
反走样直线画法里核心原理的展示
http://freespace.virgin.net/hugo.elias/graphics/x_wuline.htm
(中文版的)
http://dev.gameres.com/Program/Visual/Effects/WuLine.htm
核心的原理就是越靠近线的点要越明亮,这样也就越接近理论上的直线.
- 2013-02-21 求子数组的最大和
##题目描述:
输入一个整形数组,数组里有正数也有负数。
数组中连续的一个或多个整数组成一个子数组,每个子数组都有一个和。
求所有子数组的和的最大值。要求时间复杂度为O(n)。
例如输入的数组为1, -2, 3, 10, -4, 7, 2, -5,和最大的子数组为3, 10, -4, 7, 2,
因此输出为该子数组的和18。
##思路:
此题可以用看作求曲线y=F(x)上的区间(a<=x<=b)上的面积的离散形式.
设面积为S=∫ F(x).函数在a到b区间上的积分.
显然,当积分函数区间a和b,分别取最小值和最大值时,面积最大.
##C++代码:
int main()
{
    const int num[8]={1, -2, 3, 10, -4, 7, 2, -5};
    int len= sizeof(num) / sizeof(int);

    int min=num[0];//保存最小的那个
    int max=min;   //最大的
    int sum=0;      //积分值

    for (int j=0;j<len;++j)
    {
        sum+=num[j];

        if (sum<min)
            min=sum;
        if (sum>max)
            max=sum;
    }

    printf("最大子数组的和为 : %d\n",max-min);
	  return 0;
}
- 2012-12-16 蘭亭序
- 2012-10-30 小Demo 测试c++ 0x右值引用
#include <stdio.h>
#include <tchar.h>
#include <vector>
#include <iostream>
using namespace  std;

class ObjA
{
public:
    ObjA():data(NULL)
    {
        cout<<_T("调用构造函数")<<endl;
    }

    ObjA(const char *_data)
    {
        int Len=strlen(_data);
        data=new char[Len];
        memcpy(data,_data,Len);
        cout<<data<<endl;
        cout<<_T("调用带参构造函数  memcpy")<<endl;
    }

    ~ObjA()
    {
        if (data)
        {
            cout<<data<<endl;
            delete[] data;
            data=NULL;
            cout<<"delete memory data"<<endl;
        }


        cout<<_T("调用析构函数.")<<endl;
    }

    //拷贝赋值
    ObjA& operator=(const ObjA &b)
    {
        int Len=strlen(b.data);
        data=new char[Len];
        memcpy(data,b.data,Len);
        cout<<_T("调用operator = 函数.  memcpy")<<endl;
        return *this;
    }

    ObjA(const ObjA &b)
    {
        cout<<_T("调用拷贝构造函数. memcpy")<<endl;
        if (this!=&b)
        {
            int Len=strlen(b.data);
            data=new char[Len];
            memcpy(data,b.data,Len);
        }
    }


    //Move拷贝构造函数
    ObjA(ObjA &&b)
    {
        cout<<"Move拷贝构造函数"<<endl;
        if (this!=&b)
        {
            data=b.data;
            b.data=NULL;
        }
    }

    //Move赋值拷贝
    ObjA& operator=(ObjA &&b)
    {
        cout<<_T("Move operator = 函数.")<<endl;
        if (this!=&b)
        {
            data=b.data;
            b.data=NULL;
        }

        return *this;
    }


    char *data;
};


ObjA testRValue_ChangeStr(ObjA o)
{
    delete[] o.data;
    char *tmp="string after change";
    int Len=strlen(tmp);
    o.data=new char[Len];
    memcpy(o.data,tmp,Len);

    return o;
}

int _tmain(int argc, _TCHAR* argv[])
{
    ObjA a("obj A");
    ObjA b("obj B");
    b=testRValue_ChangeStr(a);//b Move拷贝了testRVa...函数返回的临时对象的数据.


    //test vector


    vector<ObjA> *v=new vector<ObjA>;
    //push_back每调用一次,就会调用Move拷贝构造函数
    //把旧内存里的对象移至新分配的内存里去.

    v->push_back(*new ObjA("C"));
     v->push_back(*new ObjA("D"));
    v->push_back(*new ObjA("E"));
    //以上总共调用了三次memcpy函数,移动数据


    return 0;
}
- 2012-01-06 初雪
layout: post_center_text\
title: 初雪
date: 2012-01-06
categories: living
懒起着我衣,推窗看天气.
天上盐似雪,地下雪似霜.
谁家花蓝落,九天玄女过.
暖被香尤在,长夜寂无眠.
- 2011-06-14 雨中吃饭
layout: post_center\
title: 雨中吃饭
date: 2011-06-14
categories: living
中午去边上的食堂,在美术馆那里,吃饭.
饭不太好吃,我很纠心也没有胃口吃太多.外面在下雨,我是感觉雨直接下在了我身上.
我很后悔,请原谅无礼的我.我决不是故意的,我的难以言语与外在的冷淡,辜负了一片好心.
- 2011-06-12 也谈禁欲与本心
也谈禁欲与本心 ~~读《山中高士晶莹雪 ——试论薛宝钗的人生境界》有感
常听佛家说到修行的过程,提得最多的大概是这么一则小故事。
据说,释迦牟尼在菩提树下盘膝而坐,就地修行,魔化身为一群美艳女子意图诱惑。
释迦牟尼坚守本心,不为所动,终于一朝顿悟,修成正果。
所谓美艳女子代表的诱惑,既为魔,佛家也说外道魔像,种种污我本心者,皆为心生,佛也讲作魔为心生。
佛的修行,既是对自己及外界的认识。如何在自己清净本心与外道魔像画清界线。
如何坚守本心,摈弃诸多诱惑,理性的消除心中欲孽,既佛家修行最重要的一点。
所谓一朝顿悟,应为刻苦修行的结果。
欲望是心生,人的欲望是无边的,我们便如同处于欲望之海中的孤岛之上。
顿悟之前,便要受到无尽的理性的煎熬,修行的一部分就是如何同欲望压制隔离(有的人熬不过了,选择了及时行乐,把“人生得意须尽欢,莫使金樽空对月”奉为人生格言,把人看成享乐的机器,那么从此便与本心无缘了,与佛无缘了)。
顿悟之后,佛已能洞察一发切,心窍已开,智慧加于我身,欲望便无处而来。这与“心中无杂物,何处惹尘埃”的境界是一致的。魔本由心生,我心已无一物,魔从何来?
原文出于国学网:http://www.guoxue.com/wk/000446_02.htm
- 2011-06-02 诗
死是可怕的事
我们却为了不渺小而活着
死中得到生的希望
我活着,呼吸着
却从永恒的孤独中
领略到死的意义
恐怖却无限光明
我相信且服从规律
又在矛盾中相信了上帝
愿上帝垂青
我将在尘世浮华中深思
之后
死亦是永恒
- 2011-05-26 清溪清我心
李白有一首诗:
清溪行
清溪清我心,水色异诸水
借问新安江,見底何如此
人行明镜中,鸟度屏风里
向晚猩猩啼,空悲远游子
清澈的溪水总是能带给诗人清心的感受,这就是清溪水色的特异之处.
我的家乡也有清心的感觉.
家乡的天空,乡间油菜花地间的小路,交错的潺潺流水,讥讥喳喳的鸟叫.
采菊东篱下,悠然见南山.
悠然卧于门前水垻的草地上,芬芳花香与清新的青草味道,被风抚摸的感觉,被大地包容的感觉,被纯白天空净化的感
觉,仿佛能看见真实的自我,活着的感觉,浑身无一处不爽快.
上海虽然人多房多,不过也在偏远点的地方,也应有被城市中心的人们遗忘的溪水小河的吧. 来到这个城市这么久,还未到过黄浦江,也没有机会去什么上海名地,说来惭愧.
上海,清溪未能蒙面,不过河水到是見过了.
河是苏州河,又名吴淞江.虽然上海市政府加大了对苏州河污染和环境破坏的整治力度.
但是苏州河是不可能回到从前的烟雨灵秀了.
河畔也立起了护河栏杆,多少断绝了人与河的联系. 人对于河水最自然的感受都没了,清心从何说起?
我明白了,这个城市里从来就没有我的立足之地,我只是在缘木求鱼而已. 生活总是这么迫人吗,于水中行进,真是不进则退吗?
- 2011-05-09 梦
渐渐昏沉
世界竟是如此
眼前一片迷茫
记忆灰蒙
在追逐? 奋起,奋起,奋起结果皆为失力
在何方? 辗转,辗转,辗转到头还是返复
无地踏足
争
醒
- 2011-05-04 我的睡觉时间与胃部健康
以前在大学养成了午饭后及晚餐前睡觉的习惯.
虽然有些不合常人之道,却也自认为算是对健康有益无害.
毕业后进了公司,上班了,这些习惯却由于某某原因无法继续保持了.
所以我中午只能小qi一会儿,晚上下班就却实在是太累了.
回住处倒床就睡,故而晚上6~8点这二个小时成了一种需要.
妈的上海菜,菜上海.来上海最对不起的就是自己的胃了.
不是糖醋系列就是红烧系列.
久而久之人都变”糖”了.
上海厨师就算是放了辣椒也没有味道.
不过还好,住处不远也有个”佳佳大排挡”,是湖南人开的.
里面的菜还挻是正宗.特别是农家小炒(牛)肉啊.
以肉片,葱,青椒,豌豆酱为料,用旺火加以爆炒.
隔着老远就能挑起人的味觉及食欲.
我也乐得偶尔改善一下生活.